- Protocols

- Articles and Issues
- For Authors
- About
- Become a Reviewer

Development, Expansion, and Histological Characterization of Patient-Derived Liver Organoids for Drug Screening and Disease Modeling
Published: Vol 16, Iss 5, Mar 5, 2026 DOI: 10.21769/BioProtoc.5631 Views: 44
Reviewed by: Hsih-Yin TanAnonymous reviewer(s)
Original research article
The authors used this protocol in:
Apr 2024

Protocol Collections
Comprehensive collections of detailed, peer-reviewed protocols focusing on specific topics


Abstract
Organoids are self-organizing 3D tissues representing an innovative technology with interesting implications and potential for the study of tumor biology. They can be developed from fine-needle biopsies or resection material from healthy or tumor tissues. Patient-derived organoids are able to retain most of the histological characteristics, the expression profile, and the genomic landscape of the corresponding primary tissues, making them suitable for translational studies and for the identification of molecular alterations in the field of personalized medicine. Here, we describe a detailed protocol for the preparation and in vitro expansion of tumor and non-tumor organoids from surgical resections or needle biopsies of patients with hepatocellular carcinoma (HCC) and intrahepatic cholangiocarcinoma (iCCA), enabling subsequent testing of small-molecule VDAC1 antagonists at different doses. In parallel, we developed a hepatic steatosis model by treating healthy liver organoids with oleic acid, recapitulating key features of lipid accumulation and metabolic dysfunction in vitro. This protocol enables the generation of patient-derived liver organoids that preserve the histological and molecular characteristics of their original tissue, providing a robust and versatile platform for translational studies, personalized drug testing, and the exploration of novel therapeutic strategies targeting tumor metabolism.
Key features
• Enables reliable establishment of liver organoids from small patient samples, including fine-needle biopsies, suitable for both tumoral and non-tumoral tissue.
• Supports the generation of disease-relevant metabolic models, such as hepatic steatosis, enabling the controlled in vitro recapitulation of lipid accumulation and metabolic dysfunction.
• Standardized and reproducible platform enabling longitudinal investigation of tumor biology and therapeutic response.
• Adaptable system supporting drug screening and co-culture with stromal or immune cell components.
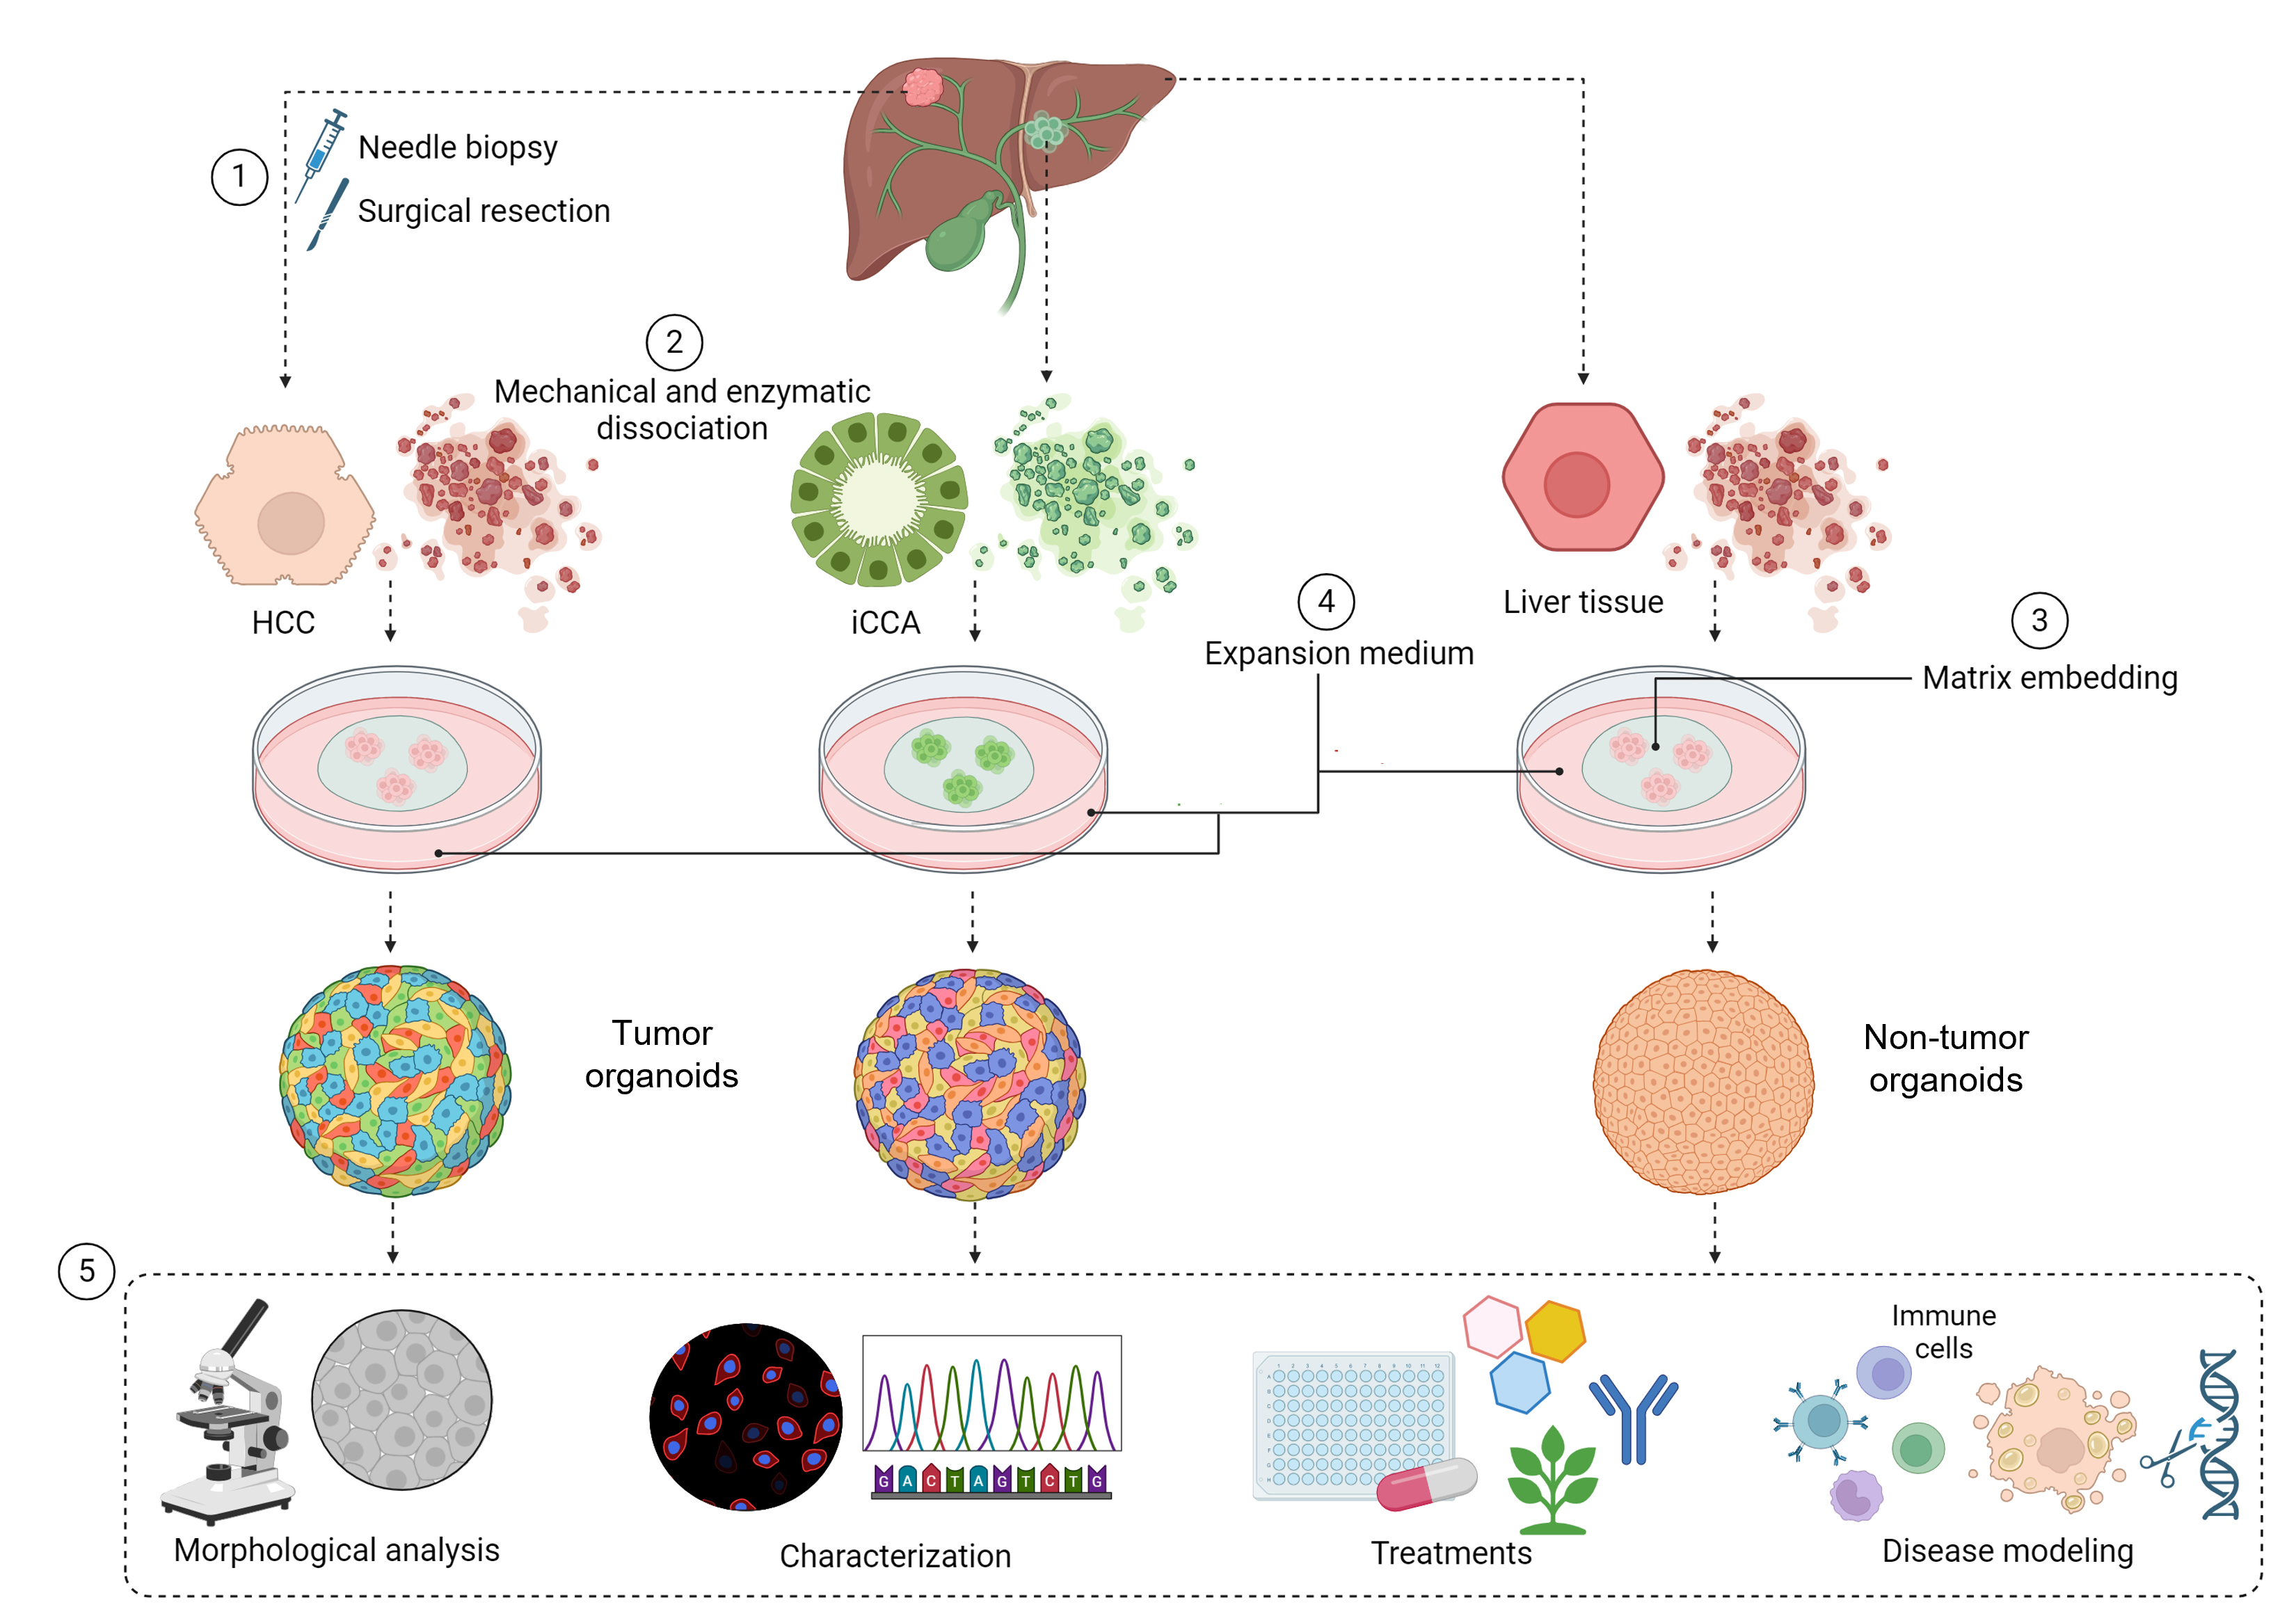
Keywords: Liver organoidsGraphical overview
Background
Liver diseases, including hepatocellular carcinoma (HCC) and intrahepatic cholangiocarcinoma (iCCA), pose significant global health challenges and contribute substantially to cancer-related mortality. These malignancies display marked molecular heterogeneity, and reliable human models for their investigation remain limited [1]. Conventional two-dimensional cell lines do not accurately replicate the complexity of liver architecture, cellular interactions, or patient-specific genetic variability; while animal models offer valuable insights, interspecies differences limit the translational applicability of these findings to human disease [2].
Three-dimensional (3D) organoid cultures provide a powerful way to overcome many of the limitations of traditional models. These self-organizing tissue structures can be grown from fine-needle biopsies or surgical samples taken from both tumor and healthy liver tissue. Because patient-derived organoids retain much of the architecture and gene expression patterns of the original tissue, they offer an opportunity to study disease in a way that is truly personalized. They are useful not only for modeling liver disorders and exploring the underlying biology but also for testing drugs in conditions that closely reflect the patient’s own tissue environment. Another advantage is their durability: organoids can be expanded over long periods in culture and cryopreserved, making them a flexible and accessible resource for ongoing and future research [3,4].
Although protocols for liver and primary liver cancer organoid cultures have been previously reported, variations in tissue sources, processing workflows, and downstream applications often limit standardization and reproducibility across laboratories. This protocol was developed to provide a standardized and reproducible workflow for the development, long-term maintenance, and functional use of patient-derived liver organoids, with a success rate of 28% for HCC, 76% for iCCA, and 91% for normal liver tissue. The lower establishment efficiency observed for HCC-derived organoids reflects intrinsic biological characteristics of hepatocyte-derived tumors and their strong dependence on tumor differentiation and stage [5].
Organoids are generated from both tumor and non-tumor tissue, starting from surgical resections or needle biopsies, enabling their application in disease modeling, drug screening, and identification of novel therapeutic targets. The method includes processing the tissue, starting the culture, and maintaining it long-term while keeping the original tissue characteristics. The protocol outlines two main uses. First, it provides a method to evaluate small molecules that modulate mitochondrial metabolism, such as VDAC1 antagonists in tumor organoids. VDAC1 is a mitochondrial outer membrane ion channel that is highly expressed in glycolytic tumor cells and contains a putative binding pocket for small molecules. Binding of these compounds can displace NADH, induce mitochondrial stress, alter outer mitochondrial membrane permeability, and promote apoptotic signaling [6]. Second, it offers a model for fatty liver disease by treating healthy liver organoids with oleic acid, mimicking key features of hepatic steatosis, including lipid accumulation and metabolic dysfunction. Together, these applications highlight the versatility of patient-derived liver organoids as a research tool. The protocol provides a robust, physiologically relevant model for studying liver tumor biology, drug responses, and metabolic regulation, bridging basic and translational research and supporting the development of targeted therapies for liver cancers and metabolic diseases.
Materials and reagents
Biological materials
1. Patient-derived resections and fine-needle biopsies (Fondazione IRCCS Policlinico San Matteo, Pavia, Italy)
The study was conducted in accordance with the Declaration of Helsinki (2013) and the Declaration of Istanbul (2018) and was approved by the Ethics Committee of the Fondazione IRCCS Policlinico San Matteo, Pavia (Prot. 20200020546, Prot. 0008508/24, and NCT06899854).
Reagents
Antibodies
1. Albumin polyclonal antibody, BSA-free (Novus Biologicals, catalog number: NBP2-38174)
2. Alpha-Feto protein, AFP polyclonal antibody (Invitrogen, catalog number: PA5-21004)
3. CD326 (EpCAM) monoclonal antibody, Alexa FluorTM (clone MH99) (Invitrogen, catalog number: 53-8326-42)
4. Cytokeratin-7 monoclonal antibody (clone OV-TL12/30) (Novus Biologicals, catalog number: NBP2-44814)
5. Cytokeratin-19 monoclonal antibody (clone ROCK108) (Invitrogen, catalog number: MA1-06329)
6. Ki67 monoclonal antibody (clone SP6) (Invitrogen, catalog number: MA5-14520)
7. Goat anti-mouse IgG (H + L) secondary antibody, Alexa FluorTM 488 (Invitrogen, catalog number: A-11001)
8. Goat anti-rabbit IgG (H + L) secondary antibody, Alexa FluorTM 647 (Invitrogen, catalog number: A-21244)
Culture media, supplements, and growth factors
1. A83-01 (Sigma-Aldrich, catalog number: SML0788)
2. Advanced DMEM/F-12 (AdDMEM/F-12) (Gibco, catalog number: 3700-100-01)
3. B-27 supplement, without vitamin A (Gibco, catalog number: 12587010)
4. BMP-7, recombinant human (Peprotech, catalog number: 120-03P)
5. DAPT (Peprotech, catalog number: 2088055)
6. Dexamethasone (Sigma-Aldrich, catalog number: D4902)
7. DMEM high glucose with L-glutamine and sodium pyruvate (EuroClone, catalog number: ECM0728)
8. Epidermal growth factor (EGF), recombinant human (R&D Systems, catalog number: 236-EG-200)
9. Fetal bovine serum (FBS) (Gibco, catalog number: 10270-106)
10. FGF-19, recombinant human (Peprotech, catalog number: 100-32)
11. Forskolin (Tocris, catalog number: 1099/10)
12. Gastrin I human (Leu15) (Sigma-Aldrich, catalog number: G9145)
13. GlutaMAXTM supplement (Gibco, catalog number: 51985-026)
14. Hepatocyte growth factor/scatter factor (HGF/SF) (homemade) [7]
15. L-WRN conditioned medium (Sigma-Aldrich, catalog number: SCM105)
16. MEM non-essential amino acids 100× w/o L-glutamine (Biowest, catalog number: X0557)
17. N-2 supplement (Gibco, catalog number: 17502048)
18. N-acetyl-L-cysteine (Sigma-Aldrich, catalog number: A9165)
19. Nicotinamide (Sigma-Aldrich, catalog number: N0636)
20. Opti-MEMTM reduced serum medium (Gibco, catalog number: 31985062)
21. Penicillin–streptomycin (Gibco, catalog number: 15140-122)
22. Recovery cell culture freezing medium (Gibco, catalog number: 12648010)
23. RPMI 1640 medium (EuroClone, catalog number: ECB9006)
24. R-Spondin-1 conditioned medium (Sigma-Aldrich, catalog number: SCM104)
25. Y-27632 dihydrochloride (ROCK inhibitor) (Tocris, catalog number: 1254/1)
Buffers, staining reagents, and general chemicals
1. ACK lysing buffer (Gibco, catalog number: A1049201)
2. Acetone (Sigma-Aldrich, catalog number: 179124)
3. Antibiotic–antimycotic solution (Sigma-Aldrich, catalog number: A5955)
4. BODIPYTM 493/503 (Invitrogen, catalog number: D3922)
5. Bovine serum albumin (BSA) (Pan-Biotech, catalog number: P06-1391500)
6. BSA, fatty acid free (Sigma-Aldrich, catalog number: A1595)
7. CellTiter-Glo 3D cell viability assay (Promega, catalog number: G9681)
8. Cultrex organoid harvesting solution (R&D Systems, catalog number: BME001-10)
9. Cultrex UltiMatrix reduced growth factor basement membrane extract (R&D Systems, catalog number: BME001-10)
10. Diaminobenzidine tetrahydrochloride (DAB) (Biocare Medical, catalog number: DB801)
11. Diva Decloaker solution 100× (Bio-Optica, catalog number: BRI2006L)
12. DMSO (Sigma-Aldrich, catalog number: 472301)
13. Dulbecco’s phosphate-buffered saline (DPBS) (Gibco, catalog number: 14190-094)
14. Eosin (Sigma-Aldrich, catalog number: 230251)
15. Eukitt (Kindler, catalog number: D-79110)
16. Hematoxylin solution (Histo-Line Laboratories, catalog number: 01HEMCA1000)
17. HEPES buffer (Gibco, catalog number: 15630056)
18. Hoechst 33342 (Invitrogen, catalog number: H1399)
19. ImmPACTTM DAB (Vector Laboratories, catalog number: NC9567138)
20. MACS® tissue storage solution (Miltenyi Biotech, catalog number: 130-100-008)
21. Oleic acid (Sigma-Aldrich, catalog number: O1383)
22. Paraformaldehyde (PFA) (Sigma-Aldrich, catalog number: 158127)
23. Paraplast X-TRA (Sigma-Aldrich, catalog number: P3808)
24. Peroxidase-blocking solution (Dako, catalog number: S2023)
25. SlowFadeTM diamond antifade mountant (Invitrogen, catalog number: S36967)
26. Trypan blue stain 0.4% (Logos Biosystems, catalog number: T13001)
27. Triton X-100 (Sigma-Aldrich, catalog number: T8787)
28. Tween 20 (PanReac AppliChem, catalog number: A4974)
29. Tumor Dissociation kit, human (Miltenyi Biotech, catalog number: 130-095-929)
30. Xylene (Bio-Optica, catalog number: 06-1304F)
Solutions
1. Complete medium (see Recipes)
2. Basal medium (see Recipes)
3. Expansion medium (see Recipes)
4. Differentiation medium (see Recipes)
5. Opti-MEM Medium (see Recipes)
6. Oleic acid/BSA reagents (see Recipes)
Recipes
1. Complete medium
| Reagent | Stock concentration | Volume |
|---|---|---|
| DMEM high glucose w/ L-glutamine w/ sodium pyruvate | 1× | 88 mL |
| Fetal Bovine Serum (FBS) | - | 10 mL |
| Antibiotic Antimycotic Solution | 100× | 1 mL |
| MEM non-essential amino acids | 100× | 1 mL |
| Total | 100 mL |
2. Basal medium
| Reagent | Stock concentration | Volume |
|---|---|---|
| AdDMEM/F-12 | 1× | 485 mL |
| Pen/Strep | 100× | 5 mL |
| GlutaMAX | 100× | 5 mL |
| HEPES | 1 M | 5 mL |
| Total | 500 mL |
3. Expansion medium
| Reagent | Stock concentration | Weight | Diluent | Solubility | Volume | Aliquot storage |
|---|---|---|---|---|---|---|
| Basal medium | 1× | 5,552 mL | ||||
| B27 | 50× | - | - | - | 200 μL | -20 °C |
| N2 | 100× | - | - | - | 100 μL | -20 °C |
| Nicotinamide | 1 M | 611 mg | 5 mL | DPBS | 100 μL | -20 °C |
| NAC | 500 mM | 408 mg | 5 mL | 37 °C H2O | 25 μL | -20 °C |
| Y-27632 | 100 mM | 10 mg | 0.308 mL | H2O | 1 μL | -20 °C |
| Forskolin | 10 mM | 10 mg | 2.44 mL | DMSO | 10 μL | -20 °C |
| A83-01 | 5 mM | 5 mg | 2.37 mL | DMSO | 10 μL | -20 °C |
| [Leu15]-gastrin I | 200 μM | 1 mg | 2.40 mL | DPBS | 0.5 μL | -20 °C |
| EGF | 500 μg/mL | 200 μg | 0.400 mL | DPBS | 1 μL | -20 °C |
| HGF/SF | 0.35 mg/mL | 0.7 μL | -20 °C | |||
| R-Spondin1 | - | - | - | - | 1 mL | -20 °C |
| Wnt3a | - | - | - | - | 3 mL | -20 °C |
| Total | 10 mL |
The expansion medium is composed of basal medium with the addition of B27 (1:50), N2 (1:100), 10 mM nicotinamide, 1.25 mM N-acetyl-L-cysteine (NAC), 10 μM forskolin, 10 μM Y-27632 dihydrochloride (ROCK inhibitor), 5 μM A83-01, 10 nM [Leu15]-gastrin I, 50 ng/mL epidermal growth factor (EGF), 25 ng/mL hepatocyte growth factor/scatter factor (HGF/SF) (homemade), 10% R-Spondin1 conditioned medium, and 30% Wnt3a conditioned medium with Noggin.
4. Differentiation medium
| Reagent | Stock concentration | Weight | Diluent | Solubility | Volume | Aliquot storage |
|---|---|---|---|---|---|---|
| Basal medium | 1× | 9,517 mL | ||||
| B27 | 50× | - | - | - | 200 μL | -20 °C |
| N2 | 100× | - | - | - | 100 μL | -20 °C |
| A83-01 | 5 mM | 5 mg | 2.37 mL | DMSO | 1 μL | -20 °C |
| [Leu15]-gastrin I | 200 μM | 1 mg | 2.40 mL | DPBS | 0.5 μL | -20 °C |
| EGF | 500 μg/mL | 200 μg | 0.400 mL | DPBS | 1 μL | -20 °C |
| HGF/SF | 0.35 mg/mL | De Nola et al. [7] | 0.7 μL | -20 °C | ||
| FGF-19 | 100 μg/mL | 5 μg | 50 μL | DPBS | 10 μL | -20 °C |
| DAPT | 10 mM | 10 mg | 2.31 mL | DMSO | 10 μL | -20 °C |
| BMP-7 | 25 μg/mL | 2 μg | 80 μL | DPBS | 10 μL | -20 °C |
| Dexamethasone | 2 mM | 25 mg | 32 mL | EtOH | 150 μL | -20 °C |
| Total | 10 mL |
The differentiation medium is composed of basal medium with the addition of B27 (1:50), N2 (1:100), 500 nM A83-01, 10 nM [Leu15]-gastrin I, 50 ng/mL EGF, 25 ng/mL HGF/SF (homemade), 100 ng/mL fibroblast growth factor 19 (FGF-19), 25 ng/mL BMP-7, 10 μM DAPT, and 30 μM dexamethasone.
5. Opti-MEM medium
| Reagent | Stock concentration | Weight | Diluent | Solubility | Volume | Aliquot storage |
|---|---|---|---|---|---|---|
| Opti-MEM | 1× | 4.73 mL | ||||
| Pen/Strep | 100× | 50 μL | -20 °C | |||
| B27 | 50× | - | - | - | 100 μL | -20 °C |
| N2 | 100× | - | - | - | 50 μL | -20 °C |
| Nicotinamide | 1 M | 611 mg | 5 mL | DPBS | 50 μL | -20 °C |
| NAC | 500 mM | 408 mg | 5 mL | 37 °C H2O | 12.5 μL | -20 °C |
| Y-27632 | 100 mM | 10 mg | 0.308 mL | H2O | 0.5 μL | -20 °C |
| Forskolin | 10 mM | 10 mg | 2.44 mL | DMSO | 5 μL | -20 °C |
| A83-01 | 5 mM | 5 mg | 2.37 mL | DMSO | 5 μL | -20 °C |
| [Leu15]-gastrin I | 200 μM | 1 mg | 2.40 mL | DPBS | 0.25 μL | -20 °C |
| EGF | 500 μg/mL | 200 μg | 0.400 mL | DPBS | 0.5 μL | -20 °C |
| HGF/SF | 0.35 mg/mL | 0.35 μL | -20 °C | |||
| Total | 5 mL |
The medium is composed of Opti-MEM with 1% penicillin/streptomycin, supplemented with B27 (1:50), N2 (1:100), 10 mM nicotinamide, 1.25 mM N-acetyl-L-cysteine (NAC), 10 μM forskolin, 10 μM Y-27632, 5 μM A83-01, 10 nM [Leu15]-gastrin I, 50 ng/mL EGF, and 25 ng/mL HGF/SF.
6. Oleic acid/BSA reagents
| Stock concentration | Reagent 1 | Volume 1 | Diluent 2 | Volume 2 | Additional information |
|---|---|---|---|---|---|
| 1 M oleic acid | 3.15 M oleic acid | 1.12 mL | 100% ethanol | 3.5 mL | |
| 37.5 mM NaOH | 100 mM NaOH | 1.5 mL | Sterile H2O | 2.5 mL | |
| 20 mM sodium oleate | 1 M oleic acid | 80 μL | 37.5 Mm NaOH | 3,920 μL | Vortex and heat at 70 °C for 30 min |
| 5% BSA/DPBS solution | 30% BSA fatty acid free | 2 mL | DPBS | 10 mL | |
| 5 mM sodium oleate | 20 mM sodium oleate | 4 mL | DPBS + 5% BSA/DPBS | 12 mL | Vortex and heat at 37 °C for 1 h |
| CTRL- solution | 37.5 mM NaOH | 4 mL | 5% BSA/DPBS | 12 mL | Heat at 37 °C for 1 h |
All solutions are aliquoted and stored at -20 °C.
Laboratory supplies
1. 10 μL pipette tips (Clearline, catalog number: 713130H)
2. 20 μL pipette tips (Clearline, catalog number: 014210CLH)
3. 200 μL pipette tips (Clearline, catalog number: 713117H)
4. 1,250 μL pipette tips (Clearline, catalog number: 713116H)
5. 10 mL serological pipettes (Greiner Bio-One, catalog number: 607180)
6. 15 mL tubes (Falcon, catalog number: 10773501)
7. 2 mL cryovials (Clearline, catalog number: CL2ARBEPSTS)
8. 25 mL serological pipettes (Greiner Bio-One, catalog number: 760160-TRI)
9. 50 mL tubes (Falcon, catalog number: 10788561)
10. Cell culture multi-well plates (24-well) (Nunc, catalog number: 144530)
11. Cell culture multi-well plates (48-well) (Nunc, catalog number: 150787)
12. gentleMACSTM C tubes (Miltenyi Biotech, catalog number: 130-093-237)
13. Ibidi chamber slides (ibidi GmbH, catalog number: 80841)
14. MACS® SmartStrainers (70 μm) (Miltenyi Biotech, catalog number: 130-098-462)
15. Petri dishes (Greiner Bio-One, catalog number: 760160-TRI)
Equipment
1. Automated cell counter (Luna, catalog number: L40002)
2. Cell culture incubator (Thermo Fisher Scientific, model: MSC Advantage 1.2)
3. Confocal microscope (Leica, model: TCS SP5)
4. GentleMACSTM dissociator (Miltenyi Biotech, catalog number: 130-093-235)
5. Light microscope (Nikon, model: Eclipse Ts2-FL Inverted)
6. Microfuge 20R (Beckman Coulter, catalog number: B30150)
7. Microtome (Leica, model: RM2155)
8. MSC Advantage 1.2 Class II biological safety cabinet (Thermo Fisher Scientific, catalog number: 51025411)
Software and datasets
1. ImageJ 1.53c (NIH, https://imagej.net/ij/)
2. Prism (GraphPad) version 8.3.0 (Dotmatics, https://www.graphpad.com)
Procedure
A. Isolation of tumor and non-tumor primary cells from liver (timing: within 24 h)
Note: This section describes how to digest liver tissues into fragments by enzymatic and mechanical digestion. All steps should be performed under sterile conditions.
A1. Liver resections (timing: 75 min)
Note: Surgically resected primary liver tumor specimens, along with matched non-neoplastic tissue, were obtained from treatment-naïve patients.
1. Prepare a 50 mL conical tube with 10 mL of MACS® tissue storage solution for each sample.
2. Place tumor and non-tumor specimens in the MACS® tissue storage solution and keep them at 4 °C until use.
3. Process the tissue as soon as possible after collection, ideally within 24 h, as longer delays may compromise sample quality and affect reproducibility.
4. Prewarm RPMI 1640 medium in a 37 °C water bath.
5. Remove the tissue storage solution using a pipette, avoiding disturbance of the tissue.
6. Transfer tissues into Petri dishes (Figure 1).
7. Cut the tissue into small pieces (2–4 mm) using scalpels (Figure 2).
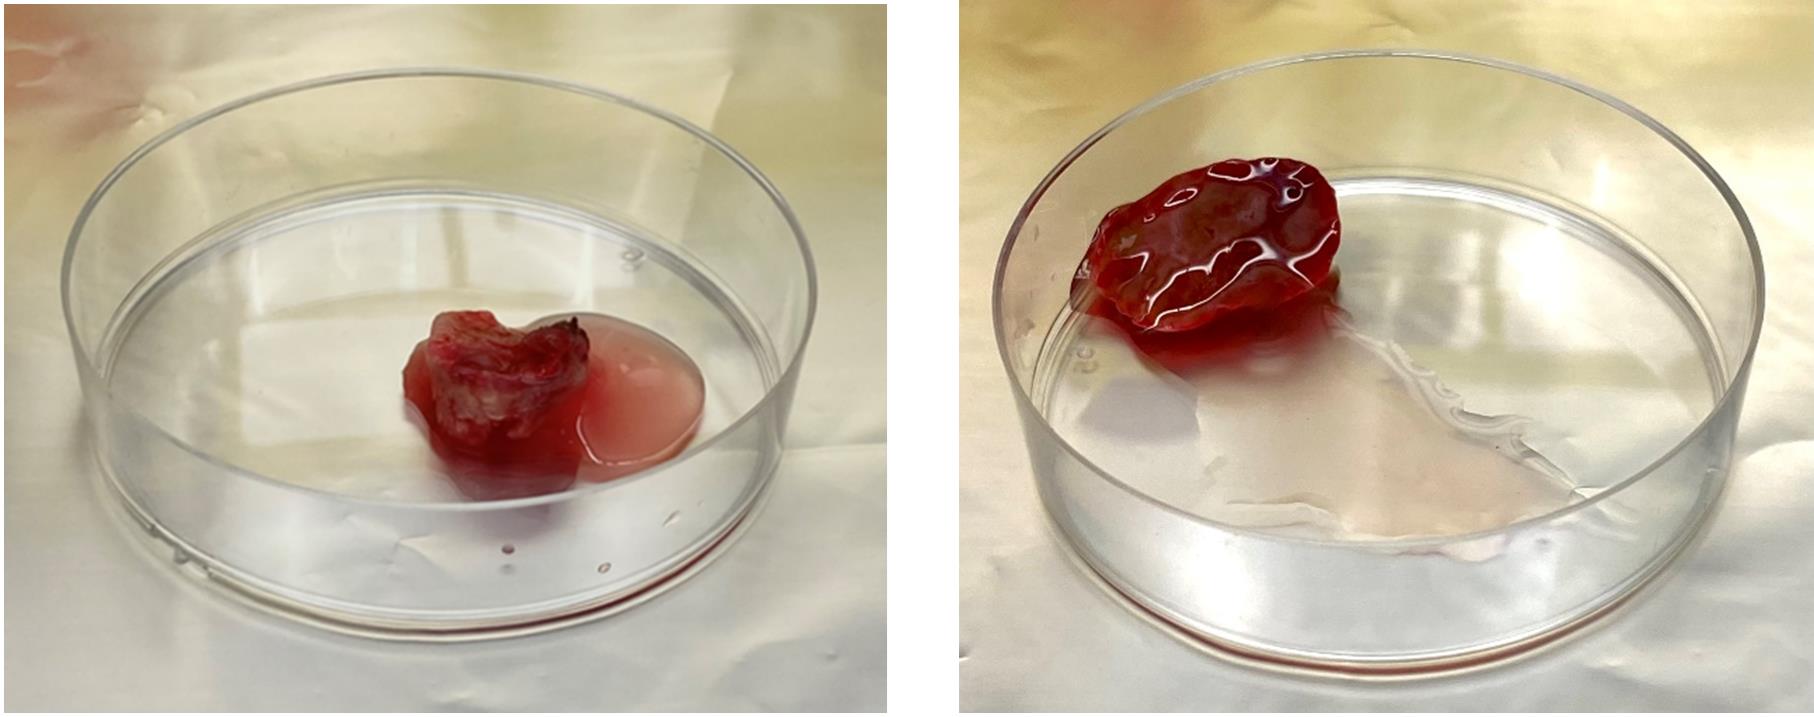
Figure 1. Liver tissues. Tumor (left) and non-tumor (right) tissue in Petri dishes.
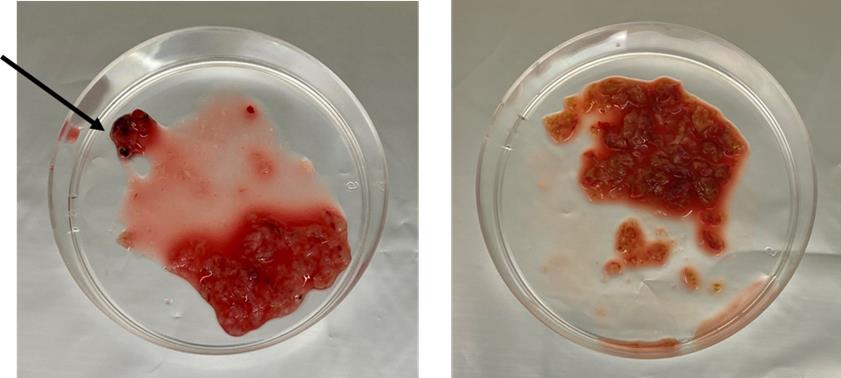
Figure 2. Dissociation of liver tissues. Representative images of tumor (left) and non-tumor (right) specimen fragments obtained after cutting with sterile surgical scalpels. The arrow indicates the cauterized fragments to be discarded.
8. Transfer the tissue pieces into the gentleMACSTM C tube containing the enzyme mix prepared following the manufacturer’s instructions of the human Tumor Dissociation kit. Briefly, prepare Enzyme H, R, and A by reconstitution of the lyophilized powder. To treat 0.2–1.0 g of tissue, prepare enzyme mix by adding the following components into a gentleMACSTM C tube: 200 μL of enzyme H, 100 μL of enzyme R, 25 μL of enzyme A, and 4.7 mL of RPMI 1640 medium.
Critical: Discard cauterized fragments, which can be visually recognized by their darkened appearance and firmer consistency compared to viable tissue. These areas have been exposed to electrosurgical devices, resulting in thermal coagulation and non-viable cells. Inclusion of cauterized tissue could compromise downstream analyses.
9. Place the gentleMACSTM C tube in the gentleMACSTM dissociator, attaching the tube upside down onto the sleeve of the dissociator.
Critical: Ensure that the sample material is located in the area of the rotor.
10. Run the gentleMACS program h_tumor_01.
11. Collect all tissue fragments at the bottom of the tube.
Critical: Ensured that no tissue fragments remain stuck in the area of the rotor.
12. Incubate samples for 30 min at 37 °C, shaking gently every 10 min (Figure 3).
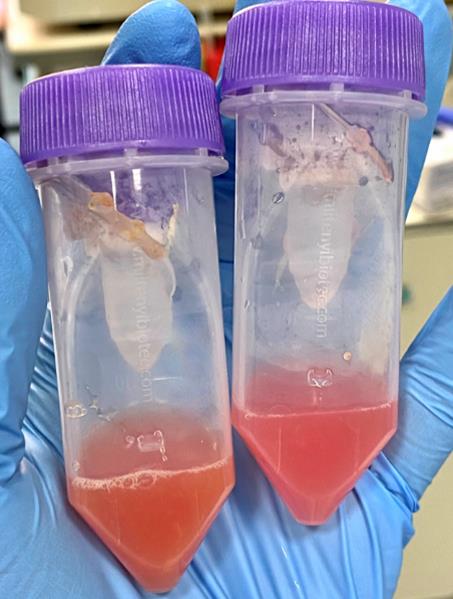
Figure 3. Fragments of tumor and liver tissue after the first dissociation step
13. Perform the tissue dissociation procedure using the gentleMACS system twice, as described in steps A1.9–12, repeated consecutively to ensure complete dissociation.
14. Filter the cell suspension using a 70 μm cell strainer.
15. Centrifuge twice at 50× g for 2 min at room temperature (RT). After each centrifugation, carefully collect the pellet of tumor or liver cells. Combine the pellets from the two centrifugation steps into a single tube to maximize cell recovery.
16. Resuspend the pellet in 3 mL of complete medium (see Recipe 1).
A2. Fine-needle biopsies (timing: 2h)
Note: A fresh tumor biopsy sample was collected from patient candidates for a liver biopsy for diagnostic purposes as per the standard of care. Tissue biopsies were subjected to enzymatic dissociation and then seeded to develop organoids (see below).
1. Prepare a 50 mL conical tube with 10 mL of MACS® tissue storage solution for each sample.
2. Place the tumor biopsy in the MACS® tissue storage solution and keep it at 4 °C until use.
3. Processing the tissue within 24 h is strongly recommended.
4. Centrifuge the 50 mL conical tube containing biopsy fragments at 500 RCF for 10 min.
5. Resuspend the pellet in 1 mL of enzyme solution prepared as described in step A1.8 and transfer it to a 1.5 mL centrifuge tube.
6. Incubate the sample for 90 min at 37 °C, shaking gently every 10 min.
7. Proceed with organoid preparation.
B. Establishment of liver organoid cultures (timing: 3 h)
Note: This section describes how to generate organoids from surgical resection (B1) and needle biopsies (B2).
B1. From surgical resection
1. Transfer the cell suspension (step A1.16) into a 15 mL conical tube.
2. Centrifuge at 300 RCF for 8 min at RT.
3. Discard the supernatant.
4. Resuspend the cell pellet, which is contaminated with red blood cells, in 1 mL of ACK lysing buffer for 1 min at RT to selectively lyse and remove them.
Critical: Avoid over-exposure of lysis buffer for more than 1 min to prevent the loss of liver cells.
5. Add 5 mL of DPBS.
6. Centrifuge at 300 RCF for 8 min at RT.
7. Discard the supernatant and resuspend the cell pellet in 1 mL of DPBS.
8. Centrifuge at 300 RCF for 8 min at RT.
9. Discard the supernatant.
10. Resuspend in 1 mL of basal medium (see Recipe 2).
11. Mix 7.5 μL of cell suspension with 7.5 μL of trypan blue (1:2 ratio).
12. Load the resulting 15 μL onto a Burker cell counting chamber.
13. Count cells manually or using an Automated Cell Counter (see details in Table 1).
14. After cell count, transfer approximately 15,000–100,000 cells per well to a 1.5 mL centrifuge tube.
Table 1. Details of the protocol used for counting cells with the automated cell counter
| Cell type | Dilution factor (1–100) | Noise reduction (1–10) | Live cell sensitivity (1–9) | Roundness (0%–100%) | Min cell size (3–59 μm) | Max cell size (4–60 μm) | Declustering levels |
|---|---|---|---|---|---|---|---|
| Hepatocytes | 2 | 5 | 1 | 50 | 20 | 30 | High |
| Cholangiocytes | 2 | 5 | 1 | 50 | 8 | 15 | High |
Note: Seed a range of 15,000–30,000 cells per well to develop iCCA-organoids or non-tumor organoids or a range of 70,000–100,000 cells per well to allow the development of HCC-derived organoids (Figure 4). When sample availability allows, seeding at the higher end of each range is recommended, as higher cell density more consistently supports efficient organoid establishment. These ranges are provided to accommodate variability in cell yield and viability across patient-derived samples.
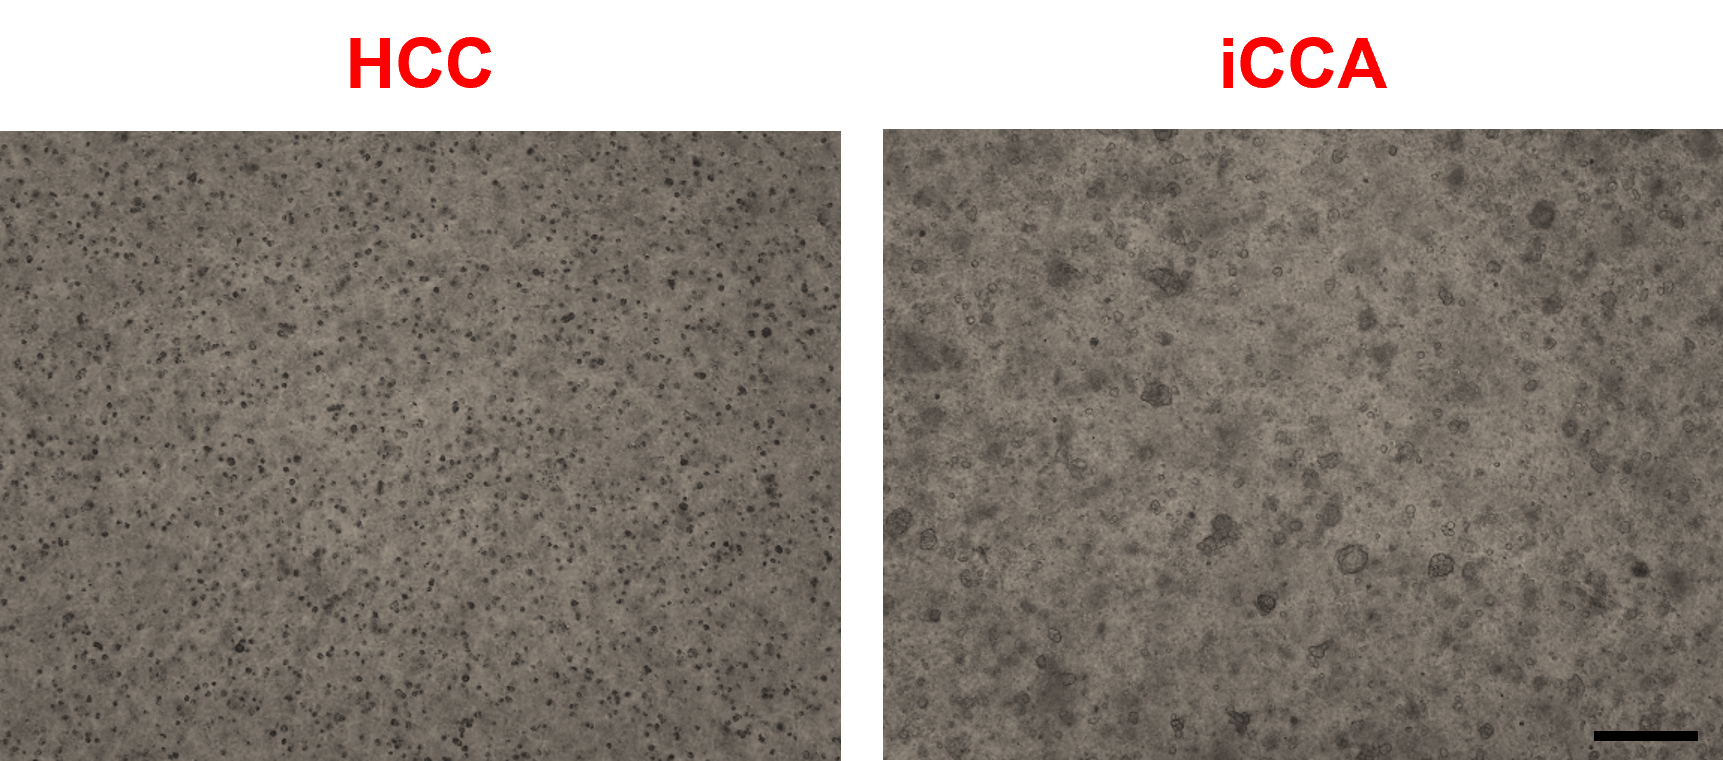
Figure 4. Single hepatocytes and cholangiocytes are embedded in basement membrane extract (BME) domes after cell counting. Representative brightfield images of hepatocellular carcinoma (HCC) and intrahepatic cholangiocarcinoma (iCCA)-derived cells after 3 days of seeding at passage 0 (P0). Scale bar: 200 μm.
15. Centrifuge at 300 RCF for 8 min at RT.
16. Discard the supernatant from the cell pellet in order to avoid a dilution of the matrix of more than 50%.
17. Remove Cultrex Ultimatrix reduced growth factor (RGF) basement membrane extract (BME) from -80 °C and keep it on ice at 4 °C until it becomes liquid.
18. Using a pre-cooled 200 μL pipette tip, resuspend the cell pellet in 40–50 μL per well of BME, gently and slowly pipetting up and down several times for an equal distribution of cells.
Critical: During this step, be careful to avoid introducing air bubbles by vigorously pipetting.
19. Place the cell cluster suspension at the center of the well, forming a BME dome, on a 24-well suspension plate.
Note: Prewarm the suspension plates in the incubator at 37 °C for about 30 min to facilitate gelling.
20. Carefully, place the suspension plate with the domes facing up in a 37 °C incubator for 30 min to 1 h to allow the domes’ gelling.
21. Add 500 μL of 37 °C prewarmed expansion medium (see Recipe 3) per well to cover BME domes.
Note: Each growth factor (Figure 5) included in the expansion medium is essential for the successful development of organoids.
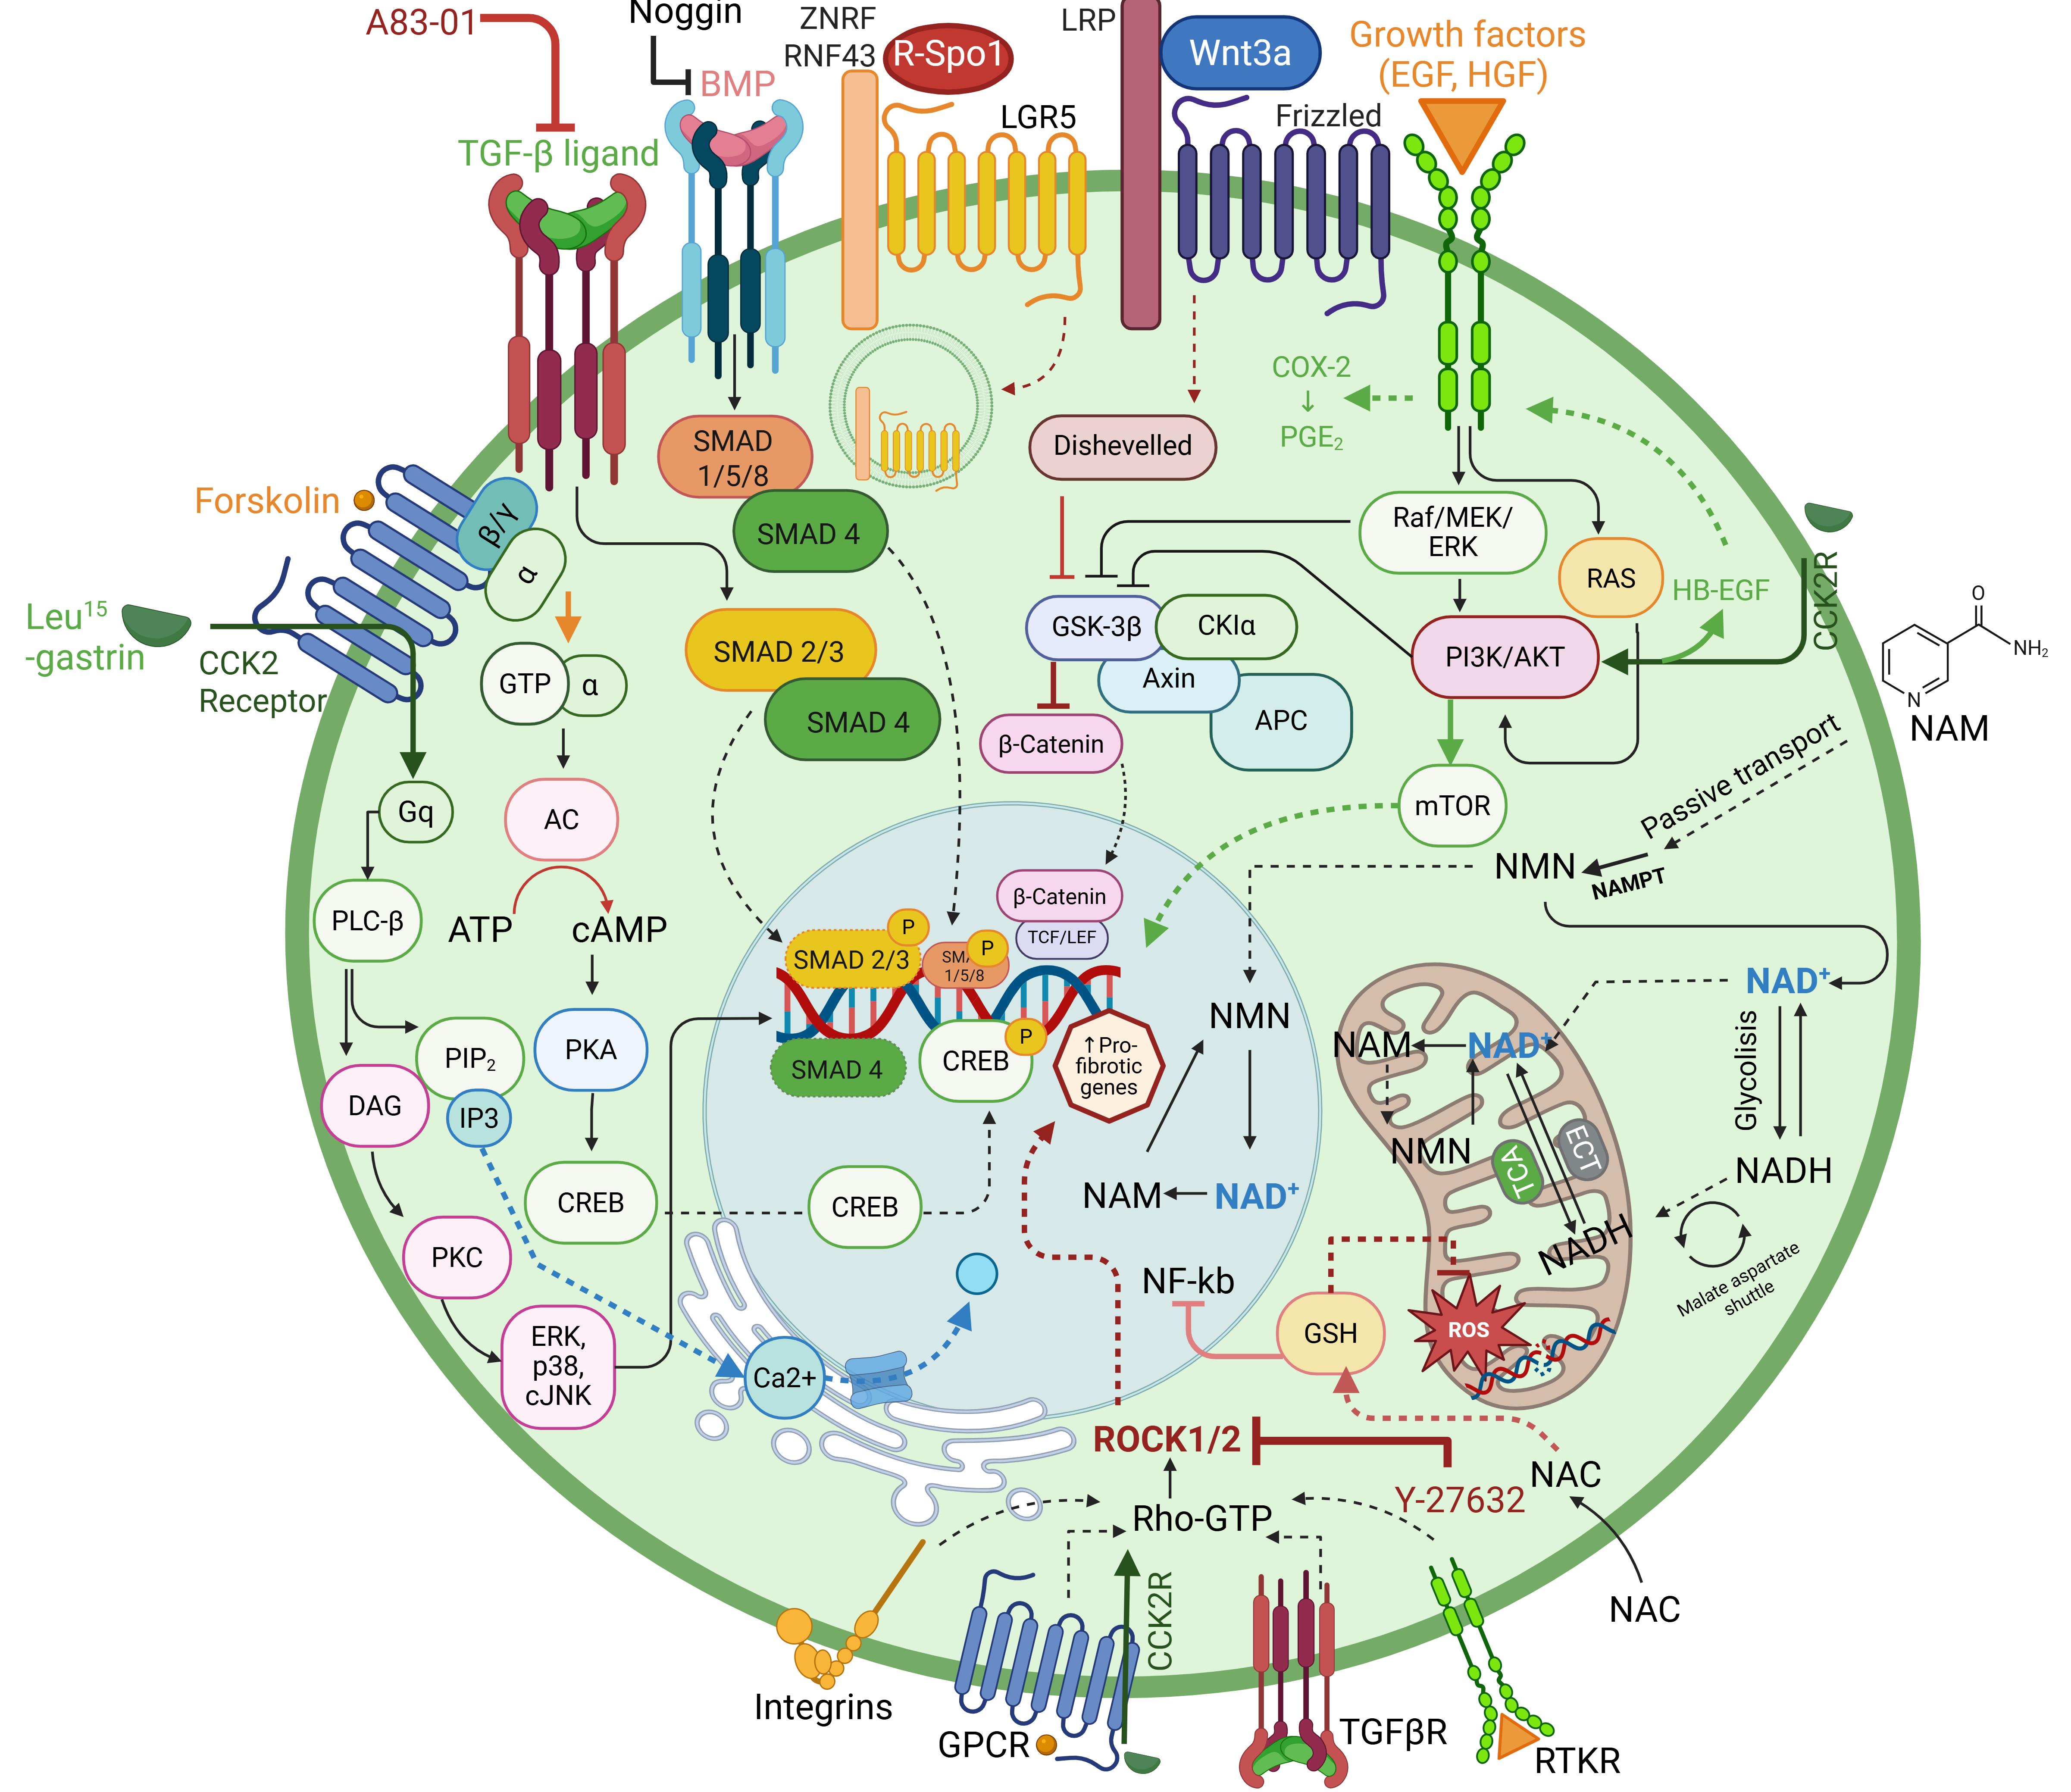
Figure 5. Schematic design illustrating the functions and related pathways associated with each supplement medium used for organoid expansion. N-acetylcysteine (NAC) is an anti-inflammatory agent that controls mitochondrial functionality through NF-Kb regulation and reactive oxygen species (ROS) level modulation. Nicotinamide (NAM) is a member of the vitamin B family and is the amide form of vitamin B3. In the liver, NAM is converted to nicotinamide mononucleotide (NMN), which is the precursor of nicotinamide adenine dinucleotide (NAD+), an essential coenzyme involved in cell metabolism, redox reactions, mitochondrial function, and energy generation. Forskolin is a diterpene agonist of adenylcyclase (AC)/cAMP/CREB pathways that promotes mRNA expression in primary hepatocytes. A83-01 is a TGF-β signaling kinase inhibitor that prevents Smad2/3phosphorilation, blocking TGF-β-induced epithelial-to-mesenchymal transition (EMT). Both forskolin and A83-01 support long-term expansion of organoid culture. [Leu15]-gastrin I is essential for the digestive system, stimulating gastric acid production from parietal cells; it functions through G protein–coupled receptor CCK2R, activated by Leu15-gastrin I via PLCγ/PKC signaling. Noggin is a secreted protein that inhibits the binding of bone morphogenic proteins (BMPs) to their receptor, causing a loss of BMP4 and pSMAD1/5/8 factor, indicating active BMP signaling. The growth factors EGF and HGF have a mitogen effect, promoting cell proliferation, differentiation, and survival through the Raf/MEK/ERK signaling. Y-27632 (ROCK inhibitor), a competitor of ATP, is able to inhibit both ROCK1 and ROCK2 in vitro kinase activity, promoting the blocking of the apoptosis process. R-Spo1 and Wnt3a proteins are agonists of the Wnt/β-catenin signaling pathway and ligands of LGR5 and Frizzled receptors and their co-receptors ZNRF/RNF43 and LRP5/6, respectively. They promote stem cell proliferation and improve the efficiency of organoid development and expansion.
22. Image under a brightfield microscope (10× magnification) to verify the presence of differently sized clustered cells in BME domes.
23. Place the plate back in the incubator.
24. Every 3 days, gently remove the expansion medium from each well, being careful not to disturb BME domes, and replace it with 500 μL of fresh prewarmed expansion medium to each well.
Note: After a few days, many small spherical structures with diameters of approximately 100–200 μm start to appear. For iCCA cells, it takes 5–10 days; for HCC cells, it takes more than 15–30 days before any structures become visible (Figure 6).
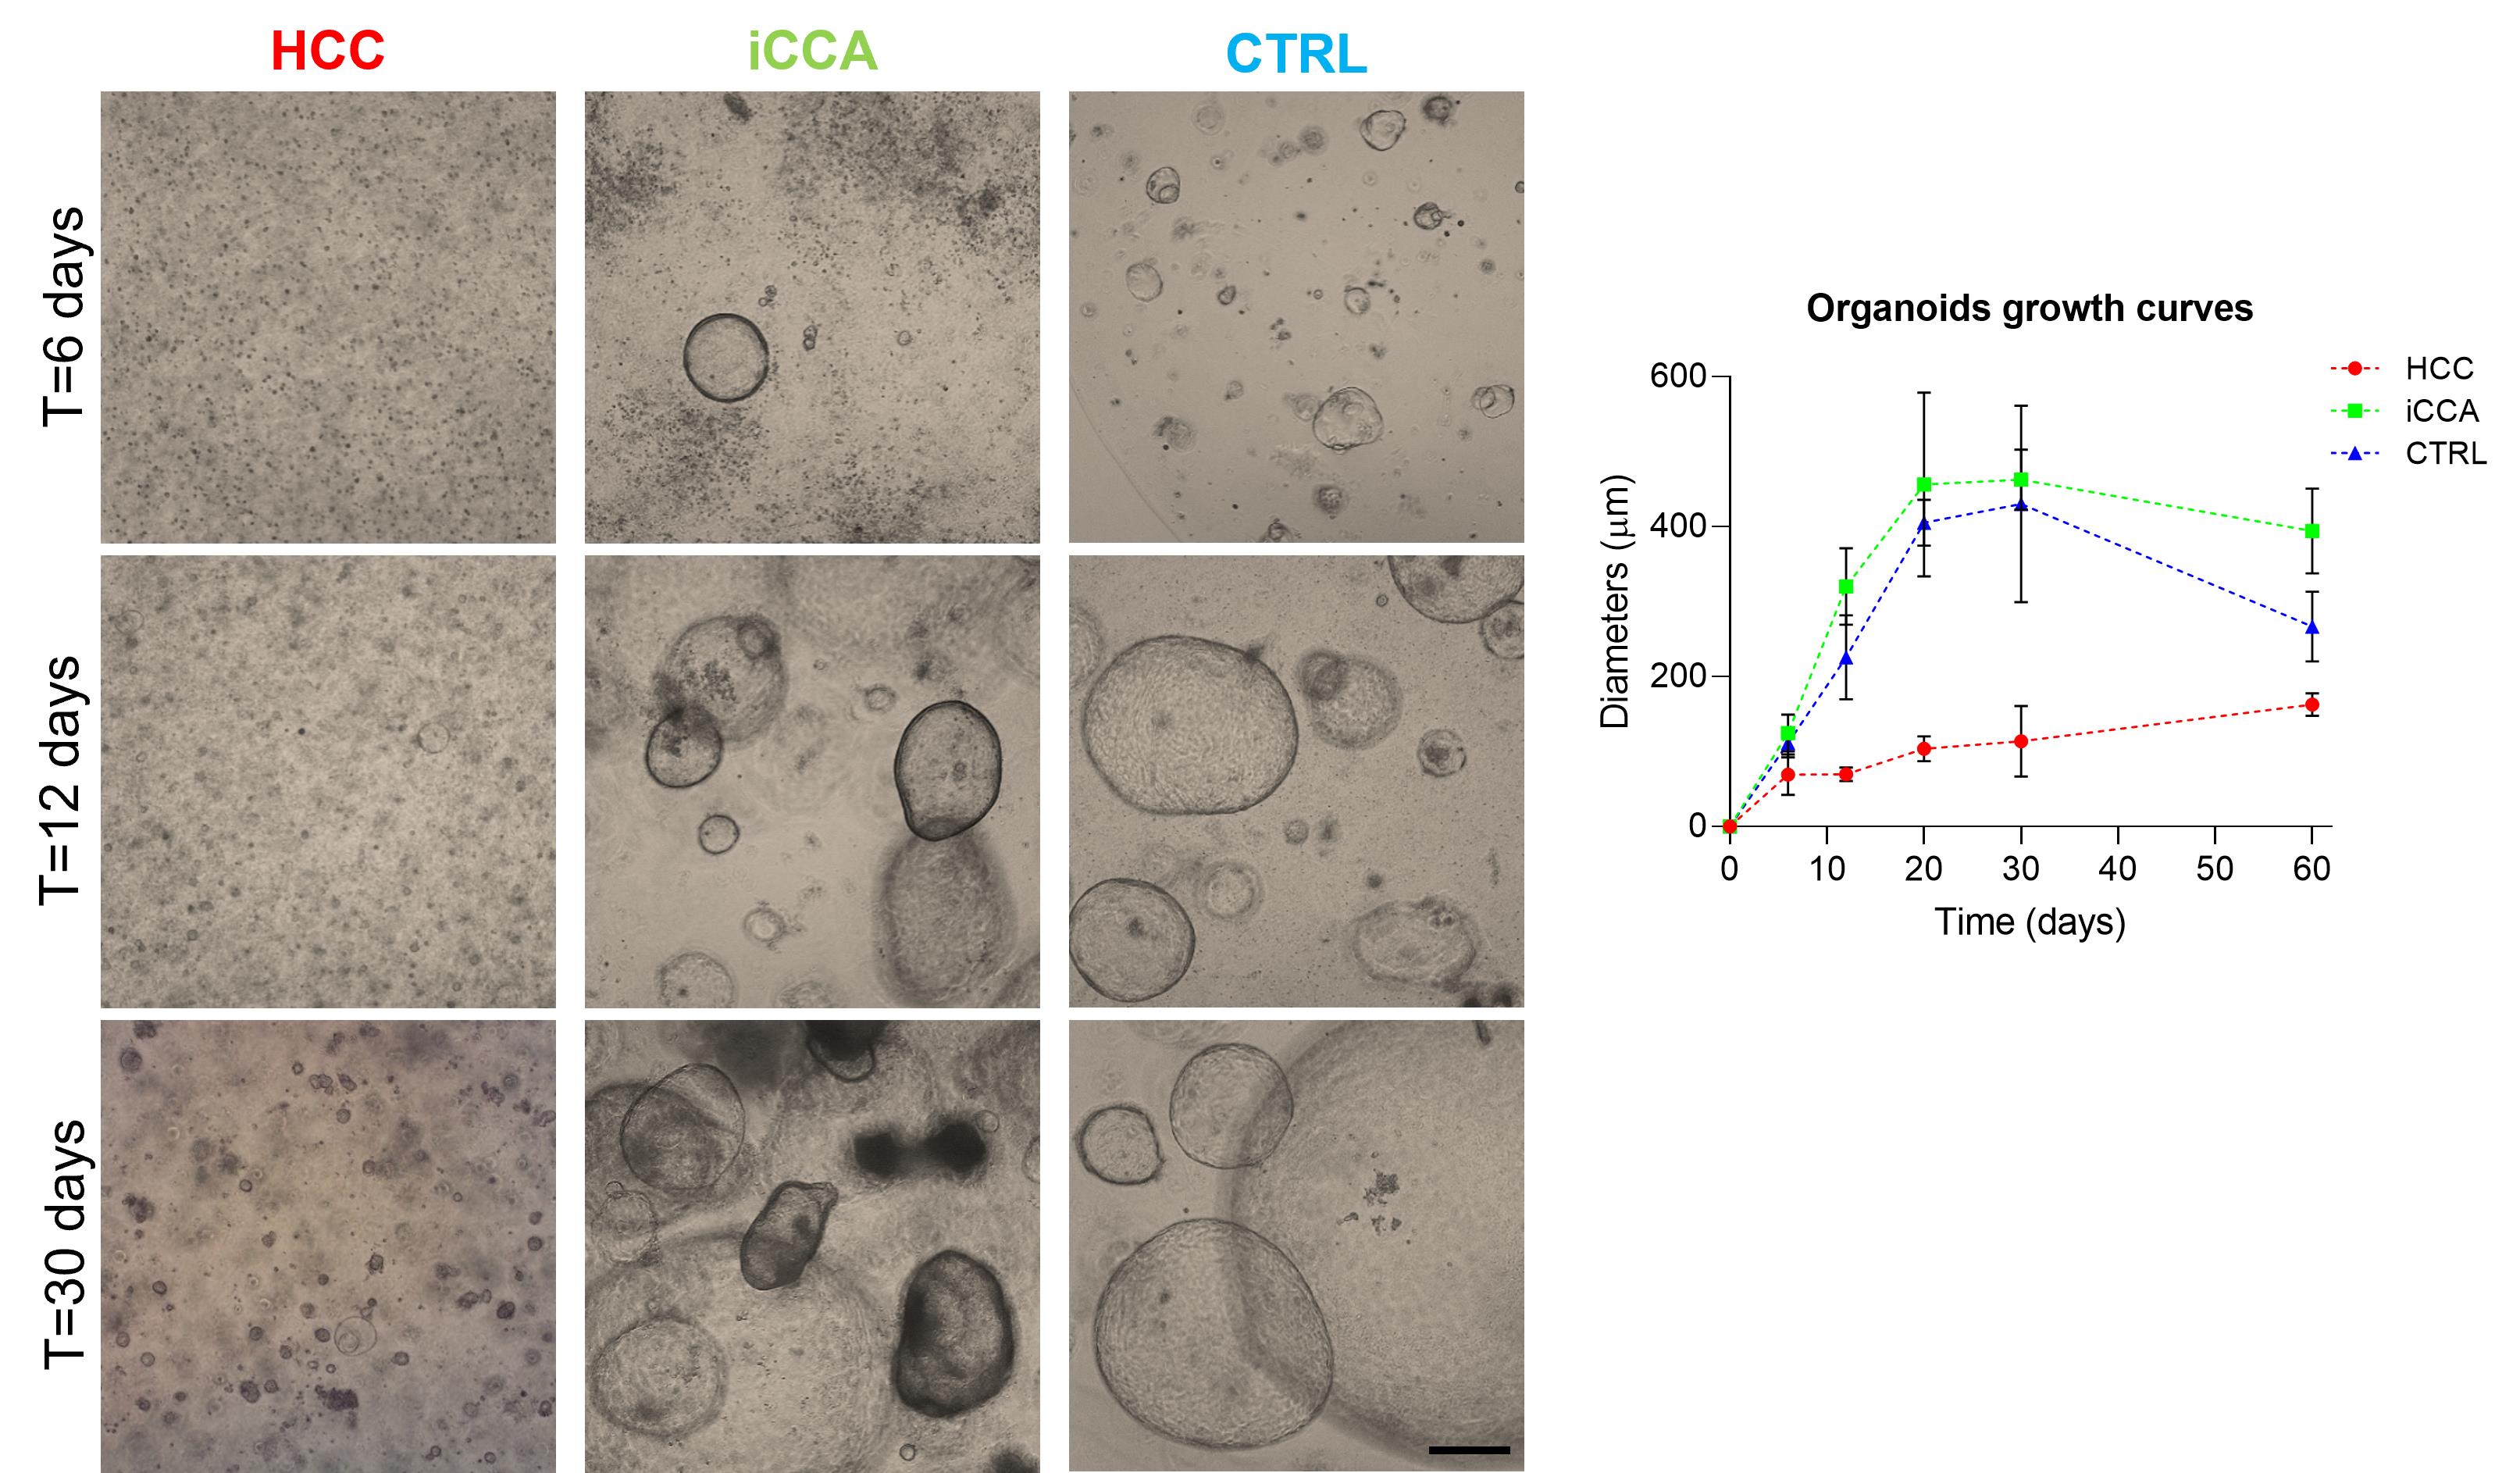
Figure 6. Differential growth kinetics of tumor and non-tumor liver organoids. (Left) Representative brightfield images of hepatocellular carcinoma (HCC), intrahepatic cholangiocarcinoma (iCCA)-derived organoids, and non-tumor organoids (CTRL). iCCA structures start to appear within 1 week, while small HCC-derived organoids start to assemble after approximately 2 weeks from seeding. Scale bar: 200 μm. (Right) Corresponding growth curves show organoid diameter over time (n = 5 per condition, mean ± SEM).
B2. From needle biopsies
1. Centrifuge biopsies (step A1.16) at 300 RCF for 8 min at RT.
2. Discard the supernatant.
3. Resuspend the cell pellet in 1 mL of DPBS, pipetting up and down about 30 times to disrupt small pieces into single cells or small cell clusters.
4. Transfer to a 1.5 mL centrifuge tube.
5. Centrifuge at 300 RCF for 8 min at RT.
6. Discard the supernatant to avoid diluting the matrix by more than 50%.
7. Resuspend the pellet in 40–50 μL per well of BME and follow the same procedure described in steps B1.17–24.
8. Image under a brightfield microscope to verify the presence of cells in BME domes (Figure 7).
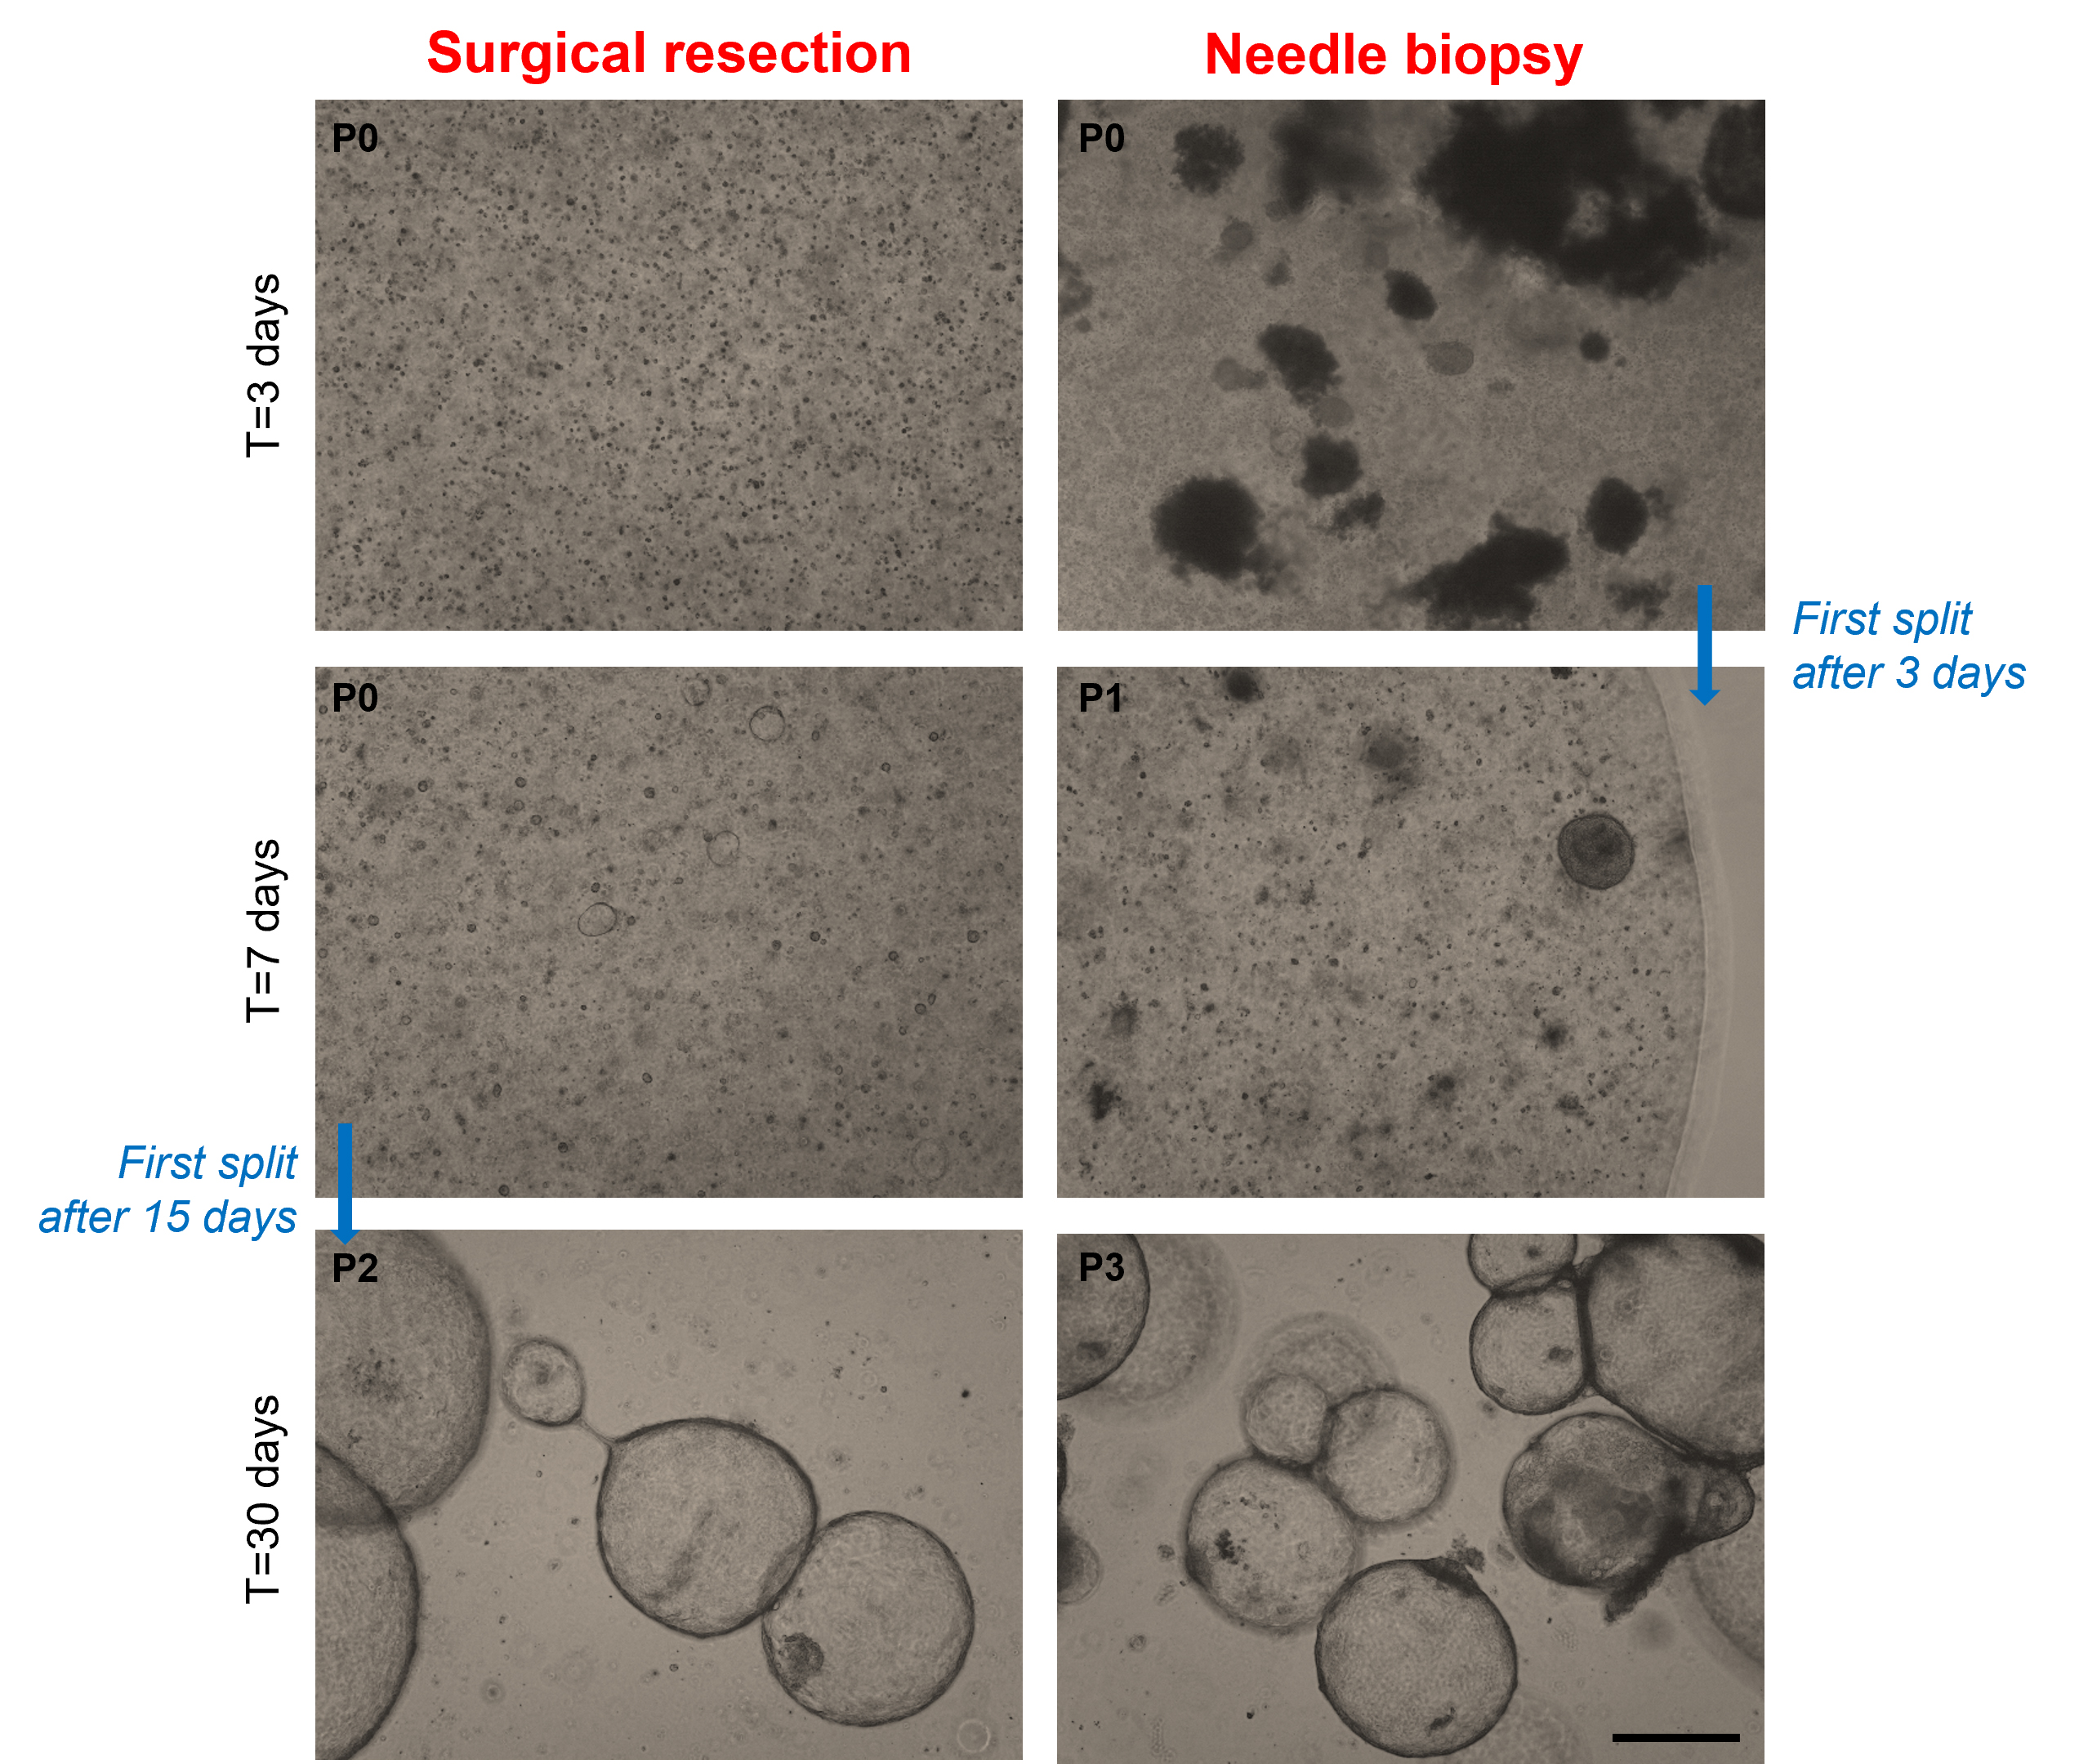
Figure 7. Development of organoids from surgical resections and needle biopsies requires different times. Representative brightfield images of organoids obtained starting from intrahepatic cholangiocarcinoma (iCCA) surgical resection and needle biopsy. Organoids are shown at the indicated passage (P) numbers. Scale bar: 200 μm.
C. Maintenance of organoids (timing: 3 h)
Notes:
1. This section describes the maintenance of organoids. After 3–15 days of culture, organoids can be (C1) passaged to grow, (C2) cryopreserved, or (C3) used to test different treatments.
2. The time before the first splitting varies depending on the growth pattern and the size of the organoid structures. The dimensions of structures (diameter > 200 μm), the integrity of BME, and the color of medium (yellow) are all elements that suggest the need to split.
1. Remove the expansion medium from each well, being careful not to remove any drops.
2. Wash with 500 μL per well of cold Cultrex organoid harvesting solution.
3. Collect organoid structures into a 1.5 mL centrifuge tube.
4. Incubate on ice for 30 min until organoids are released from the BME matrix.
Critical: At this step, the pellet appears sticky due to the presence of BME residues. Pipette up and down about 10 times to disrupt all the BME and facilitate cell pipetting.
5. Centrifuge at 200 RCF for 5 min at 4 °C.
6. Discard the supernatant.
7. Resuspend the pellet in 250–500 μL of cold DPBS and pipette up and down to disrupt organoid structures and remove all BME residues.
8. Centrifuge at 500 RCF for 5 min at 4 °C.
9. Discard the supernatant.
Critical: If the pellet is still sticky, add another wash with DPBS.
Note: In case of splitting, be careful to remove all liquid to avoid diluting the BME by more than 50%.
C1. Splitting (timing: 90 min)
Note: The passage of organoids is performed in a 1:2–1:5 split ratio.
1. Remove Cultrex Ultimatrix RGF BME from -80 °C and keep it on ice at 4 °C until it becomes liquid.
2. Resuspend the cell pellet in 40–50 μL per well of fresh BME and pipette up and down to evenly resuspend the cell pellet.
Critical: During this step, be careful to avoid introducing air bubbles.
3. Seed BME domes on a 37 °C pre-heated 24-well suspension plate and carefully incubate in a 37 °C incubator for 30 min to 1 h to allow the domes to polymerize.
4. After polymerization, add 500 μL per well of prewarmed expansion medium.
5. Place the plate back in the incubator.
Note: Once developed, tumor organoids can survive for extended periods, allowing freezing stocks to be made during the culture period. In contrast, non-tumor organoids have limited growth over time, characterized by robust proliferation in the initial stages of the culture that wanes after a few passages, ultimately halting their development (Figure 8).
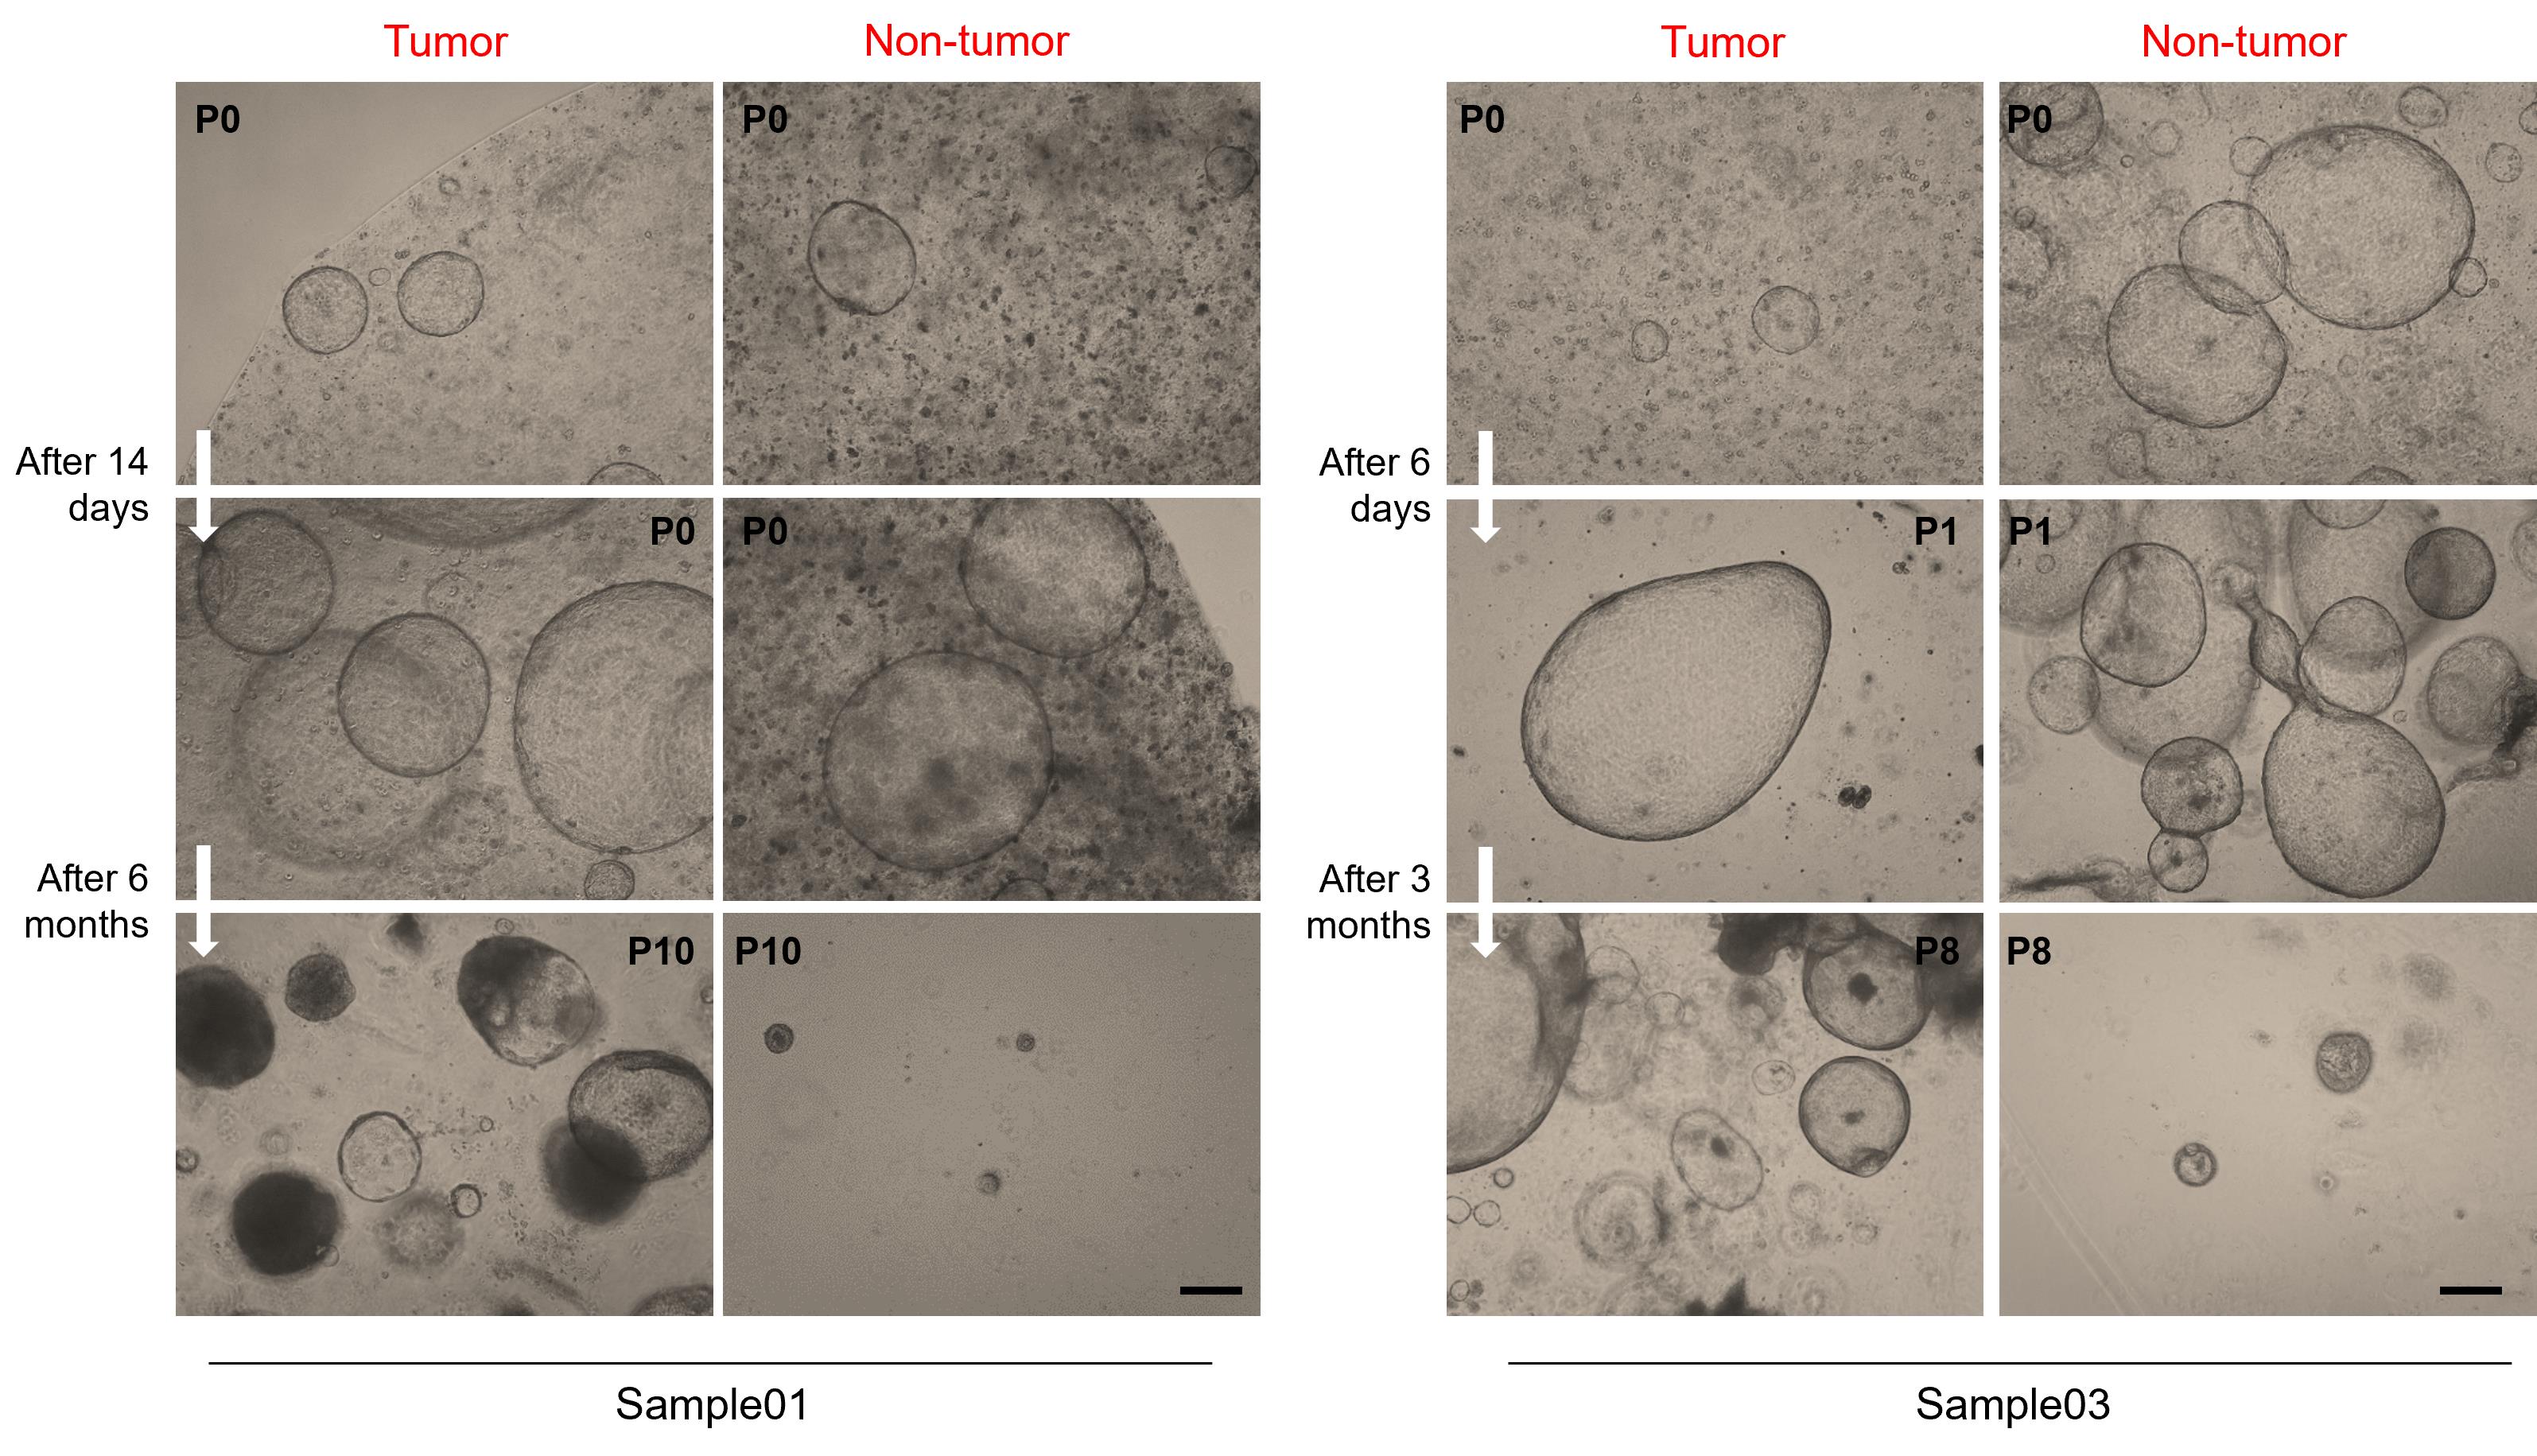
Figure 8. Representative brightfield images of tumor and paired non-tumor liver organoids from different intrahepatic cholangiocarcinoma (iCCA) patients. Tumor organoids (left panels) can be propagated for extended periods, while non-tumor organoids (right panels) show limited growth and stop proliferating after a few passages, depending on the sample. Organoids are shown at the indicated passage numbers (P). Scale bar: 200 μm
C2. Freezing (timing: 10 min)
1. Resuspend the cell pellet in 500 μL per well of recovery cell culture freezing medium.
2. Transfer the resuspended pellet into a cryovial.
Note: Avoid freezing BME domes with very few cells (<2 wells) or organoids at late passages, as these conditions reduce recovery and viability after thawing.
3. Store at -80 °C. For long-term storage, aliquots can be transferred to liquid nitrogen.
4. For thawing, move the cells to a 15 mL conical tube containing 3 mL of prewarmed basal medium.
5. Centrifuge at 300 RCF for 8 min at RT.
6. Discard the supernatant.
7. Resuspend the organoid pellet in 1 mL of prewarmed basal medium and transfer to a 1.5 mL centrifuge tube.
8. Centrifuge at 500 RCF for 5 min at RT.
9. Discard the supernatant.
10. Resuspend the pellet in 40–50 μL per well of BME and follow the same procedure described in steps B1.17–24.
C3. Drug treatment (timing: 3 days)
1. Using a fresh 200 μL pipette tip, resuspend the cell pellet in 20–25 μL per well of BME gently and slowly pipetting up and down 10–20 times to ensure an equal distribution of cells without compromising viability.
Critical: During this step, be careful to avoid introducing air bubbles.
2. Seed cell suspension at the center of the well, forming BME domes, on a prewarmed 48-well suspension plate.
3. Carefully, place the suspension plate in a 37 °C incubator for 30 min to 1 h to allow the domes to polymerize.
4. After polymerization, add 250 μL per well of prewarmed expansion medium.
5. Preparation of expansion medium with different treatments:
a. Expansion medium with VDAC1-antagonist (VA) molecule treatments: VDAC1 antagonists (D10, C1, and C4) are used to modulate VDAC1-mediated metabolism and pro-survival signaling in cancer-derived organoids. The concentration range used in this protocol is based on dose–response experiments reported in the original study [6]. In a 15 mL conical tube, add 10 mL of expansion medium with the addition of 0.02% of Tween 20. Transfer 250 μL per well of medium in a 1.5 mL centrifuge tube and resuspend VA small molecules at different concentrations (1, 5, 10, 15, 20, 50, and 100 μM) or DMSO.
b. Preparation of clinically used drug treatments or other substances: transfer 250 μL per well of expansion medium in a 1.5 mL centrifuge tube and resuspend clinically used drugs (gemcitabine, cisplatin, or sorafenib) [6] or natural substances (usnic acid) [8] at different dosages. Negative controls consist of vehicle-treated organoids: DMSO alone for VDAC1 antagonists and DPBS for clinically approved drugs, according to the solvent used for each compound.
6. Place the plate back in the incubator.
Note: After 2–3 days, the structures are re-formed and can be used for drug testing.
7. Gently remove expansion medium from each well, being careful not to disturb BME domes, and replace it with 250 μL of prewarmed expansion medium containing VA molecules or clinically used drugs in each well.
8. Every day, image with a brightfield microscope to verify the effect of small molecules on the morphology of organoid structures.
9. After 72 h, to evaluate cell viability, remove the plate from the incubator and allow it to equilibrate at RT under the hood for 25 min, as recommended by the CellTiter-Glo 3D Cell Viability Assay protocol.
Note: VA molecules are expected to reduce the viability of iCCA organoids in a dose-dependent manner (EC50 ~15–25 μM), while non-tumor organoids are minimally affected, as validated in the original study [6].
10. Add 100 μL (1:2 ratio) of CellTiter-Glo 3D Cell Viability Assay solution to each well and vigorously mix with a 200 μL pipette, disrupting drops and cells.
Note: It is important that organoid structures are broken to allow luciferase to interact with the cell and act. Pipette vigorously up and down approximately 10 times to be sure to disrupt organoids.
11. Transfer the entire volume (approximately 200 μL) to a white luminescence-compatible 96-well plate and incubate for 30 min at RT in a dark room.
12. Measure luminescence with a microplate reader (Figure 9) (gain adjustment: emission: UV LEN and gain: 2794).
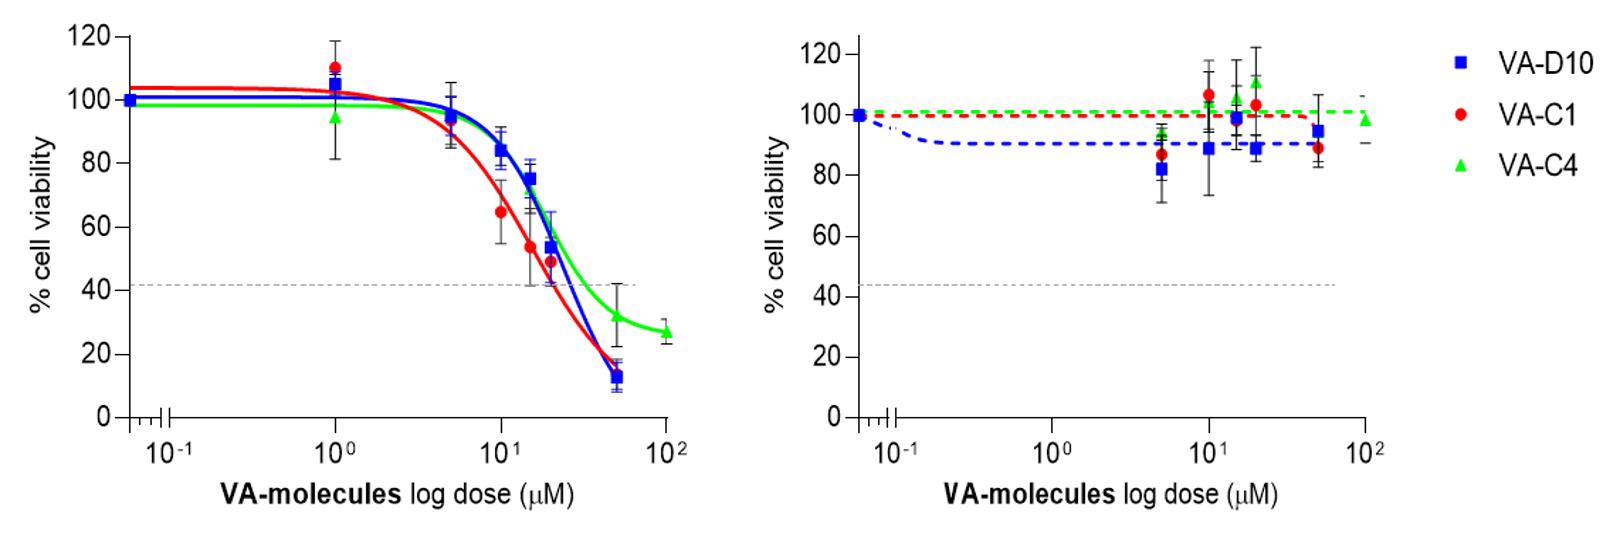
Figure 9. Effect of VDAC1-antagonist (VA) molecules on intrahepatic cholangiocarcinoma (iCCA) (left) and non-tumor (right) organoids. Cell viability was measured by luciferase assay after 72 h exposure to VA molecules at the indicated concentrations [6].
C4. Organoid differentiation (timing: 15 days)
Note: After about 7–10 days of culture, non-tumor organoids can be differentiated.
1. Remove the expansion medium from each well, being careful not to disturb the BME domes.
2. Wash with 500 μL per well of cold Cultrex organoid harvesting solution.
3. Collect organoid structures into a 1.5 mL centrifuge tube.
4. Incubate on ice for 30 min to allow BME to dissolve from the organoids. At this step, the pellet may appear sticky; pipette up and down to wash the BME.
5. Centrifuge at 200 RCF for 5 min at 4 °C.
6. Discard the supernatant.
7. Resuspend the pellet in 250–500 μL of cold DPBS and pipette up and down to disrupt organoid structures and remove all BME residues.
8. Centrifuge at 500 RCF for 5 min at 4 °C.
9. Discard the supernatant. If the pellet is still sticky, add another wash with DPBS. While splitting, be careful to remove all liquid to avoid diluting the BME by more than 50%.
10. Remove Cultrex Ultimatrix RGF BME from -80 °C and keep it on ice at 4 °C until it becomes liquid.
11. Resuspend the cell pellet in 40–50 μL per well of fresh BME and pipette up and down to evenly resuspend the cell pellet.
Critical: During this step, be careful to avoid introducing air bubbles.
12. Seed BME domes on a prewarmed 24-well suspension plate and carefully incubate in a 37 °C incubator for 30 min to 1 h to allow the domes to polymerize.
13. After polymerization, add 500 μL of expansion medium supplemented with 25 ng/mL BMP-7.
14. After 1 week, split the organoids as previously described in section C1 and replace the medium with differentiation medium (see Recipe 4).
15. Every 3 days, for approximately 8–13 days, gently remove differentiation medium from each well, being careful not to disturb the BME domes, and replace it with 500 μL of fresh prewarmed differentiation medium to each well (Figure 10).
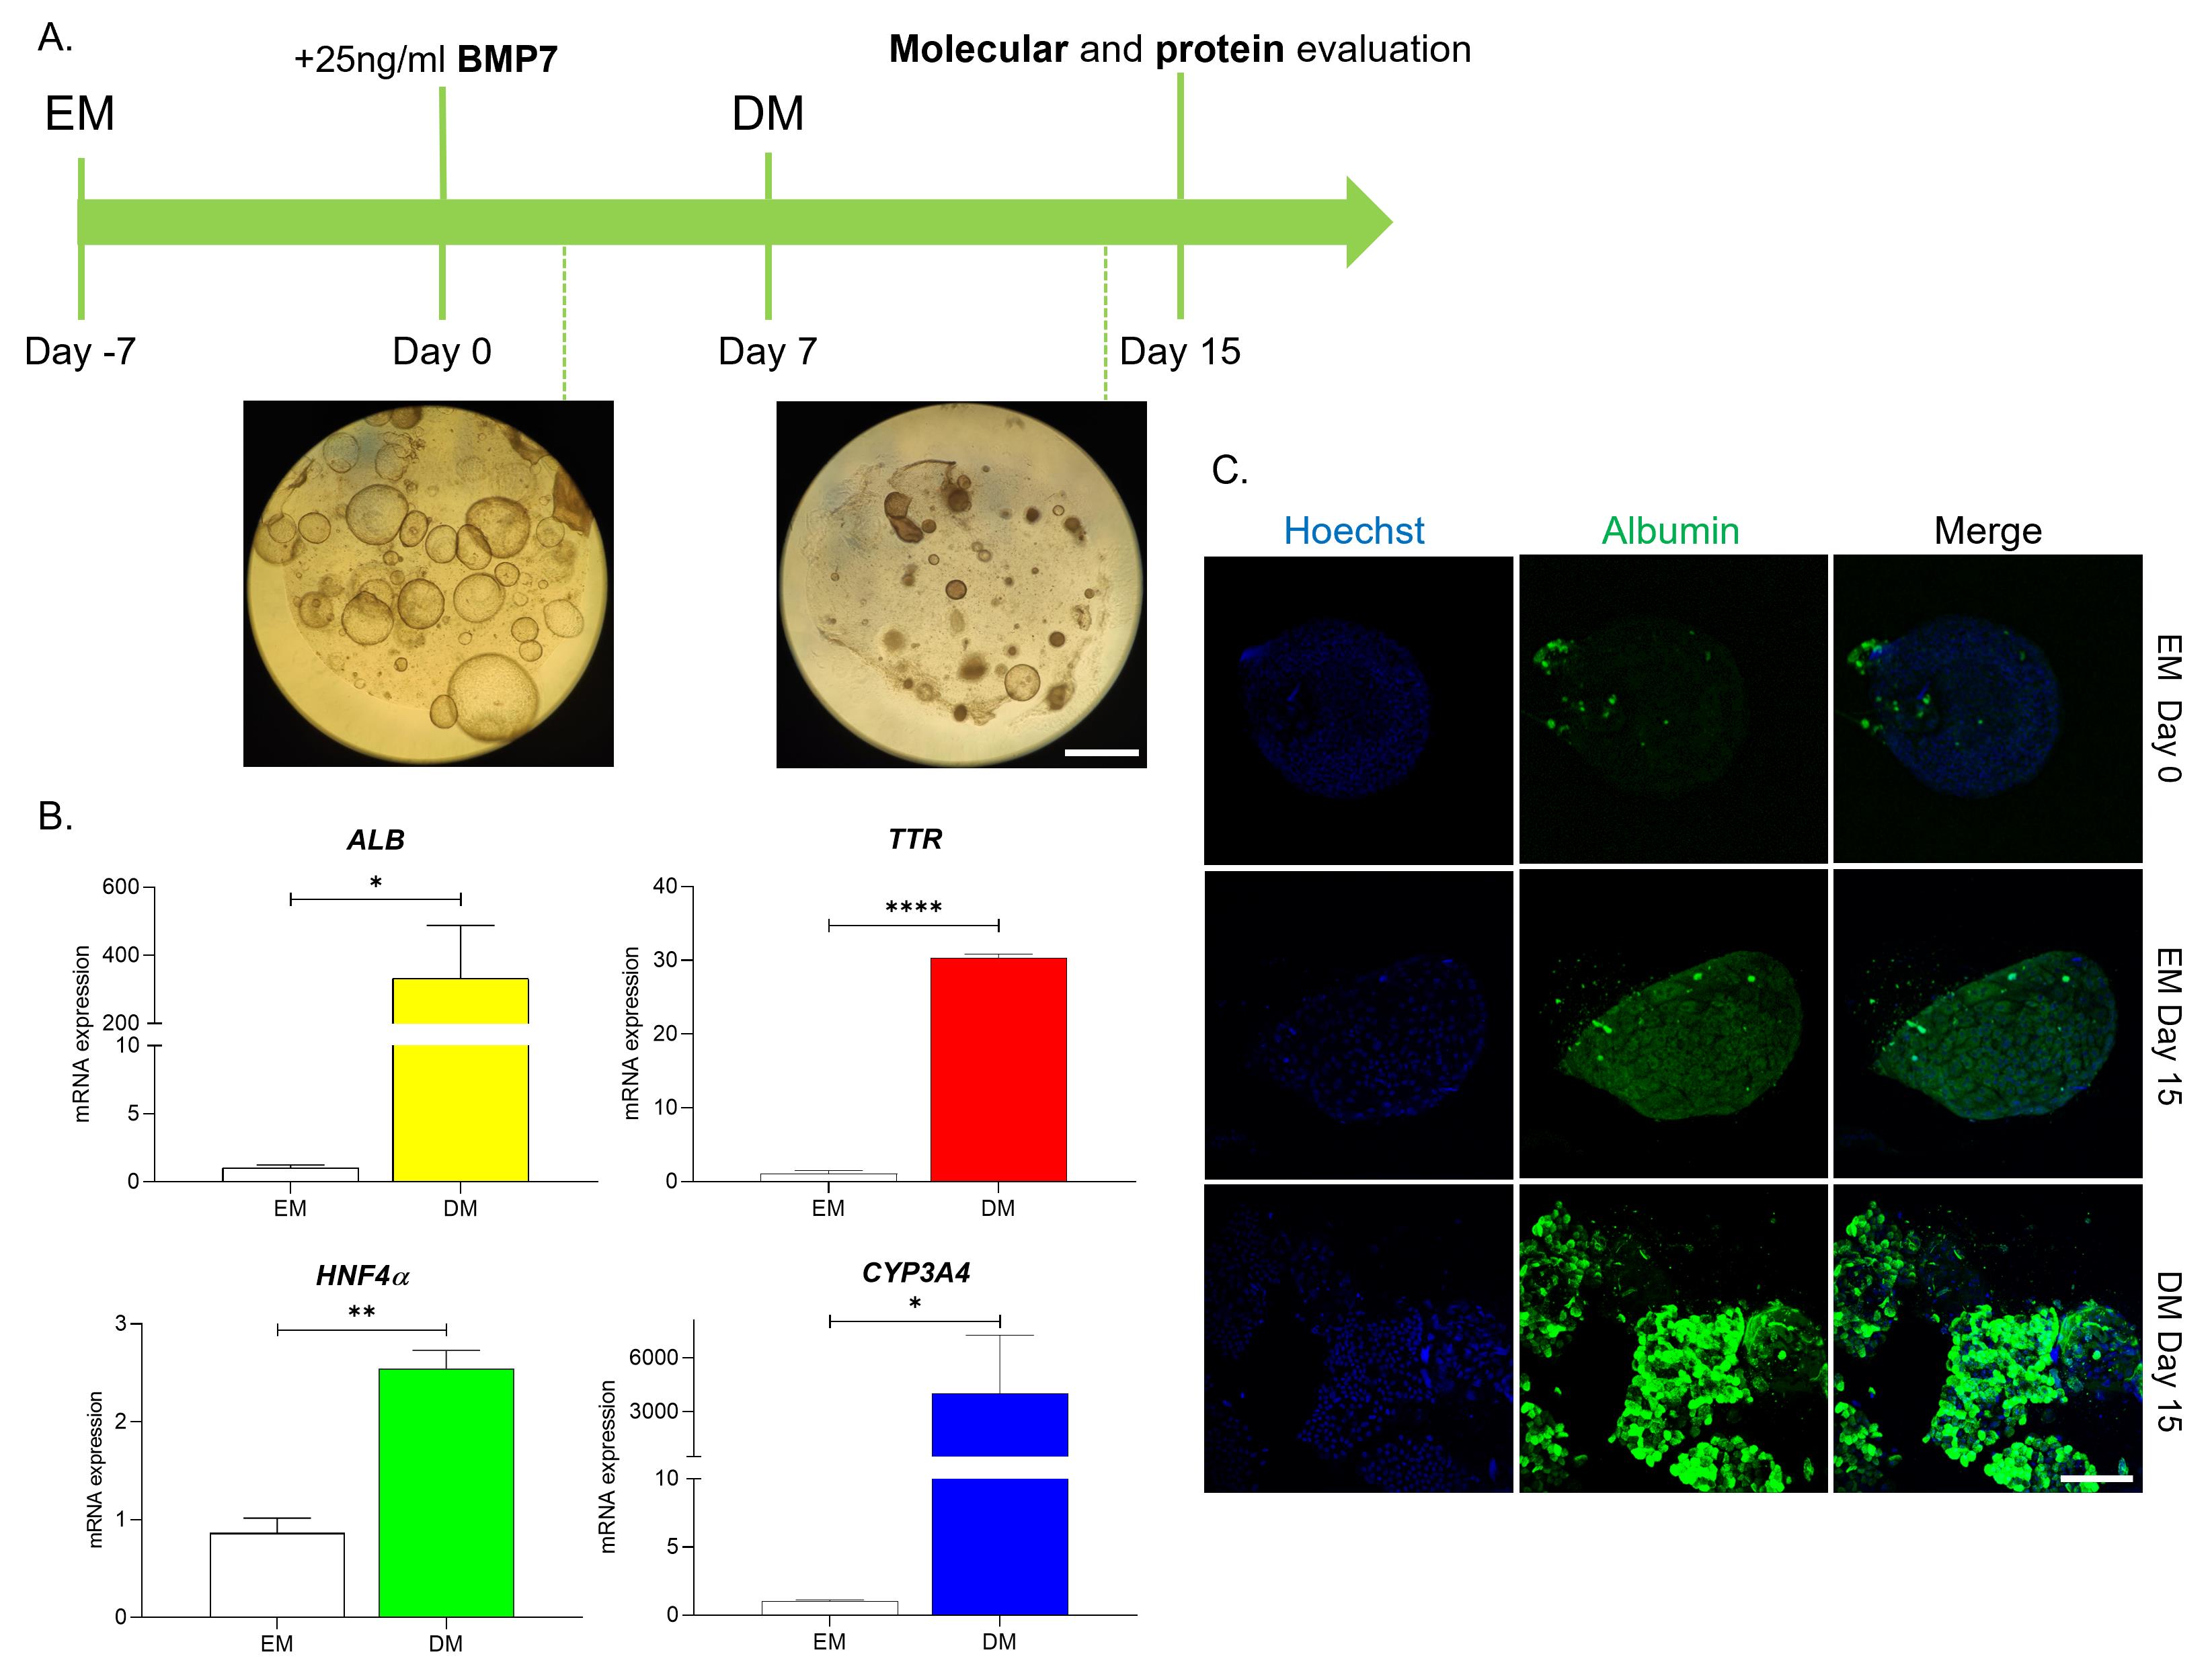
Figure 10. Differentiation of liver organoids. (A) Schematic representation of the liver organoid differentiation process and representative morphology brightfield images of liver organoids at expansion medium (EM) and differentiation medium (DM)-cultured maturation stages (T = 15 days). Scale bar: 200 μm. (B) mRNA expression (fold change) of different hepatocyte markers (ALB, TTR, HNF4α) and drug metabolism gene (CYP3A4), evaluated by quantitative PCR (qPCR) (n = 5 per condition, mean ± SEM; unpaired t-test, *p < 0.05, **p < 0.01, ***p < 0.001). (C) Representative images obtained by immunofluorescence and subsequently acquired by confocal microscopy of differentiated organoids in each differentiation stage, stained for albumin (green). Nuclei were counterstained with Hoechst 33342 (blue). Scale bar: 50 μm.
D. Organoid embedding (timing: 40 h)
Note: Before starting the embedding protocol, use sterile scissors to cut the 200 μL pipette tips.
1. Using cut tips, collect one well of liver organoids from a 24-well plate into a 1.5 mL centrifuge tube and remove the expansion medium.
2. Add 500 μL of cold DPBS and gently pipette up and down with cut tips to wash the Cultrex Ultimatrix RGF BME from the organoids.
3. Incubate on ice for 30 min to remove all BME residues.
4. Centrifuge at 200× g for 5 min at 4 °C.
5. Gently remove the supernatant.
Critical: Be careful not to remove too many of the floating organoid structures.
6. Wash another time with 500 μL of cold DPBS.
7. Centrifuge at 500× g for 5 min at 4 °C.
8. After removing DPBS, add 500 μL of 4% PFA and incubate for 40 min at 4 °C. After 20 min, pipette up and down with cut tips to make an even suspension of organoids in solution.
9. Remove the PFA solution.
Note: After this step, you can proceed with the sample embedding and then with hematoxylin & eosin or immunohistochemistry staining (sections E–F) or move directly to the organoid immunofluorescence protocol (section G).
Subsequently, proceed with the dehydration and embedding of the samples, as previously described [9]. In brief:
10. Wash pellet in 500 μL of DPBS.
11. Wash pellet in 500 μL of deionized H2O.
12. Add 500 μL of EtOH 70% for 20 min.
13. Remove the EtOH 70% solution.
14. Add 500 μL of EtOH 95% for 10 min.
15. Remove the EtOH 95% solution.
16. Add 500 μL of acetone for 5 min.
17. Remove acetone.
18. Embed in Paraplast X-TRA at 60 °C for 40 min.
19. Allow the sample to solidify at room temperature overnight.
20. Cut 5-μm thick sections using a microtome, collect them on silane-coated slides, and let them dry at room temperature.
E. Organoid hematoxylin & eosin staining (timing: 30 min)
1. Dip slides in xylene for 1 min.
2. Remove the xylene.
3. Dip the slides in absolute ethanol for 1 min.
4. Remove the absolute ethanol.
5. Dip the slides in 80% ethanol for 1 min.
6. Remove 80% ethanol.
7. Dip the slides in 70% ethanol for 30 s.
8. Remove 70% ethanol.
9. Dip the slides in hematoxylin solution for 2 min.
10. Remove the hematoxylin solution.
11. Rinse in tap water.
12. Dip the slides in eosin for 30 s.
13. Remove the eosin.
14. Rinse in deionized H2O.
15. Dip the slides in 70% ethanol for 30 s.
16. Remove 70% ethanol.
17. Dip the slides in 80% ethanol for 1 min.
18. Remove 80% ethanol.
19. Dip the slides in absolute ethanol for 1 min.
20. Remove the absolute ethanol.
21. Dip the slides in xylene for 1 min.
22. Remove the xylene.
23. Mount in Eukitt (Figure 11).

Figure 11. Organoids retain the primary features of the corresponding tissue. Representative brightfield images, hematoxylin and eosin (H&E) staining, immunofluorescence (IF), and immunohistochemistry (IHC) for the markers cytokeratin 7 (CK7) and cytokeratin 19 (CK19) on the primary tumor tissue and the corresponding organoid (passage P3). Upper row scale bars are the same as those in the lower row.
F. Organoid immunohistochemistry (timing: 2 days)
1. Dip the slides in xylene for 1 min.
2. Remove the xylene.
3. Dip the slides in absolute ethanol for 1 min.
4. Remove the absolute ethanol.
5. Dip the slides in 80% ethanol for 1 min.
6. Remove 80% ethanol.
7. Dip the slides in 70% ethanol for 30 s.
8. Remove 70% ethanol.
9. Wash in DPBS.
10. Incubate the slides in blocking solution (55% methanol, 3% hydrogen peroxide, and deionized H2O) for 10 min.
11. Wash in DPBS.
12. Incubate in serum for 15 min.
13. Remove serum.
14. Incubate with the primary antibody diluted in DPBS overnight.
15. Wash in DPBS.
16. Incubate with the secondary antibody diluted in DPBS for 30 min.
17. Wash in DPBS.
18. Incubate with avidin-biotin complex for 30 min.
19. Wash in DPBS.
20. Incubate with ImmPACT DAB for 1 min.
21. Wash in DPBS.
22. Dip the slides in hematoxylin solution for 2 min.
23. Remove the hematoxylin solution.
24. Rinse in tap water.
25. Rinse in deionized H2O.
26. Dip the slides in 70% ethanol for 30 s.
27. Remove 70% ethanol.
28. Dip the slides in 80% ethanol for 1 min.
29. Remove 80% ethanol.
30. Dip the slides in absolute ethanol for 1 min.
31. Remove the absolute ethanol.
32. Dip the slides in xylene for 1 min.
33. Remove the xylene.
34. Mount in Eukitt.
Note: To assess the preservation of tissue-specific features, immunohistochemistry was performed not only on the organoid cultures but also on the corresponding parental tissue from which the organoids originated, processed as previously reported [10] (Figure 11).
G. Organoid immunofluorescence (timing: 2 days)
Note: Before starting the immunofluorescence protocol, use sterile scissors to cut the bottom of the 200 μL pipette tips to have a wider bore and prevent the breakage of organoids.
1. Using cut tips, collect one well of liver organoids from a 24-well plate into a 1.5 mL centrifuge tube.
2. After organoids naturally deposit on the bottom of the tube, remove the expansion medium.
3. Add 500 μL of cold DPBS and gently pipette up and down with cut tips to wash the Cultrex Ultimatrix RGF BME from the organoids.
4. Incubate on ice for 30 min to remove all BME residues.
5. Centrifuge at 200 RCF for 5 min at 4 °C.
6. Gently remove the supernatant.
Critical: Be careful not to remove too many of the floating organoid structures. Organoids are visible and appear like small white spheres.
7. Wash another time with 500 μL of cold DPBS.
8. Centrifuge at 500 RCF for 5 min at 4 °C.
9. After removing DPBS, add 500 μL of 4% PFA and incubate for 40 min at 4 °C. After 20 min, pipette up and down with wide-bore tips to make an even suspension of organoids in solution.
10. After the fixation step, organoid pellets naturally deposit on the bottom of the centrifuge tube. If not, centrifuge at 200 RCF for 5 min at RT.
11. Remove the PFA solution.
12. Wash the pellet in 250 μL of DPBS and centrifuge at 200 RCF for 5 min at RT.
Note: If necessary, the staining protocol can be paused here and proceeded within a week after the fixation step.
13. Prepare the permeabilization solution (0.1% Tween 20 + DPBS): For 10 mL, add 10 μL of Tween 20 and 10 mL of DPBS.
14. Add 500 μL of permeabilization solution per tube and incubate for 10 min at 4 °C.
Note: Organoids naturally deposit on the bottom of the centrifuge tube. If not, spin down at 200 RCF for 5 min at RT and remove the supernatant.
15. Prepare blocking solution (0.1% TritonX-100 + DPBS + 2% BSA): For 10 mL, add 10 μL of TritonX-100, 0.2 g of BSA, and 10 mL of DPBS.
16. Add 500 μL per tube of blocking solution and incubate for 30 min at RT.
Note: Organoids naturally deposit on the bottom of the centrifuge tube. If not, spin at 200 RCF for 5 min at RT and remove the supernatant.
17. Prepare the primary antibody mixture: In 250 μL of blocking solution, add diluted primary antibody.
18. Add the primary antibody mixture, gently resuspend organoids with wide-bore tips, and place the centrifuge tube on a shaker overnight at 4 °C.
19. Remove the supernatant and perform two washes in 500 μL of 0.1% TritonX-100 + DPBS solution, spinning down and removing wash buffer each time.
20. Prepare the secondary antibody mixture: In 250 μL of 0.1% TritonX-100 + DPBS solution + 0.5% BSA, add a 1:500 dilution of appropriate secondary antibody.
21. Add 500 μL of secondary antibody mixture to the tube with organoids and leave for 1 h at RT in a dark room.
22. Remove supernatant and perform two washes in 500 μL of 0.1% TritonX-100 + DPBS solution, spinning down and removing the wash buffer each time.
23. Add 250 μL of 1:5,000 Hoechst 33342 for 20 min in a dark room.
24. Remove Hoechst solution and resuspend in 30 μL of DPBS.
25. Using wide-bore tips, recover organoids and carefully transfer them onto a glass slide.
26. Remove the excess DPBS on the slide with a 10 μL pipette.
27. Add 10 μL of SlowFadeTM diamond antifade mountant.
28. Cover with the coverslip, avoiding air bubbles (Figure 12).
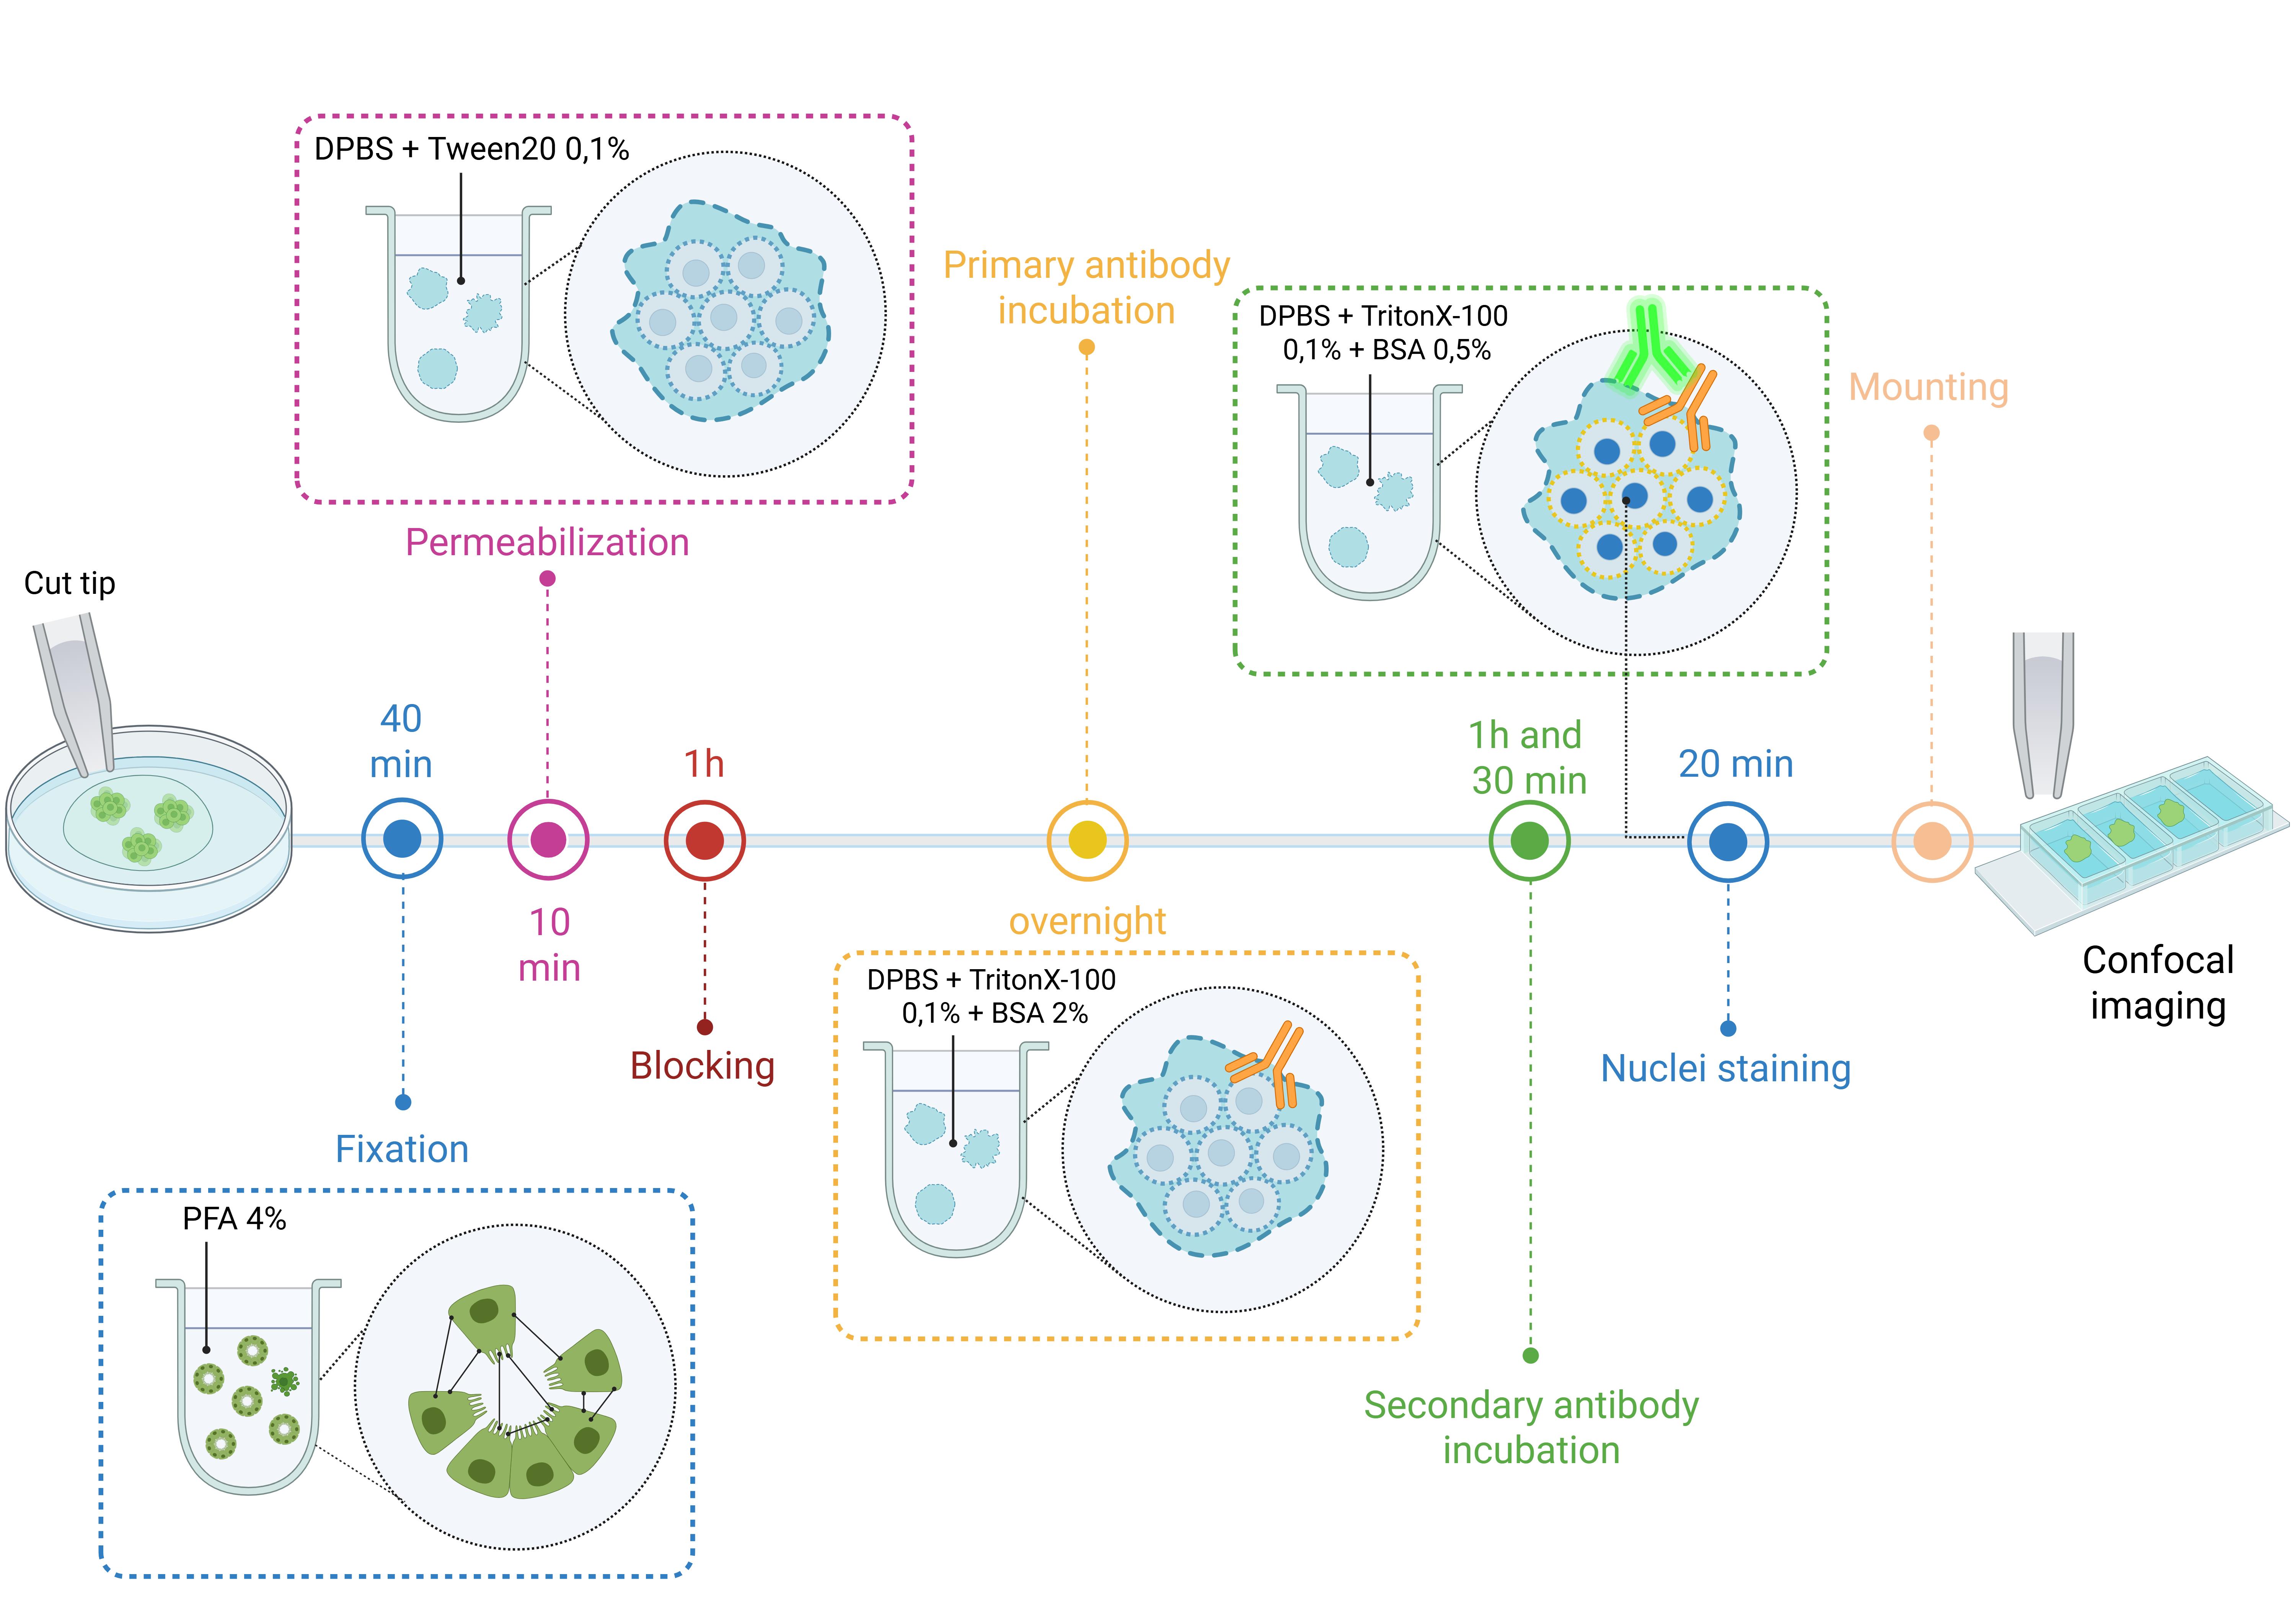
Figure 12. A schematic overview of the immunofluorescence protocol
H. Imaging acquisition and analysis (timing: 1–2 h)
Note: Organoids were visualized using a confocal microscope.
1. To acquire images with a confocal microscope (SP5), first switch on the lasers: 405 diode, argon, and HeNe 633 (Table 2). Change objectives using the software (25× water).
Table 2. Different lasers, emission wavelengths, and fluorophores available with the confocal microscope (SP5)
| Laser | Lines (nm) | Color of fluorophores | Example of fluorophores |
|---|---|---|---|
| 405 Diode | 405 | Deep blue | DAPI, Hoechst |
| Argon | 458, 476, 488, 496, 514 | Green (cyan and yellow) | GFP, Alexa 488, FITC |
| HeNe 594 | 594 | Red | Alexa 594, Texas Red |
| HeNe 633 | 633 | Far-red | Alexa 633, Cy5 |
2. Use the precise control switches for XY positioning and focus adjustment.
3. For 3D acquisition, select the modality “xyz” and press the “seq” button to open the sequential scan box.
4. Select the format 1,024 × 1,024 pixels and bidirectional X.
5. Adjust the line averaging number (value 1).
6. Set up the sequential scanning by clicking “+” to generate how many channels you want acquire.
7. Adjust the right windows of the emission wavelengths for each channel: for DAPI, 430–500 nm, for FITC, 500–535 nm, and for Cy5, 670 nm.
8. To Z-stack acquisition, click live and adjust z-position, gain, and offset for each channel.
9. Specify the top and the bottom of the stacks, moving to one side of the sample and clicking, and then moving to the other side and clicking.
10. Enter the z-step size (1 μm).
11. Click Start and start the acquisition.
12. To perform image analysis, use the Fiji (ImageJ) application (Figure 13).
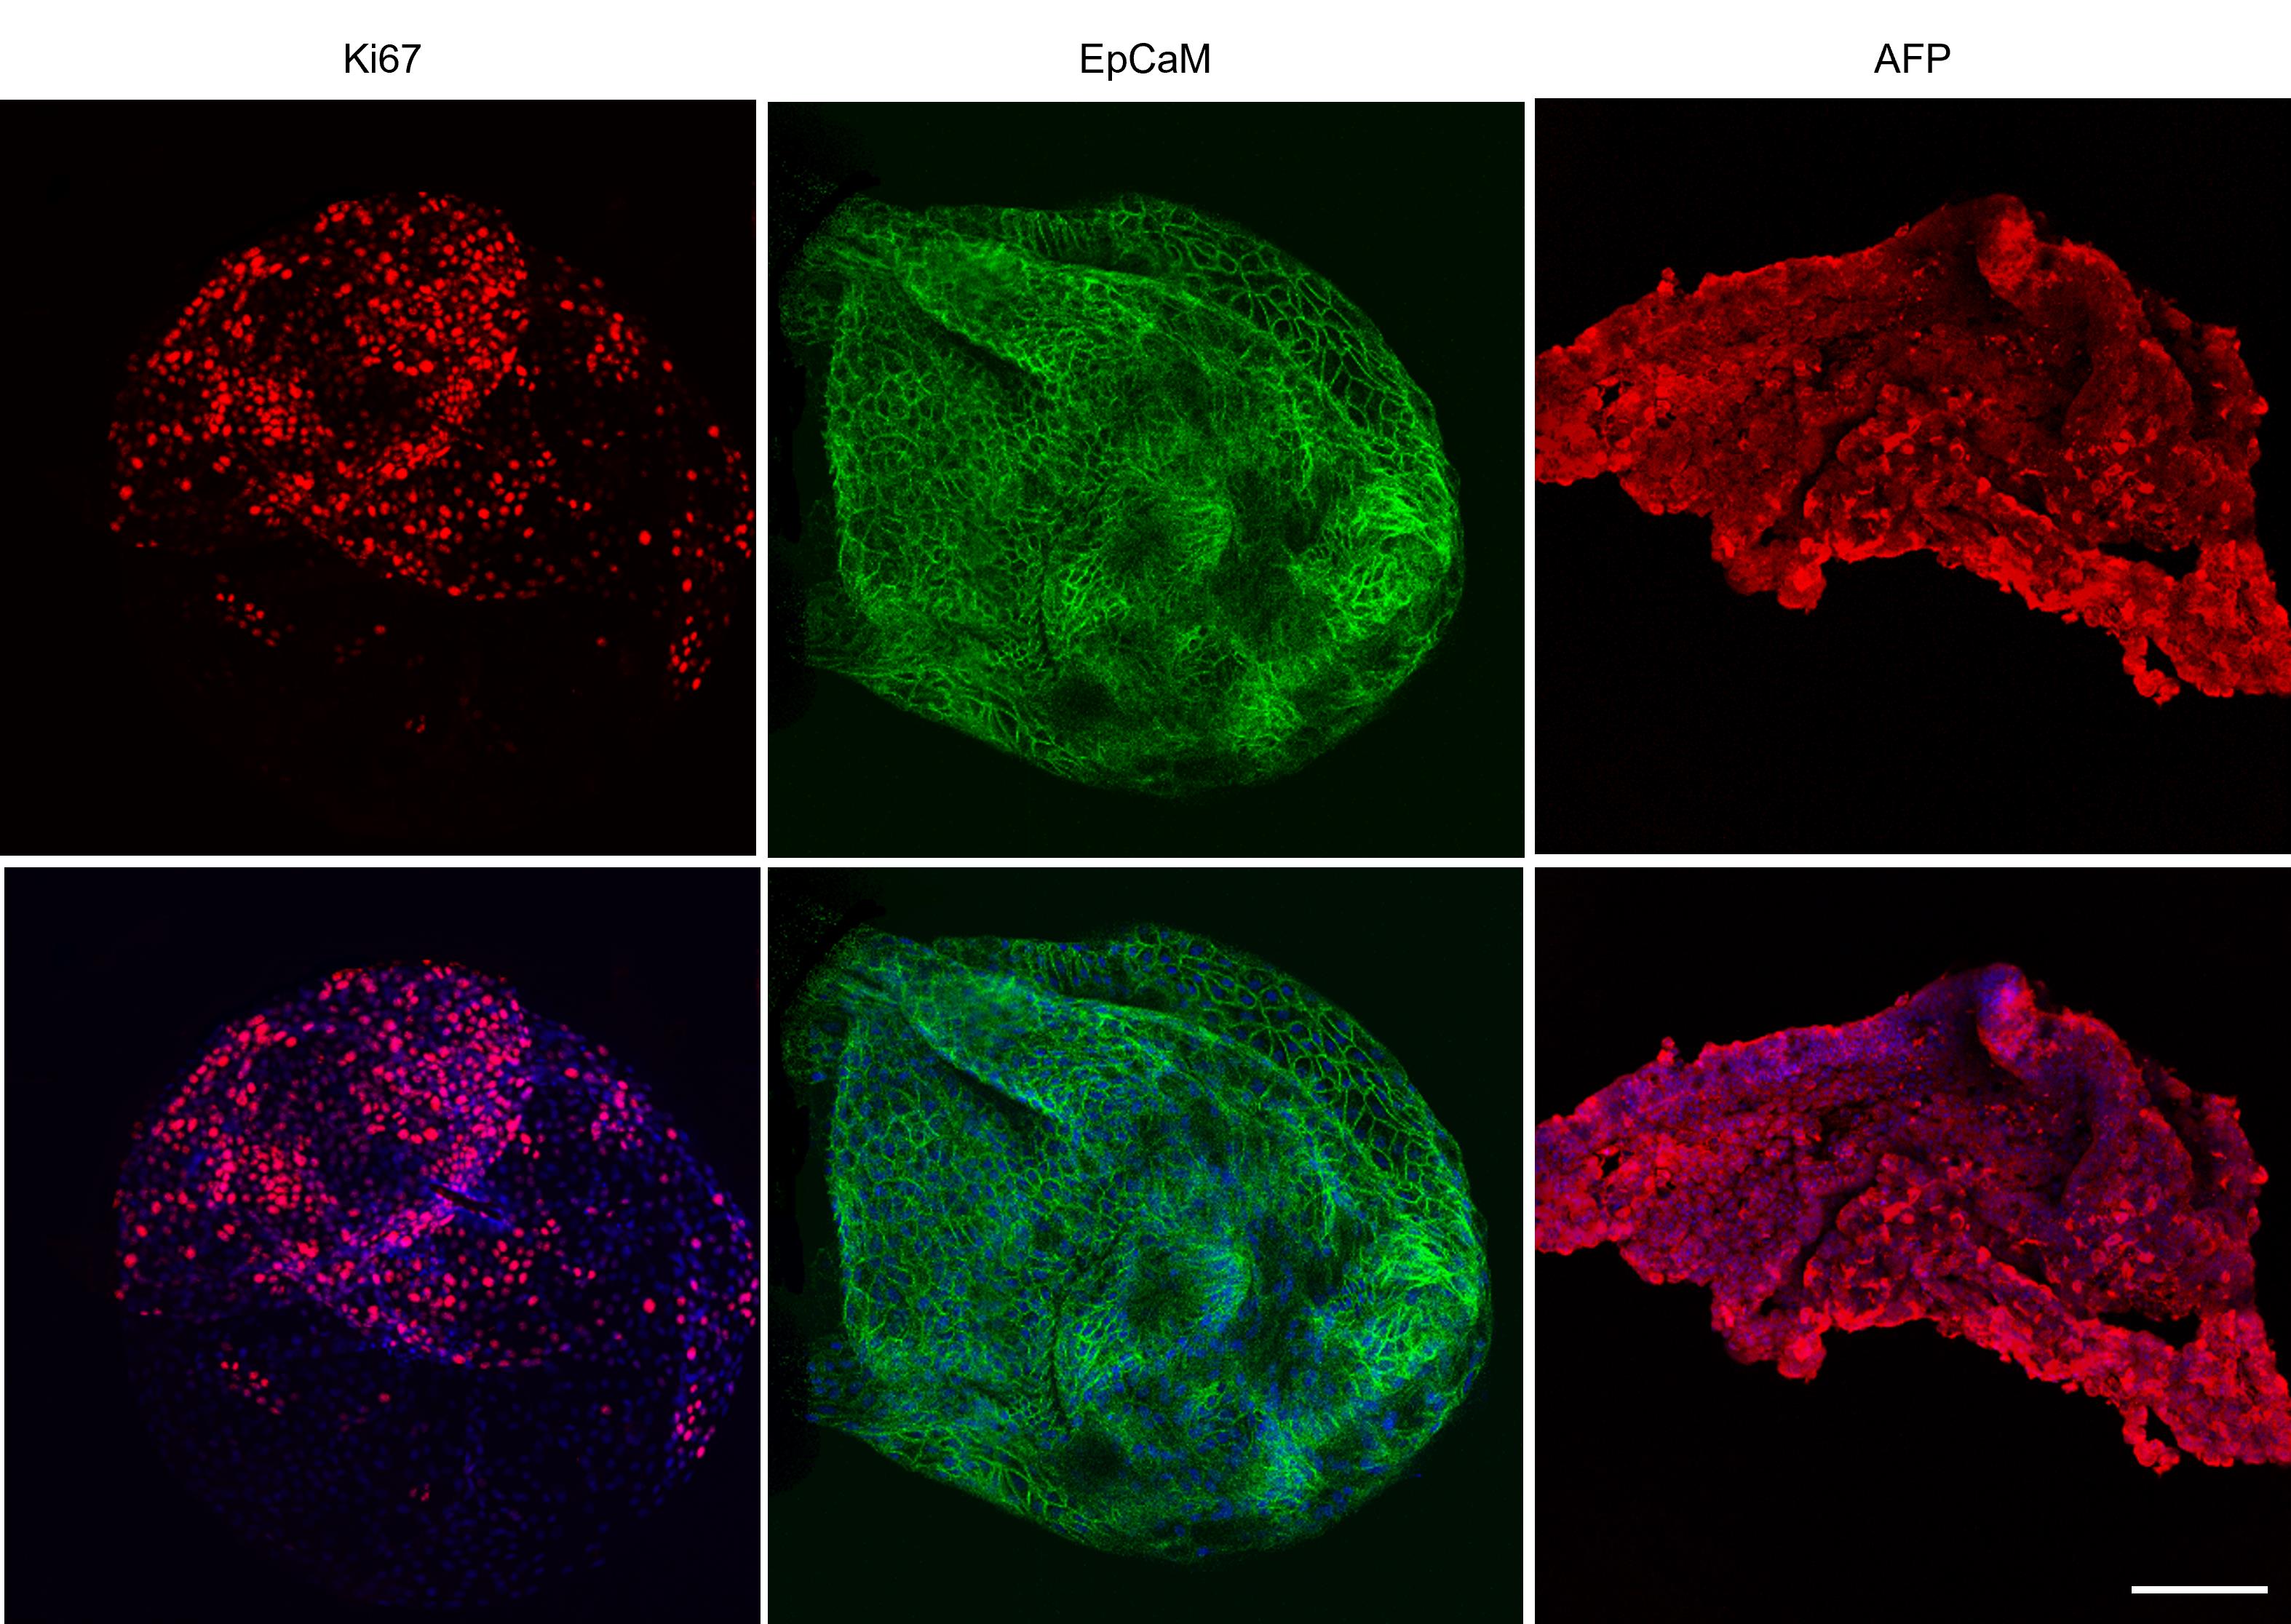
Figure 13. Immunofluorescence images of tumor organoids. Representative confocal images of organoids stained Ki67 (red), epithelial cell adhesion molecule (EpCaM, green), and Alpha-Feto protein (AFP, red) markers. Nuclei were counterstained with Hoechst 33342 (blue). Scale bar: 50 μm. Images were acquired with a SP5 confocal microscope (Leica).
I. Modeling hepatic lipid accumulation in normal liver organoids using oleic acid (timing: 2 h)
Note: To model hepatic lipid accumulation under controlled in vitro conditions, normal liver organoids were treated with oleic acid, inducing steatosis-like lipid deposition and providing a physiologically relevant system to study hepatocyte lipid metabolism and storage. While this model has not been extensively characterized for all hallmarks of NAFLD, it allows controlled experimental manipulation of lipid levels in organoids and can be combined with lipid staining or quantitative assays to assess lipid accumulation.
1. Using wide-bore tips, collect one well of liver organoids from a 24-well plate into a 1.5 mL centrifuge tube.
2. After organoids naturally deposit on the bottom of the tube, remove expansion medium.
3. Add 500 μL of cold DPBS and gently pipette up and down with cut tips to wash the Cultrex Ultimatrix RGF BME from the organoids.
4. Incubate on ice for 30 min to remove all BME residues.
5. Centrifuge at 200 RCF for 5 min at 4 °C.
6. Gently remove the supernatant.
Critical: Be careful not to remove too many of the floating organoid structures. Organoids are visible and appear like small white spheres.
7. Wash another time with 500 μL of cold DPBS.
8. Centrifuge at 500 RCF for 5 min at 4 °C.
9. After removing DPBS, resuspend in 250 μL of Opti-MEM medium (see Recipe 5).
10. Add 10% of BME (25 μL) to the tube.
11. With a cut tip, seed the broken structures on a 48-well suspension plate. In each well, add the treatment with 5 mM sodium oleate at the desired final concentration or with the CTRL- solution, which is used for normalization.
Notes:
1. Oleic acid (OA) is very insoluble in cell culture medium and will form crystal and fat droplets; for this reason, it was first prepared different sodium oleate solutions (see Recipe 6).
2. The use of fatty acid–free BSA is intended to minimize potential confounding effects from endogenous fatty acids present in BSA and to limit background lipid variability.
12. After 72 h, transfer the well content into a 1.5 mL centrifuge tube.
Note: The 72-h treatment allows sufficient lipid accumulation and provides a practical and reproducible time point for analysis (Figure 14).
13. Centrifuge at 500 RCF for 5 min at RT.
14. Remove the supernatant.
15. Add 500 μL of 4% PFA to the pellet and incubate for 15 min.
16. After fixation, organoids naturally form a pellet at the bottom of the centrifuge tube. If not, centrifuge at 200 RCF for 5 min at RT.
17. Remove the PFA solution.
18. Wash pellet in 250 μL of DPBS and centrifuge at 500 RCF for 5 min at RT.
19. Remove the supernatant.
20. Resuspend in 300 μL of Opti-MEM medium and add 0.3 μL of 7.6 mM BODIPY solution (1:1,000) and 0.3 μL of Hoechst 33342 (1:1,000).
Note: BODIPY solution is used to stain neutral lipids.
21. Incubate at 37 °C for 30 min to 1 h.
22. After incubation, organoids naturally form a pellet at the bottom of the centrifuge tube. If not, centrifuge at 200 RCF for 5 min at RT.
23. Remove the supernatant and resuspend in 250 μL of DPBS.
24. Using wide-bore tips, move the organoid structures to an 8-well Ibidi chamber.
25. Image using a confocal microscope (Figure 14).
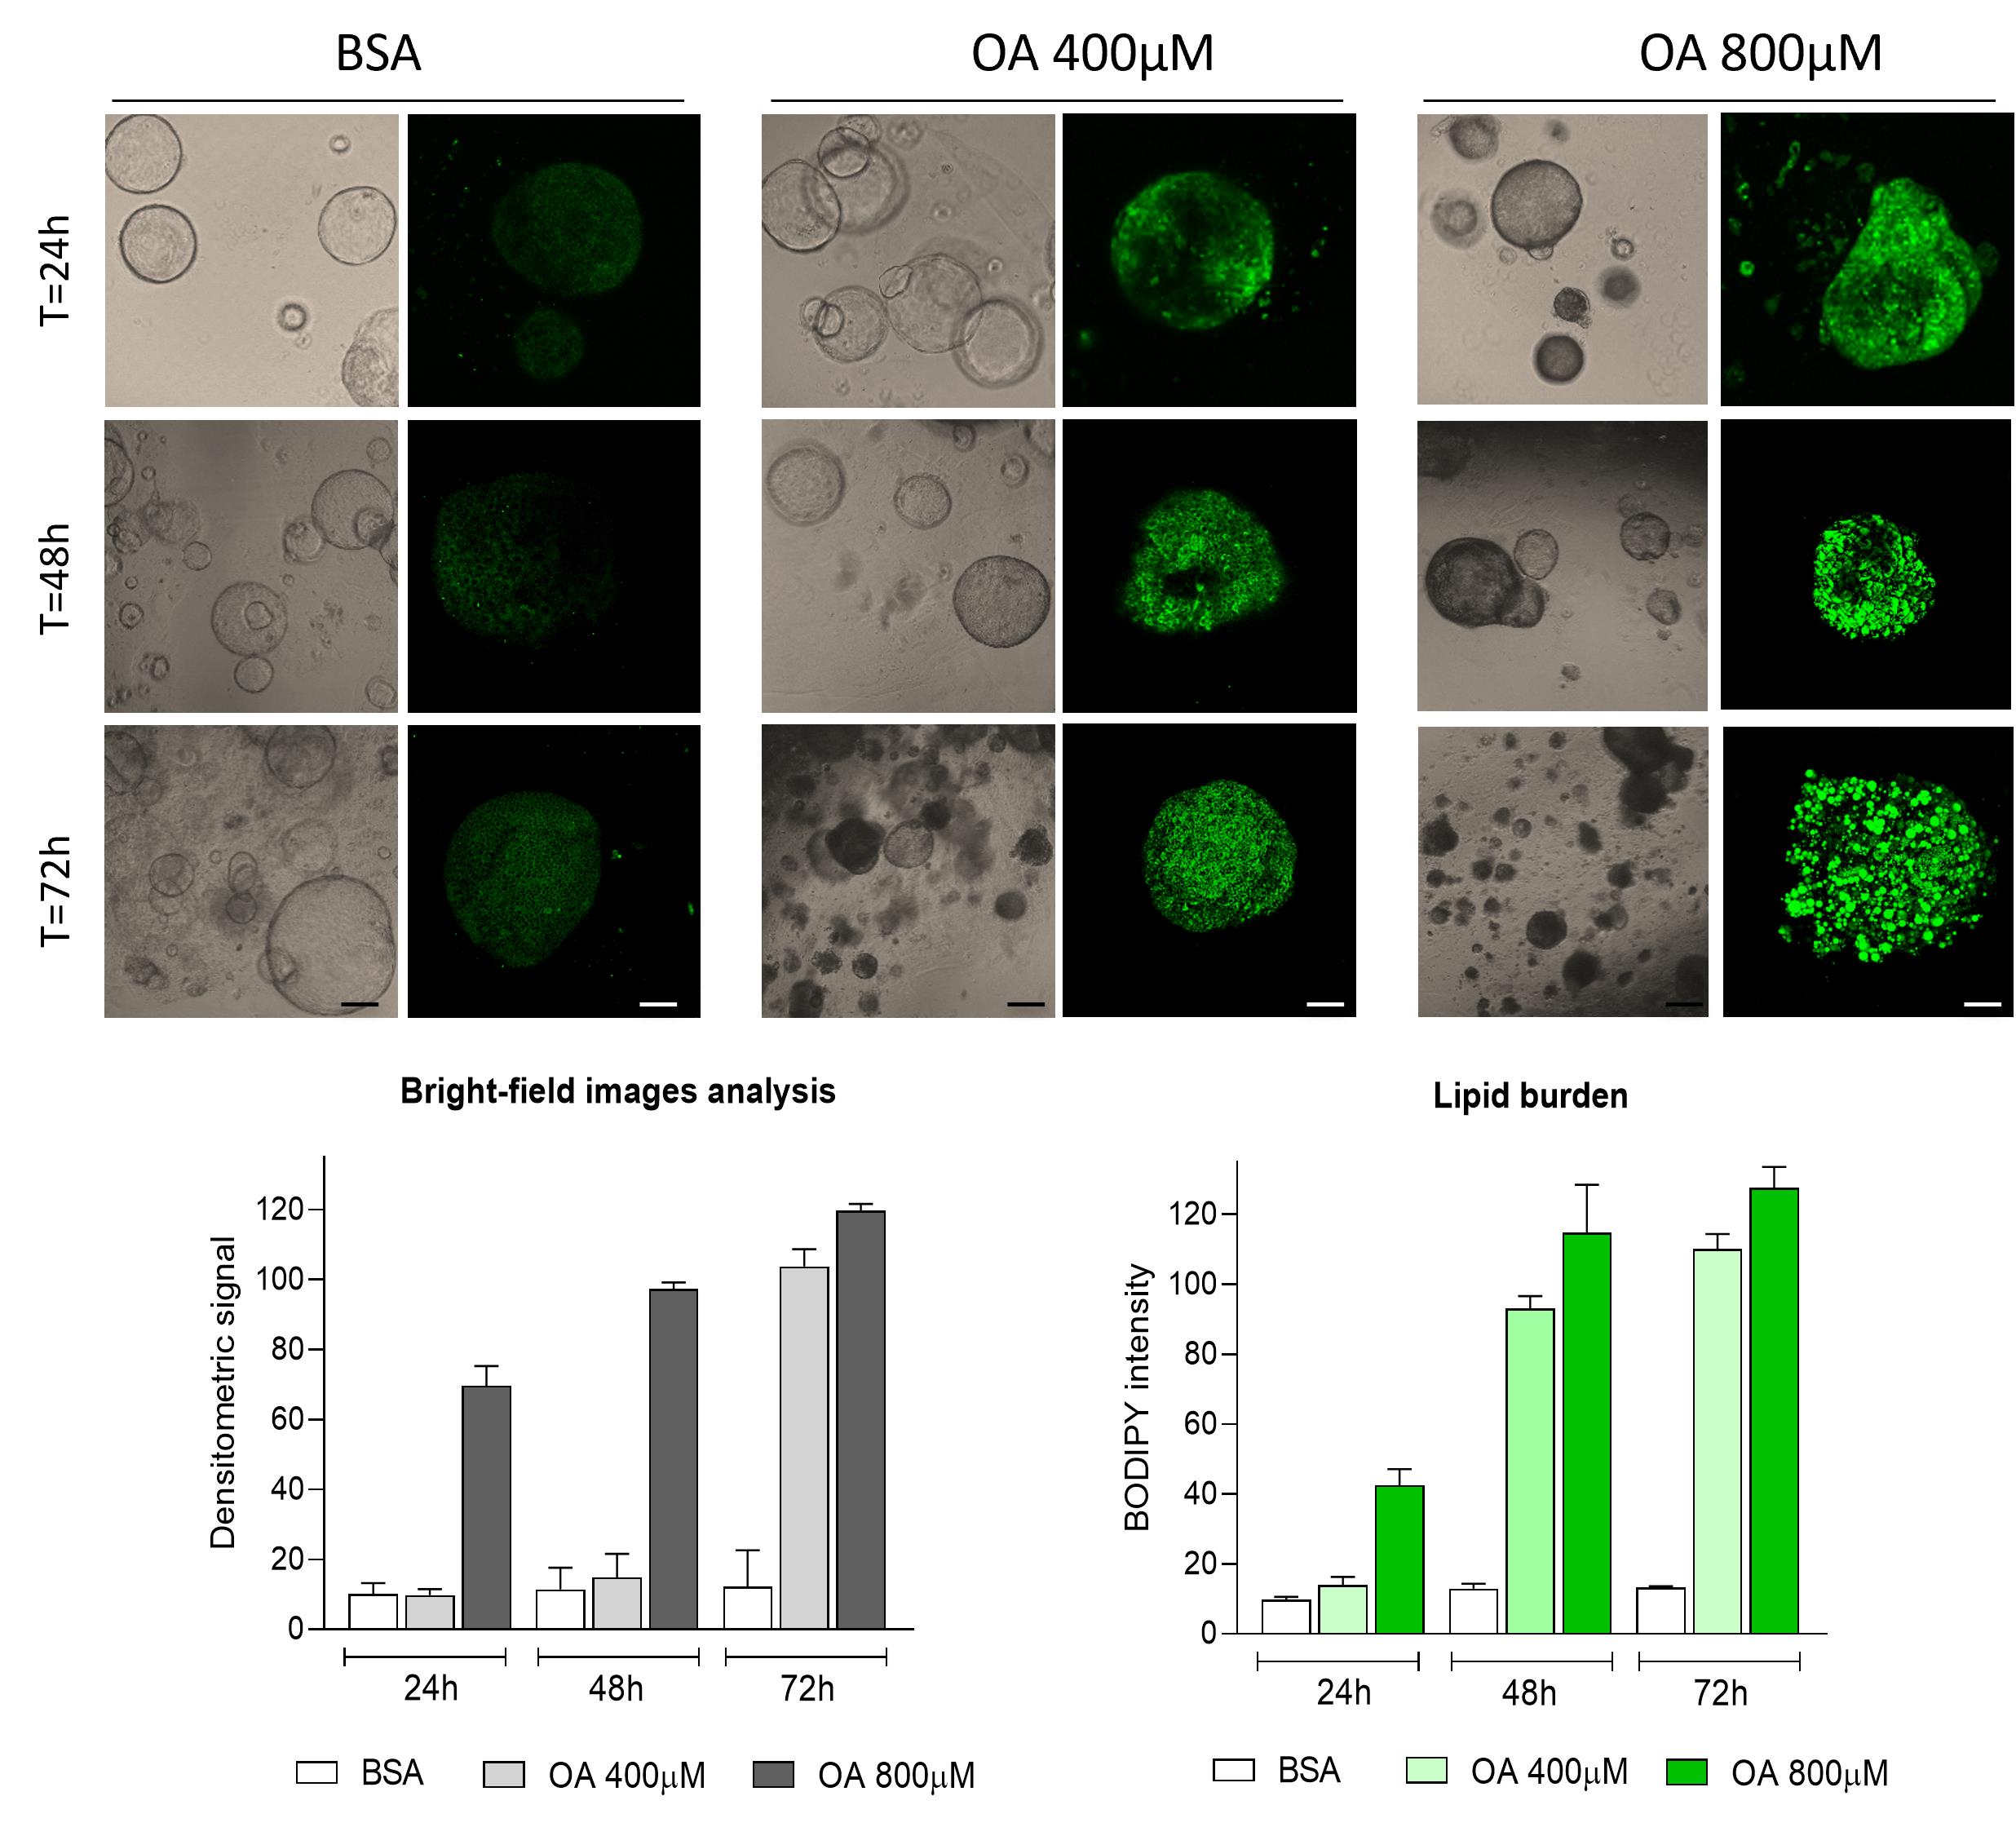
Figure 14. Oleic acid treatment. On top, representative brightfield and confocal images of liver organoids stained with BODIPY (green) after treatment with oleic acid (OA) at the indicated concentrations. Scale bars: 200 μm (brightfield); 25 μm (IF). On the bottom, densitometric analysis was quantified from brightfield images using ImageJ/Fiji by measuring the integrated density of defined regions of interest and subtracting background values (gray graph). Lipid accumulation was assessed by BODIPY staining, and fluorescence signals were quantified in ImageJ/Fiji as background-subtracted normalized integrated density, expressed as arbitrary units (green graph). Data are shown as mean ± SEM, n = 5 per condition.
Validation of protocol
This protocol has been used and validated in the following research article:
Conti Nibali et al. [6]. VDAC1-interacting molecules promote cell death in cancer organoids through mitochondrial-dependent metabolic interference. IScience (Figure 8 and Supplemental figures 4–5)
Cavalloro et al. [8]. From lichen to organoids: Usnic acid enantiomers show promise against Cholangiocarcinoma via MNK2 targeting and MAPK pathway modulation. Biomed Pharmacother (Figure 6).
General notes and troubleshooting
General notes
This protocol successfully established primary liver organoids with a variable success rate from tumor resections (76% for iCCA and 28% for HCC) and 91% from normal liver tissue. These organoids can be expanded, biobanked, and used for drug testing [4]. A notable observation is the wide range of growth rates among different organoids [11]. Initially, organoids appear as small, rounded, or folded structures, and it typically takes 3–7 days after seeding for the cultures to be ready for their first passage. The timing of the first passage depends on the growth pattern and size of the organoid structures. While there are generally no limitations on the expansion potential of successfully cultured tumor organoids, it is advisable to limit passages to avoid genomic and phenotypic drift in culture. When treated with drugs of interest, visible changes in tumor organoids compared to vehicle controls can be observed within 72 h of incubation. Organoid viability measurements can then be used to generate dose–response curves and calculate the half-maximal effective concentration (EC50) to assess treatment sensitivity.
Although this protocol is well defined and generally leads to successful experiments, important biological limitations affecting its efficiency should be considered before its application. In particular, while all iCCA patient–derived samples supported organoid establishment and long-term in vitro expansion, HCC-derived samples showed a markedly lower success rate, with an overall efficiency of approximately 28%, consistent with previous reports [12]. This reduced efficiency is likely due to intrinsic features of hepatocytes, which lack key epithelial stem cell properties required for efficient organoid initiation and propagation [5]. In addition, organoid formation strongly depends on tumor differentiation and stage: poorly differentiated primary liver tumors (Edmondson grade III–IV) have a higher likelihood of successful organoid development, whereas well-differentiated tumors (grade I–II) are more difficult to establish [3]. In addition, the differential histopathological diagnosis between HCC and iCCA is not always well defined at early stages, and the differences are not always easily identifiable.
The proliferative index of the cells also plays a crucial role in the development of organoid cultures. As previously described, it is necessary for the starting tissue to have at least 5% of cells in active proliferation to successfully propagate an organoid culture [13].
In addition, a substantial number of organoids are required to enable drug screening at low- to medium-throughput scales. The expansion phase that follows the initial establishment of cultures from primary tissue can extend over several weeks, or even months, depending on the organoid model [14]. Consequently, drug testing may not be feasible until long after culture initiation. Notably, all drug-screening assays should be conducted on early-passage organoids, as prolonged culture may promote the selection or enrichment of specific tumor subclones, the impact of which remains uncertain.
Finally, we described the use of PLC patient-derived organoids to test drug efficacy within a 72 h (3 day) time frame. However, treatment schedules and procedures may need to be adjusted based on factors such as the stability of the being tested and the growth rate of the cultures, which may necessitate medium refreshing.
If extended treatment durations are required, adjustments such as medium refreshing, organoid passaging, and the re-addition of small molecules must be taken into consideration.
Troubleshooting
Problem 1: BME aliquots rapidly solidify.
Possible cause: BME begins to polymerize when exposed to temperatures above 4 °C or when handled slowly at room temperature.
Potential solution: It is preferable to keep thawed BME aliquots at 4 °C and use them only after the supernatant has been removed and the pellet is resuspended. It is possible to use cold tips when resuspending the cell pellet in BME. In addition, to facilitate resuspension, it is preferable to use 1.5 mL centrifuge tubes with a conical bottom, so that the cells are more easily and readily visible and more clustered.
Problem 2: Large amount of BME is present after washing steps.
Possible cause: Incomplete removal of BME during centrifugation or insufficient pipetting may leave residual matrix attached to the cell pellet.
Potential solution: Add intermediate washing steps using cold DPBS and gently pipette.
Problem 3: Significant differences in the cell viability values between technical replicates.
Possible causes: This may be due to either a non-homogeneous dispensing of the organoids or an inadequate number of plated organoids per well.
Potential solutions: To address these issues, increase the number of organoids per well. We also advise repeating the growth curve experiment to determine the optimal organoid seeding density if the organoid cultures exhibit a change in growth speed during the expansion phase. Additionally, ensure a homogeneous population of organoids is present at the time of harvesting to prevent uneven dispensing of the organoids upon plating.
Problem 4: Loss of three-dimensionality after the immunofluorescence protocol.
Possible causes: Organoids can lose their spherical morphology if they are exposed to mechanical stress or compression from coverslips; hardening of the mounting medium can also flatten organoids and reduce their three-dimensionality.
Potential solutions: To avoid breaking the structures after the fixation step in PFA 4%, you can use a 200 μL pipette with wide-bore tips, avoiding excessive and vigorous pipetting, use Ibidi-slides that do not require the use of coverslips, which prevent crushing of the structures, or use slow fade non-polymerizing mountants.
Problem 5: Clustering organoid structures during the incubation step with the primary antibody.
Possible cause: Large organoid structures tend to settle, aggregate, or adhere to each other during prolonged incubation, especially in small volumes.
Potential solution: It is advisable to visually monitor the steps and stain fewer structures per tube. Be careful not to aspirate the small number of structures, as they may adhere to the pipette tip or be accidentally discarded during washing steps.
Problem 6: Loss of organoids during wash steps.
Possible cause: Organoids may settle or adhere to the tube, making them easy to accidentally aspirate during washes.
Potential solution: Visually monitor the wash steps and pipette carefully to avoid aspirating the organoids, which often appear as large white spheres.
Acknowledgments
We are grateful to L. Iamele and H. de Jonge, University of Pavia, Italy, for providing human HGF/SF [7].
The authors gratefully acknowledge Centro Grandi Strumenti and the Microscope Facility (University of Pavia) for their support and assistance in this work.
The following figures were created using BioRender: Graphical overview, BioRender.com/33g8jx0; Figure 5,BioRender.com/1nb8t15; Figure 12, BioRender.com/wn7xpac.
This work was supported by Immuno-HUB T4-CN-02-year 2021-Italian Ministry of Health; PRIN 2022SZT583_001-Italian Ministry of University and Research, and RC-2024-n.000489-Italian Ministry of Health.
Conceptualization, T.C., D.S.S.; Methodology, investigation, and validation, D.S.S., M.S., O.B., M.M.U., M.D.N., S.C., F.B., D.L.F., M.M., C.S., L.M., C.S.; Writing—original draft, D.S.S., M.S., O.B., T.C.; Writing—review and editing, all authors; Supervision, T.C.
The protocol described here was based on the previous original research paper: Conti Nibali, S., De Siervi, S. at al. [6]. VDAC1-interacting molecules promote cell death in cancer organoids through mitochondrial-dependent metabolic interference. IScience 2024, doi: 10.1016/j.isci.2024.109853.
Competing interests
The authors declare that they have no competing interests.
Ethical considerations
The study was conducted in accordance with the Declaration of Helsinki (2013) and the Declaration of Istanbul (2018) and was approved by the Ethics Committee of the Fondazione IRCCS Policlinico San Matteo, Pavia (Prot. 20200020546, Prot. 0008508/24, and NCT06899854).
References
- Kondili, L. A., Lazarus, J. V., Jepsen, P., Murray, F., Schattenberg, J. M., Korenjak, M., Craxì, L. and Buti, M. (2024). Inequities in primary liver cancer in Europe: The state of play. J Hepatol. 80(4): 645–660. https://doi.org/10.1016/j.jhep.2023.12.031
- Giron-Michel, J., Padelli, M., Oberlin, E., Guenou, H. and Duclos-Vallée, J. C. (2025). State-of-the-Art Liver Cancer Organoids: Modeling Cancer Stem Cell Heterogeneity for Personalized Treatment. BioDrugs. 39(2): 237–260. https://doi.org/10.1007/s40259-024-00702-0
- Nuciforo, S. and Heim, M. H. (2021). Organoids to model liver disease. JHEP Reports. 3(1): 100198. https://doi.org/10.1016/j.jhepr.2020.100198
- De Siervi, S. and Turato, C. (2023). Liver Organoids as an In Vitro Model to Study Primary Liver Cancer. Int J Mol Sci. 24(5): 4529. https://doi.org/10.3390/ijms24054529
- Wang, H., Calvisi, D. F. and Chen, X. (2021). Organoids for the Study of Liver Cancer. Semin Liver Dis. 41(1): 019–027. https://doi.org/10.1055/s-0040-1719176
- Conti Nibali, S., De Siervi, S., Luchinat, E., Magrì, A., Messina, A., Brocca, L., Mantovani, S., Oliviero, B., Ahmed, M. H., Mondelli, M. U., et al. (2024). VDAC1-interacting molecules promote cell death in cancer organoids through mitochondrial-dependent metabolic interference. iScience. 27(6): 109853. https://doi.org/10.1016/j.isci.2024.109853
- de Nola, G., Leclercq, B., Mougel, A., Taront, S., Simonneau, C., Forneris, F., Adriaenssens, E., Drobecq, H., Iamele, L., Dubuquoy, L., et al. (2022). Dimerization of kringle 1 domain from hepatocyte growth factor/scatter factor provides a potent MET receptor agonist. Life Sci Alliance. 5(12): e202201424. https://doi.org/10.26508/lsa.202201424
- Cavalloro, V., Malacrida, A., Miloso, M., Ronchi, D., Porta, A., Fossati, A., Gheza, G., De Siervi, S., Mantovani, S., Oliviero, B., et al. (2025). From lichen to organoids: Usnic acid enantiomers show promise against Cholangiocarcinoma via MNK2 targeting and MAPK pathway modulation. Biomed Pharmacother. 188: 118208. https://doi.org/10.1016/j.biopha.2025.118208
- De Luca, F., Roda, E., Ratto, D., Desiderio, A., Venuti, M. T., Ramieri, M., Bottone, M. G., Savino, E. and Rossi, P. (2023). Fighting secondary triple-negative breast cancer in cerebellum: A powerful aid from a medicinal mushrooms blend. Biomed Pharmacother. 159: 114262. https://doi.org/10.1016/j.biopha.2023.114262
- Marzano, P., Soldani, C., Cazzetta, V., Franceschini, B., Terzoli, S., Carletti, A., Polidoro, M. A., Marchesi, F., Locati, M., Basso, G., et al. (2025). Tissue-Specific Immunosuppressive and Proliferating Macrophages Fuel Early Metastatic Progression of Human Colorectal Cancer to the Liver. Cancer Immunol Res. 13(11): 1783–1797. https://doi.org/10.1158/2326-6066.cir-25-0031
- Saito, Y., Muramatsu, T., Kanai, Y., Ojima, H., Sukeda, A., Hiraoka, N., Arai, E., Sugiyama, Y., Matsuzaki, J., Uchida, R., et al. (2019). Establishment of Patient-Derived Organoids and Drug Screening for Biliary Tract Carcinoma. Cell Rep. 27(4): 1265–1276.e4. https://doi.org/10.1016/j.celrep.2019.03.088
- Nuciforo, S., Fofana, I., Matter, M. S., Blumer, T., Calabrese, D., Boldanova, T., Piscuoglio, S., Wieland, S., Ringnalda, F., Schwank, G., et al. (2018). Organoid Models of Human Liver Cancers Derived from Tumor Needle Biopsies. Cell Rep. 24(5): 1363–1376. https://doi.org/10.1016/j.celrep.2018.07.001
- Broutier, L., Mastrogiovanni, G., Verstegen, M. M., Francies, H. E., Gavarró, L. M., Bradshaw, C. R., Allen, G. E., Arnes-Benito, R., Sidorova, O., Gaspersz, M. P., et al. (2017). Human primary liver cancer–derived organoid cultures for disease modeling and drug screening. Nat Med. 23(12): 1424–1435. https://doi.org/10.1038/nm.4438
- Huch, M., Gehart, H., van Boxtel, R., Hamer, K., Blokzijl, F., Verstegen, M. M., Ellis, E., van Wenum, M., Fuchs, S. A., de Ligt, J., et al. (2015). Long-Term Culture of Genome-Stable Bipotent Stem Cells from Adult Human Liver. Cell. 160: 299–312. https://doi.org/10.1016/j.cell.2014.11.050
Article Information
Publication history
Received: Nov 19, 2025
Accepted: Jan 29, 2026
Available online: Feb 24, 2026
Published: Mar 5, 2026
Copyright
© 2026 The Author(s); This is an open access article under the CC BY-NC license (https://creativecommons.org/licenses/by-nc/4.0/).
How to cite
De Siervi, S., Mantovani, S., Oliviero, B., Mondelli, M. U., Di Noia, M., Soldani, C., Franceschini, B., De Luca, F., Maestri, M., Corallo, S., Lolicato, M., Cannito, S. and Turato, C. (2026). Development, Expansion, and Histological Characterization of Patient-Derived Liver Organoids for Drug Screening and Disease Modeling. Bio-protocol 16(5): e5631. DOI: 10.21769/BioProtoc.5631.
Do you have any questions about this protocol?
Post your question to gather feedback from the community. We will also invite the authors of this article to respond.