- Protocols

- Articles and Issues
- For Authors
- About
- Become a Reviewer

Obtaining Chondroprogenitors (Articular Cartilage-Derived Cells) via Explant Methodology
(*Contributed equally to this work, §Technical contact: d.levy@hc.fm.usp.br) Published: Vol 16, Iss 5, Mar 5, 2026 DOI: 10.21769/BioProtoc.5624 Views: 287
Reviewed by: Anonymous reviewer(s)
Original research article
The authors used this protocol in:
Jun 2025
Advertisement


Protocol Collections
Comprehensive collections of detailed, peer-reviewed protocols focusing on specific topics


Abstract
Obtaining articular cartilage-derived cells (chondroprogenitors) by explant methodology is a reliable approach for isolating migratory progenitor cells that retain strong chondrogenic potential. This method allows cells to emerge naturally from small cartilage fragments without enzymatic digestion. The procedure consists of plating cartilage explants on a plastic surface with culture medium, from which cells subsequently migrate and adhere to the substrate. Compared with enzymatic isolation, the explant approach minimizes cellular stress and better reproduces the physiological microenvironment of cartilage tissue. This protocol can be applied to both osteoarthritic and non-osteoarthritic samples, enabling comparative studies on disease-related phenotypic differences. Overall, this technique offers a reproducible, straightforward, and minimally invasive strategy for obtaining functional chondroprogenitor cells suitable for cartilage regeneration research.
Key features
• This protocol is used to generate chondroprogenitors (articular cartilage-derived cells) from normal or osteoarthritis cartilage of the knee by explant-based isolation methodology.
• This protocol enables the isolation of chondroprogenitors without enzymatic digestion, preserving native cell–matrix interactions and minimizing chondrocyte dedifferentiation while maintaining stable chondrogenic gene expression.
• The method relies on the intrinsic migratory capacity of chondroprogenitor cells, allowing the selective enrichment of a highly proliferative and chondrogenic population.
• The method is based on a technically simple, low-cost, and scalable approach suitable for both research and translational applications.
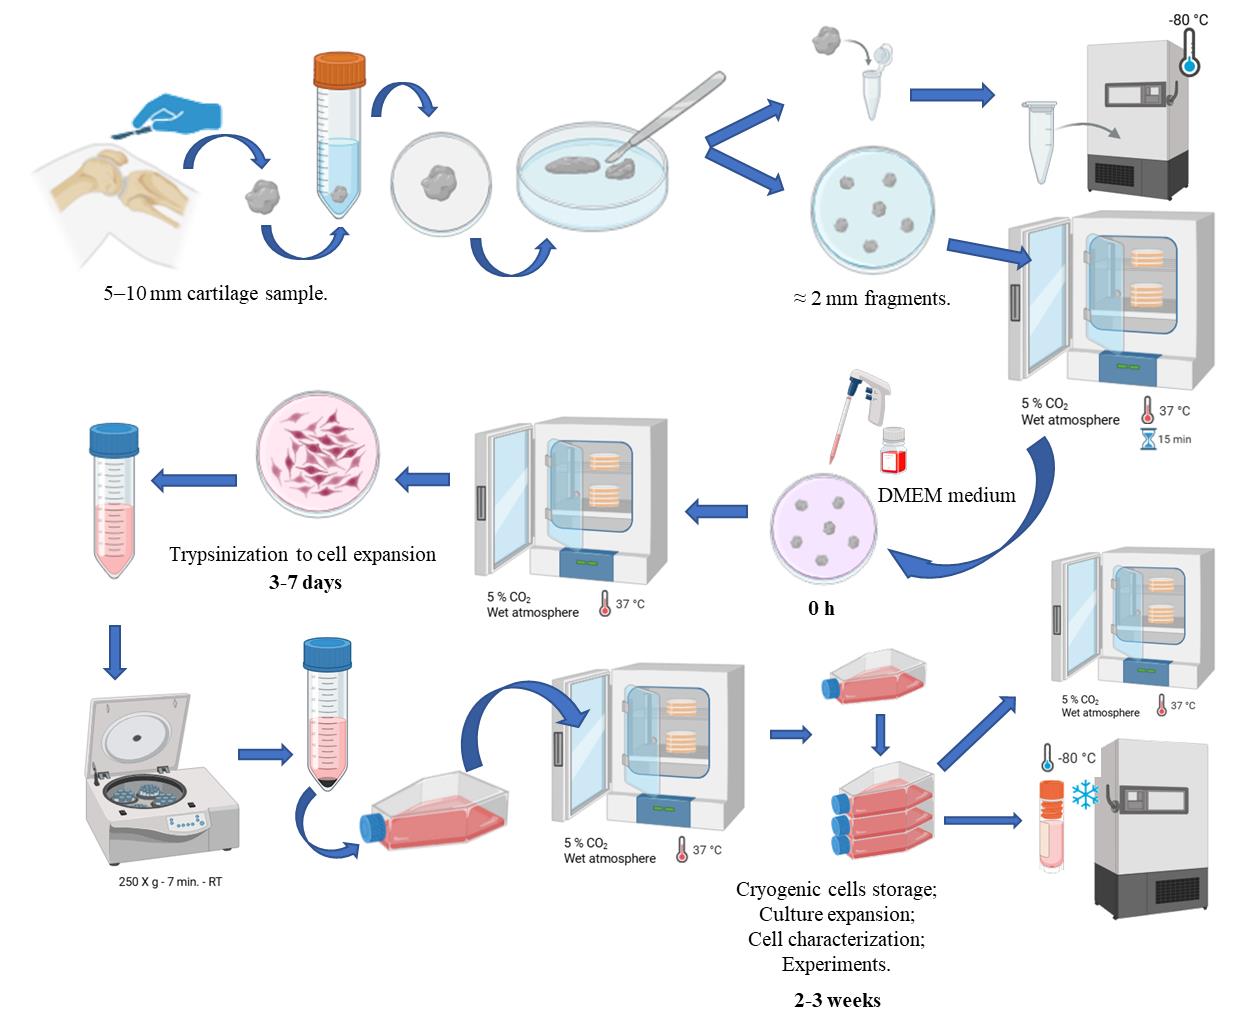
Keywords: ChondroprogenitorsGraphical overview
Background
Focal cartilage lesions represent a major challenge in orthopedic and knee surgery because they are highly prevalent, clinically debilitating, exhibit limited intrinsic repair capacity, and tend to progress to osteoarthritis.
The first use of cell-based therapy for cartilage repair dates to 1987 and was described in 1994 by Brittberg et al. [1], introducing autologous chondrocyte implantation (ACI). In this procedure, autologous chondrocytes harvested from the patient’s articular cartilage via arthroscopic biopsy are expanded in vitro and subsequently reimplanted into the chondral defect to promote the formation of hyaline-like repair tissue. The cultured cells are injected under a periosteal flap sutured over the defect during a second surgery. Later generations of ACI replaced the periosteum with biomaterial scaffolds, such as decellularized collagen membranes or hyaluronic acid matrices, pre-seeded with autologous cells [2]. These advances have allowed cartilage regeneration beyond the limited capacity of native tissue repair. ACI is widely recognized as an effective treatment option for focal chondral lesions, showing favorable long-term outcomes.
Progenitor cells have been identified in various adult tissues [3], including articular cartilage. Chondroprogenitors are less differentiated than mature chondrocytes and are thought to participate in cartilage regeneration, representing a promising cell source for articular cartilage repair [4]. These cells display a strong chondrogenic phenotype, low hypertrophic potential, high proliferative capacity, and maintenance of chondrogenic potential during extended in vitro expansion [5–8]. Chondroprogenitors have emerged as a promising alternative for cell-based therapy in cartilage repair. In 2004, chondroprogenitor cells were first isolated using a fibronectin adhesion assay [9]. Subsequently, alternative isolation methods were described, including migration-based selection [10] and sorting by surface markers [11–13].
The fibronectin adhesion assay selects cartilage cells that attach rapidly to fibronectin-coated substrates; it was among the first practical methods used to prospectively enrich cartilage progenitor-like cells and remains widely applied in cartilage progenitor research. This approach is relatively simple, can yield clonogenic progenitor clones, and selects based on a behaviorally relevant property (adhesion). The limitations are the heterogeneity of the cells obtained, the differing performance by cartilage source, and protocol variability [14,15].
Surface marker sorting aims to prospectively isolate chondroprogenitors by antigen expression, enabling more defined populations when robust markers are available. It presents high specificity when validated markers exist, the ability to combine markers for refined subpopulations, and high-purity populations for downstream assays [16]. As limitations, it requires cytometry infrastructure, can be time-consuming, and surface antigen expression can be contextually variable or lost during expansion [17].
The explant-based isolation of chondroprogenitor cells offers several biological and methodological advantages over enzymatic or adhesion-based protocols. In explant cultures, cells remain initially embedded within their native extracellular matrix (ECM), preserving key cell–matrix interactions that support a chondrogenic phenotype and reduce dedifferentiation typically observed during monolayer expansion [16]. Moreover, explant systems naturally select for migratory chondroprogenitors—cells capable of leaving the tissue and migrating into the surrounding environment—which may reflect an intrinsic regenerative response to cartilage injury. These cells exhibit enhanced proliferative capacity, low hypertrophic potential, and stable expression of chondrogenic genes such as SOX9, ACAN, and COL2A1 even after prolonged culture [16,18]. Furthermore, when tested in ex vivo models, chondroprogenitors isolated from explants retained high viability and regenerative capacity within platelet-rich plasma scaffolds, forming a cartilage-like matrix rich in glycosaminoglycans and type II collagen [19]. Together, these findings highlight that explant-based approaches not only preserve the native microenvironment but also enrich for a physiologically relevant progenitor population with promising potential for cartilage repair strategies. Obtaining chondroprogenitors by explant is an important way to obtain cells for both scientific research and use in ACI. Therefore, we present a protocol for obtaining chondroprogenitors by explants.
Materials and reagents
Biological materials
1. 5–10 mm full-thickness cartilage fragment from a non-weight-bearing area on the lateral edge of the trochlea or intercondylar notch
Reagents
1. DMEM low glucose (Dulbecco’s modified Eagle’s medium) (Sigma, catalog number: D5523-1L)
2. Penicillin-Streptomycin (Pen/Strep) (5,000 U/mL/5,000 μg/mL) (Thermo Fisher Scientific, Gibco, catalog number: 15070063)
3. Fetal bovine serum (FBS) (Vitrocell, catalog number: 90011)
4. 0.25% trypsin-EDTA solution (Sigma, catalog number: T4049-500mL)
5. Dimethyl sulfoxide (DMSO) (Sigma, catalog number: D-5879)
6. Sodium bicarbonate (Sigma, catalog number: S5761-1KG)
7. Trypan Blue solution (Sigma, catalog number: T8154-100ML)
8. 10× phosphate-buffered saline (PBS) pH 7.4 (Invitrogen, catalog number: AM9624)
9. Milli-Q® water (produced in-house)
10. Ethanol 70% (Vic pharma by schülke)
Solutions
1. DMEM low glucose (see Recipes)
2. DMEM complete culture medium (see Recipes)
3. PBS 1× (see Recipes)
4. Freezing medium (see Recipes)
Recipes
1. DMEM low glucose medium
| Reagent | Final concentration | Quantity |
|---|---|---|
| DMEM low glucose | 10.0 g/L | 10.0 g |
| Sodium bicarbonate | 3.7 g/L | 3.7 g |
| Milli-Q water | n/a | q.s. 1,000 mL |
Note: Adjust pH to 7.2. Filter the media in a 500 mL filter system and store at 4 °C for 6 months.
2. DMEM complete culture medium
| Reagent | Final concentration | Volume |
|---|---|---|
| DMEM low glucose medium | n/a | 445 mL |
| FBS | 10% | 50 mL |
| Pen-Strep | 50 IU/mL/50 μg/mL | 5 mL |
| Total | n/a | 500 mL |
Note: Store media at 4 °C for 3 months; before use, it must be warmed up to 37 °C in a water bath.
3. PBS 1×
| Reagent | Final concentration | Volume |
|---|---|---|
| 10× PBS | 1× | 50 mL |
| Milli-Q water | n/a | q.s. 500 mL |
Note: Adjust pH to 7.4.
4. Freezing medium
| Reagent | Final concentration | Volume |
|---|---|---|
| DMEM low glucose | n/a | 16 mL |
| FBS | 10% | 2 mL |
| DMSO | 10% | 2 mL |
| Total | n/a | 20 mL |
Note: Freezing medium should always be prepared on the day of freezing.
Laboratory supplies
1. 55 cm2 polystyrene non-treated culture dishes (Corning, catalog number: CLS430591EA)
2. Scalpel blade #11 (Descarpack, catalog number: 433-1-MKP)
3. Cell culture treated flasks, 75 cm2, vent cap (UltraCruz, Santa Cruz, catalog number: CS-200263)
4. Cell culture treated flasks, 182 cm2, vent cap (UltraCruz, Santa Cruz, catalog number: CS-200264)
5. 15 mL conical tubes (Corning, catalog number: 430791)
6. 50 mL conical tubes (Corning, catalog number: 430829)
7. Filtermax filter top fast 500 mL, pore 0.22 μm (TPP, catalog number: 9505)
8. 2 mL cryovials (Corning, catalog number: CLS431417-500EA)
9. 5 mL serological pipettes (Fisher Scientific, Fisherbrand, catalog number: 13-678-11D)
10. 10 mL serological pipettes (ExactaCruz, Santa Cruz, catalog number: SC-200281)
11. 25 mL serological pipettes (Fisher Scientific, Fisherbrand, catalog number: 13-678-11)
12. 10 μL pipette tips, filtered (Bio Point Scientific, catalog number: 321-4050)
13. 20 μL pipette tips, filtered (Bio Point Scientific, catalog number: 341-4050)
14. 200 μL pipette tips, filtered (Neptune, catalog number: BT200)
15. 1,000 μL pipette tips, filtered (Bio Point Scientific, catalog number: 361-4050)
16. Microcentrifuge tubes 0.5 mL, conical bottom (Jet Biofil, catalog number: CFT-000-005)
17. CountessTM cell counting chamber slides (Thermo Fisher Scientific, Invitrogen, catalog number: C10283)
18. BRAND® laboratory bottle, graduated with screw cap (Merck, catalog number: BR122554)
Equipment
1. Class I biological safety cabinet (VECO, catalog number: VLFS12)
2. Forma Series II Water-Jacketed CO2 Incubator (Thermo Fisher Scientific, catalog number: 3110)
3. Benchtop Centrifuge model Allegra X-12R (Beckman Coulter, catalog number: 392302)
4. Axion Vert.A1 inverted microscope (objectives 4×, 10×, 20×) (Carl Zeiss, catalog number: 431030-9010-000)
5. Micropipette Eppendorf Research plus 0.5–10 μL (Eppendorf, catalog number: 3123000020)
6. Micropipette Eppendorf Research plus 2–20 μL (Eppendorf, catalog number: 3123000039)
7. Micropipette Eppendorf Research plus 20–200 μL (Eppendorf, catalog number: 3123000055)
8. Micropipette Eppendorf Research plus 100–1,000 μL (Eppendorf, catalog number: 3123000063)
9. Scientific’s Pipet-Aid model XP (Drummond, catalog number: 4-000-101)
10. Water bath IIO2 (37 °C) (FANEM, catalog number: BM1102)
11. Countess II FL automated cell counter (Thermo Fisher Scientific, catalog number: AMQAF1000)
12. Freezer (-20 °C)
13. Ultrafreezer (Sanyo Ultra Low -80 °C, catalog number: MDF-U56VC)
14. Refrigerator (2–8 °C)
15. Lab Stirring hot plate (Thermolyne, catalog number: SPA1025B)
16. Magnetic stirring bars (Cole-Parmer Instrument Company, catalog numbers: 8551, 8550, and 8552)
17. pH/ORP/ISE Meter (Hanna Instruments, catalog number: HI3222)
18. Balance (Sartorius, catalog number: 1409)
19. Milipore Mili-Q Integral 5 Water Purification System (Milipore, catalog number: ZRXQ005BR)
20. Steam Sterilizer Nurse II (Baumer, catalog number: B0108-100)
Procedure
A. Preparation of Class I biological safety cabinet
1. Separate all supplies, reagents, and solutions that will be needed.
2. Turn on the class I biological safety cabinet.
3. Sanitize all supplies that will be needed with ethanol 70% and put them inside the Class I biological safety cabinet: one 55 cm2 polystyrene non-treated culture dish; one scalpel blade #11; one 2-mL cryovial; one 10-mL serological pipette; one 25-mL serological pipette; one 50-mL conical tube; and one sterile surgical tweezers.
4. Turn on the ultraviolet lamp of the Class I biological safety cabinet for 15 min.
5. After 15 min, turn off the ultraviolet lamp and turn on the traditional lamp.
B. Preparation of solutions
1. After preparing solutions (see Recipes), acclimate the DMEM complete culture medium and the PBS 1× to 37 °C in a water bath.
C. Preparation of the tube to transport the cartilage sample
1. After preparing the Class I biological safety cabinet, sanitize PBS 1× flasks with ethanol 70% and put them inside the Class I biological safety cabinet.
2. Aseptically transfer 10 mL of cold PBS 1× to a 50 mL conical tube and seal with parafilm.
Note: This tube will be used to transport cartilage samples from the surgical center to the laboratory.
D. Acquisition and transport of cartilage samples
1. The cartilage sample must be collected by a specialized doctor in the surgical center after obtaining a signature on a free and informed consent form from the patient.
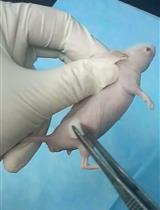
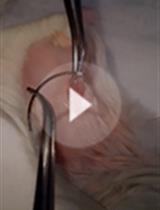
2. Following arthroscopic inspection, extract a 5–10 mm full-thickness cartilage fragment from a non-weight-bearing area on the lateral edge of the trochlea or intercondylar notch using a specialized arthroscopic gouge (Figure 1).
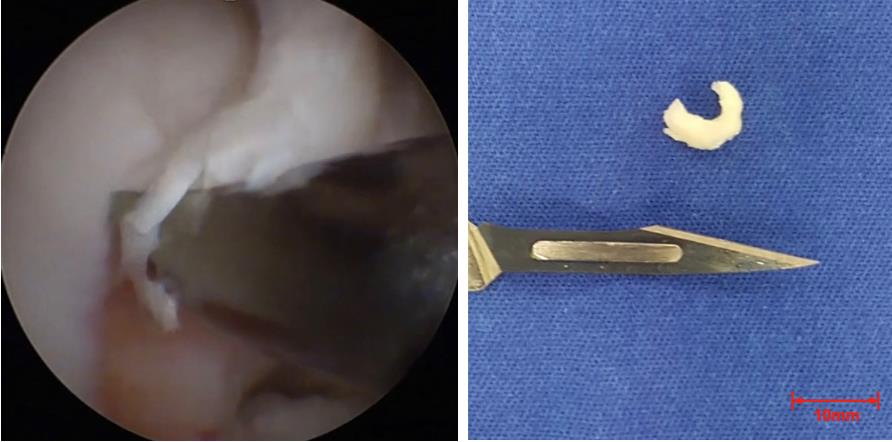
Figure 1. Cartilage obtained by arthroscopic surgery. (Left) Arthroscopic image of the surgery at the moment of cartilage collection. (Right) Cartilage fragment.
3. After cartilage sample collection, transfer it aseptically to the 50 mL conical tube with sterile cold PBS prepared in section C.
4. Immediately transport the cartilage sample in ice to the laboratory.
E. Cartilage sample preparation
1. In the Class I biological safety cabinet, with surgical tweezers, aseptically transfer the cartilage sample to a 55 cm2 polystyrene non-treated culture dish at room temperature.
2. Divide the fragments of cartilage sample into several small fragments and scatter these fragments in all areas of the 55 cm2 polystyrene non-treated culture dish (Figure 2A). Do not allow the fragments to come into close contact with each other. Leave a small space between them.
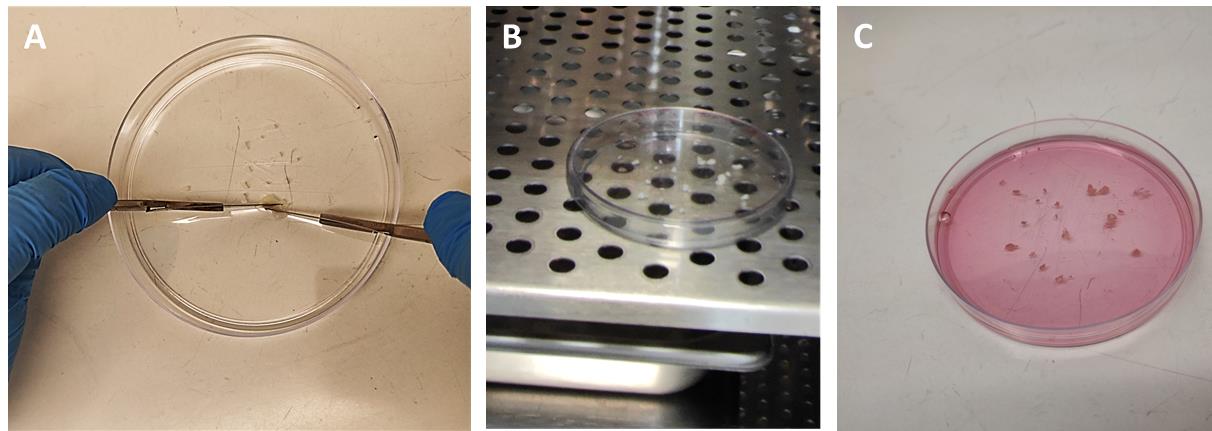
Figure 2. Cartilage sample preparation. (A) The cartilage sample is divided into several small fragments using a scalpel blade #11. (B) The culture dish, with the cartilage fragments, has to be incubated for 15 min in the incubator. (C) Culture dish with cartilage fragments and complete medium.
3. Incubate the 55 cm2 polystyrene non-treated culture dish with the cartilage fragments for 15 min at 37 °C with 5% CO2 and a wet atmosphere. This promotes tissue adhesion to the bottom dish (Figure 2B).
4. After incubation, in the Class I biological safety cabinet, carefully add 15 mL of DMEM complete culture medium to the culture dish using a pipette. Do not disturb the cartilage fragments (Figure 2C).
5. Transfer the culture dish with cartilage fragments and culture medium to the incubator at 37 °C with 5% CO2 and a wet atmosphere.
Critical: The culture dish with cartilage fragments and culture medium should be incubated for 72 h without any disturbance.
F. Cartilage culture
1. After 72 h in the incubator, replace the medium in the Class I biological safety cabinet. Discard DMEM complete medium together with all loose fragments that are not attached to the plastic. Add 15 mL of fresh DMEM complete medium (Figure 3).
2. Change the medium every second day until the culture reaches 80% confluence.
Note: It could take up to 3 weeks for cells to migrate from the cartilage to the plastic. The time of migration depends on each patient. After three weeks without cells, the culture can be discarded.
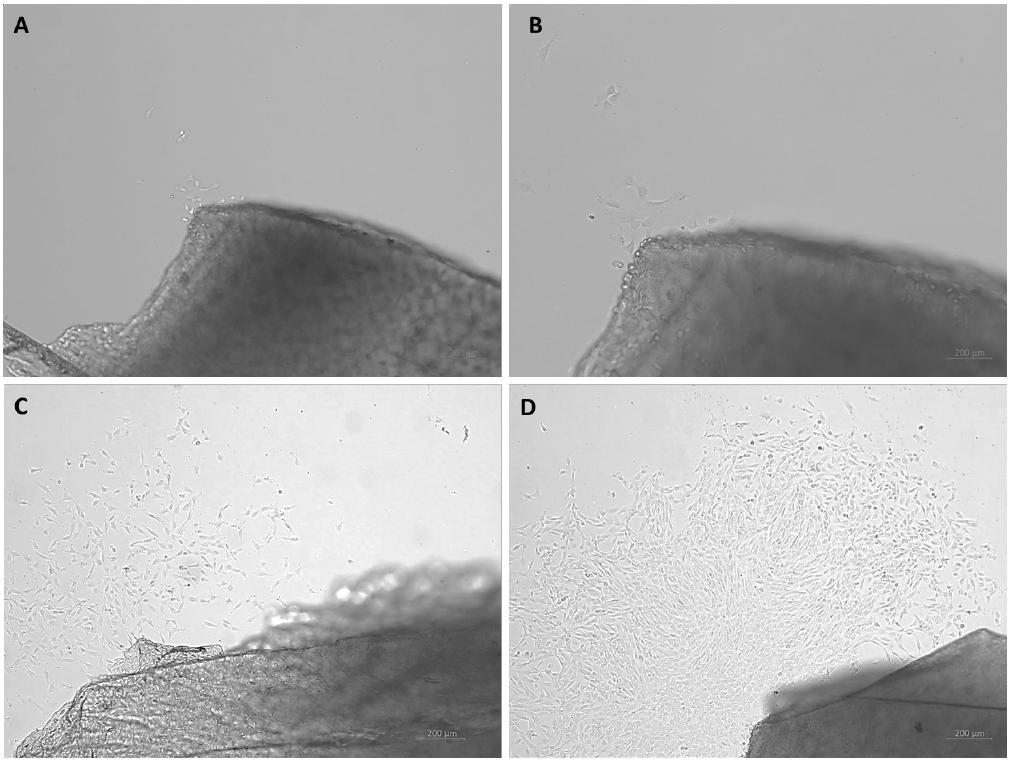
Figure 3. Photomicrograph of migrating cells from cartilage explant and cell culture. (A) Four days of culture; (B) nine days of culture; (C) twelve days of culture; (D) fifteen days of culture. Images were obtained with the inverted microscope Axio A.1 (Carl Zeiss, Oberkochen, Germany). Scale bars, 200 μm. Reprinted/adapted from Giglio et al. [20]. © The Authors, some rights reserved; exclusive licensee, American Association for the Advancement of Science. Distributed under a Creative Commons Attribution NonCommercial License 4.0 (CC BY-NC). http://creativecommons.org/licenses/by-nc/4.0/
G. Chondroprogenitor passaging and expansion
Critical: The culture should not be more than 80% confluent. At this confluence, cells should be subcultured.
1. In the Class I biological safety cabinet, aspirate and discard the medium from the culture dish. Add 10 mL of 1× PBS warmed at 37 °C. Then, aspirate and discard the PBS. Add 1 mL of 0.25% Trypsin-EDTA to detach the chondroprogenitors. Incubate the plate at 37 °C in the CO2 incubator for 3–7 min.
2. After incubation, add 1 mL of DMEM complete culture medium to neutralize the trypsin.
3. Transfer the entire cell suspension into a sterile 15 mL centrifuge tube.
4. Count the cells and viability using trypan blue (1:1) in a Countess II FL automated cell counter.
5. Centrifuge at 180× g for 5 min. Carefully discard the supernatant.
6. Transfer 1–2 × 10⁴ cells per cm2. Depending on the number of cells, use a T-75 or T182 flask.
7. Label the flask as Passage 1, including the patient ID and date.
8. Incubate the flask at 37 °C with 5% CO2 and a wet atmosphere. Monitor cell attachment and morphology every alternate day. Replace the medium every 4–5 days.
9. Once chondroprogenitors reach 80% confluence in the flask, repeat the trypsinization, neutralization, and centrifugation steps (G1–5) for expansion or cryopreservation.
Note: It is expected to obtain 1–5 × 10⁴ cells per cm2; however, this is highly variable depending on the sample. The cell density for the subsequent culture should be between 1 and 2 × 10³ cells per cm2.
H. Cell cryopreservation
1. After trypsinization, count the total chondroprogenitor cells.
2. Centrifuge at 180× g for 5 min. Carefully discard the supernatant.
3. Use 1 mL of freezing medium for 1 × 10⁶ viable cells. After the freezing media has been added, gently pipette the sample up and down a couple of times to ensure re-suspension.
4. Add 1 mL of cell suspension to each pre-chilled cryovial.
5. Introduce the cryovials in a -80 °C ultrafreezer.
6. The next day, transfer the cryovials to a liquid nitrogen tank for long-term storage.
Note: Chondroprogenitor cells can be kept for days or even weeks at -80 °C before transfer to liquid nitrogen; however, there is progressive loss of viability and function with longer storage at -80 °C. Also, repeated cycling between -80 °C (or dry ice) and liquid nitrogen will negatively affect viability and function. Thus, if cells are to be shipped on dry ice, it is preferable to store them short-term at -80 °C, ship them, and then move to liquid nitrogen.
Validation of protocol
This protocol (or parts of it) has been used and validated in the following research article(s):
• Giglio et al. [20]. Isolation and Characterization of Articular Cartilage-Derived Cells Obtained by Arthroscopic Cartilage Biopsy from Non-Osteoarthritic Patients. Cells. 14(11): 830. doi: 10.3390/cells14110830.
• Levy et al. [21]. TNF-Alpha Inhibitor Prevents Cigarette Smoke Extract-Induced Cell Death in Osteoarthritis-Derived Chondrocytes in Culture. Cells. 14(7): 489. doi: 10.3390/cells14070489.
General notes and troubleshooting
General notes
1. Use only sterile pre-filtered solutions; store all reagents at the recommended temperatures to maintain sterility and effectiveness.
2. Patient-to-patient variability in outgrowth can occur; keep detailed logs for each sample to track culture progress.
Troubleshooting
Problem 1: Cartilage does not adhere to the plastic.
Possible cause: There is an excess of liquid in the sample.
Solution: It is important that the samples are dry after incubation in section E. If samples, after 15 min, have visible liquid, add more time in incubation and monitor every 5 min. Do not exceed 30 min total incubation.
Problem 2: Contamination in culture.
Possible cause: Inadequate aseptic technique.
Solution: Work only in a certified Class I biosafety cabinet. Disinfect surfaces and instruments before and after use. UV-sterilize the workspace and wipe down with 70% ethanol. Use only sterile, pre-filtered media and solutions.
Acknowledgments
This protocol was conceptualized by D.L. and P.N.G. Method standardization and investigation were carried out by D.L., P.N.G., F.A.F., S.P.B., and M.K.D. Data curation and validation were done by D.L., P.N.G., F.A.F., S.P.B., and M.K.D. The original draft was prepared by D.L. and F.A.F., with review and editing by S.P.B. and M.K.D. S.P.B. and M.K.D. provided overall supervision. S.P.B. acquired funding for this work. This research was supported by the National Institute of Science and Technology in Regenerative Medicine (INCT-Regenera—SBP) and CNPq (SPB—305990/2020-9), Brazil.
This protocol is related to [20].
Competing interests
The authors declare no conflicts of interest.
Ethical considerations
All procedures involving human subjects were conducted in accordance with the Declaration of Helsinki. The protocol was approved by the Ethical Committee of the Hospital das Clinicas, Faculdade de Medicina, Universidade de São Paulo, São Paulo, SP, Brazil. CAE 46438821.2.0000.0068 approved data: 7 August 2021. Written informed consent was obtained from all patients prior to sample collection.
References
- Brittberg, M., Lindahl, A., Nilsson, A., Ohlsson, C., Isaksson, O. and Peterson, L. (1994). Treatment of Deep Cartilage Defects in the Knee with Autologous Chondrocyte Transplantation. N Engl J Med. 331(14): 889–895. https://doi.org/10.1056/nejm199410063311401
- Hinckel, B. B. and Gomoll, A. H. (2017). Autologous Chondrocytes and Next-Generation Matrix-Based Autologous Chondrocyte Implantation. Clin Sports Med. 36(3): 525–548. https://doi.org/10.1016/j.csm.2017.02.008
- Bozdağ, S. C., Yüksel, M. K. and Demirer, T. (2018). Adult Stem Cells and Medicine. Adv Exp Med Biol. 1079: 17–36. https://doi.org/10.1007/5584_2018_184
- Vinod, E., Parameswaran, R., Ramasamy, B. and Kachroo, U. (2020). Pondering the Potential of Hyaline Cartilage–Derived Chondroprogenitors for Tissue Regeneration: A Systematic Review. Cartilage. 13: 34S–52S. https://doi.org/10.1177/1947603520951631
- Khan, I. M., Bishop, J. C., Gilbert, S. and Archer, C. W. (2009). Clonal chondroprogenitors maintain telomerase activity and Sox9 expression during extended monolayer culture and retain chondrogenic potential. Osteoarthritis Cartilage. 17(4): 518–528. https://doi.org/10.1016/j.joca.2008.08.002
- Marcus, P., De Bari, C., Dell’Accio, F. and Archer, C. W. (2014). Articular Chondroprogenitor Cells Maintain Chondrogenic Potential but Fail to Form a Functional Matrix When Implanted Into Muscles of SCID Mice. Cartilage. 5(4): 231–240. https://doi.org/10.1177/1947603514541274
- Hayes, A. J., Tudor, D., Nowell, M. A., Caterson, B. and Hughes, C. E. (2007). Chondroitin Sulfate Sulfation Motifs as Putative Biomarkers for Isolation of Articular Cartilage Progenitor Cells. J Histochem Cytochem. 56(2): 125–138. https://doi.org/10.1369/jhc.7a7320.2007
- Jayasuriya, C. T. and Chen, Q. (2015). Potential benefits and limitations of utilizing chondroprogenitors in cell-based cartilage therapy. Connect Tissue Res. 56(4): 265–271. https://doi.org/10.3109/03008207.2015.1040547
- Dowthwaite, G. P., Bishop, J. C., Redman, S. N., Khan, I. M., Rooney, P., Evans, D. J. R., Haughton, L., Bayram, Z., Boyer, S., Thomson, B., et al. (2004). The surface of articular cartilage contains a progenitor cell population. J Cell Sci. 117(6): 889–897. https://doi.org/10.1242/jcs.00912
- Koelling, S., Kruegel, J., Irmer, M., Path, J. R., Sadowski, B., Miro, X. and Miosge, N. (2009). Migratory Chondrogenic Progenitor Cells from Repair Tissue during the Later Stages of Human Osteoarthritis. Cell Stem Cell. 4(4): 324–335. https://doi.org/10.1016/j.stem.2009.01.015
- Su, X., Zuo, W., Wu, Z., Chen, J., Wu, N., Ma, P., Xia, Z., Jiang, C., Ye, Z., Liu, S., et al. (2014). CD146 as a new marker for an increased chondroprogenitor cell sub‐population in the later stages of osteoarthritis. J Orthop Res. 33(1): 84–91. https://doi.org/10.1002/jor.22731
- Yu, Y., Zheng, H., Buckwalter, J. and Martin, J. (2014). Single cell sorting identifies progenitor cell population from full thickness bovine articular cartilage. Osteoarthritis Cartilage. 22(9): 1318–1326. https://doi.org/10.1016/j.joca.2014.07.002
- Zhao, X., Dong, Y., Zhang, J., Li, D., Hu, G., Yao, J., Li, Y., Huang, P., Zhang, M., Zhang, J., et al. (2016). Leptin changes differentiation fate and induces senescence in chondrogenic progenitor cells. Cell Death Dis. 7(4): e2188–e2188. https://doi.org/10.1038/cddis.2016.68
- Vinod, E., Parasuraman, G., Livingston, A., Sathishkumar, S. and Ramasamy, B. (2024). Isolation of Chondrocytes and Chondroprogenitors using Fibronectin Adhesion and Migratory Assay. J Visualized Exp.: e3791/67160. https://doi.org/10.3791/67160
- Zhang, C., Wang, G. and An, Y. (2023). Achieving Nasal Septal Cartilage In Situ Regeneration: Focus on Cartilage Progenitor Cells. Biomolecules. 13(9): 1302. https://doi.org/10.3390/biom13091302
- Vinod, E., Parasuraman, G., Livingston, A., Amirtham, S. M., Rebekah, G., Lisha, J. J., Daniel, A. J. and Sathishkumar, S. (2023). Comparison of methods for the isolation and culture of Migratory chondroprogenitors from Human articular cartilage. Connect Tissue Res. 64(4): 389–399. https://doi.org/10.1080/03008207.2023.2202266
- Jessop, Z. M., Al-Sabah, A., Simoes, I. N., Burnell, S. E. A., Pieper, I. L., Thornton, C. A. and Whitaker, I. S. (2020). Isolation and characterisation of nasoseptal cartilage stem/progenitor cells and their role in the chondrogenic niche. Stem Cell Res Ther. 11(1): 177. https://doi.org/10.1186/s13287-020-01663-1
- Koelling, S., Kruegel, J., Irmer, M., Path, J. R., Sadowski, B., Miro, X. and Miosge, N. (2009). Migratory Chondrogenic Progenitor Cells from Repair Tissue during the Later Stages of Human Osteoarthritis. Cell Stem Cell. 4(4): 324–335. https://doi.org/10.1016/j.stem.2009.01.015
- Lisha, J. J., Parasuraman, G., Amirtham, S. M., Francis, D. V., Livingston, A., Goyal, A., Ramasamy, B., Sathishkumar, S. and Vinod, E. (2024). Comparative assessment of chondral defect repair using migratory chondroprogenitors suspended in either gelled or freeze-dried platelet-rich plasma: An in vitro and ex vivo human osteochondral unit model study. The Knee. 48: 603–614. https://doi.org/10.1016/j.knee.2024.03.006
- Giglio, P. N., Levy, D., Favaron, P. O., Melo, L. d. P., Reichert, C. O., de Freitas, F. A., Sampaio Silva, J., Teodoro, W. P. R., Bydlowski, S. P., Demange, M. K., et al. (2025). Isolation and Characterization of Articular Cartilage-Derived Cells Obtained by Arthroscopic Cartilage Biopsy from Non-Osteoarthritic Patients. Cells. 14(11): 830. https://doi.org/10.3390/cells14110830
- Levy, D., Calllera, A. F., Moreira, A. R., Tibério, I. d. F. L. C., Giglio, P. N., Demange, M. K., Bydlowski, S. P. and Lopes, F. D. T. Q. D. S. (2025). TNF-Alpha Inhibitor Prevents Cigarette Smoke Extract-Induced Cell Death in Osteoarthritis-Derived Chondrocytes in Culture. Cells. 14(7): 489. https://doi.org/10.3390/cells14070489
Article Information
Publication history
Received: Oct 13, 2025
Accepted: Jan 26, 2026
Available online: Feb 12, 2026
Published: Mar 5, 2026
Copyright
© 2026 The Author(s); This is an open access article under the CC BY-NC license (https://creativecommons.org/licenses/by-nc/4.0/).
How to cite
Levy, D., Giglio, P. N., De Freitas, F. A., Bydlowski, S. P. and Demange, M. K. (2026). Obtaining Chondroprogenitors (Articular Cartilage-Derived Cells) via Explant Methodology. Bio-protocol 16(5): e5624. DOI: 10.21769/BioProtoc.5624.
Category
Cell Biology > Cell Transplantation > Allogenic Transplantation
Medicine
Cell Biology > Cell isolation and culture
Do you have any questions about this protocol?
Post your question to gather feedback from the community. We will also invite the authors of this article to respond.